# Getting Started
# 1.Login
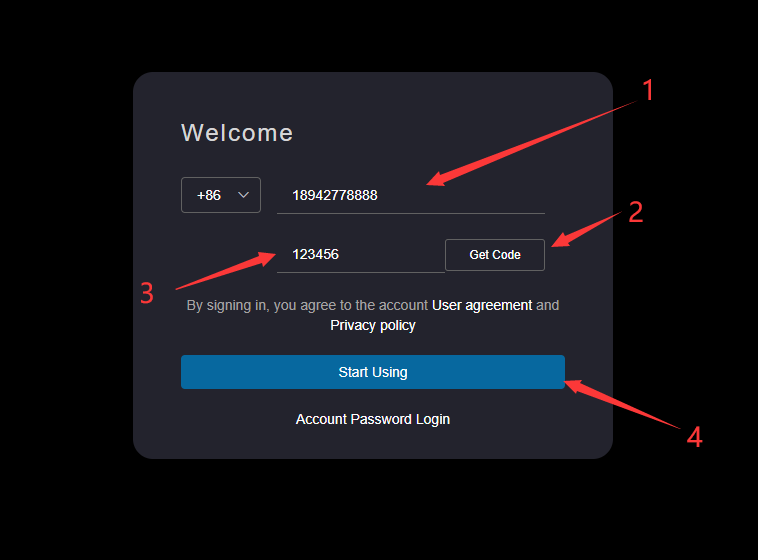
If user login for the first timeYou must use the SMS shortcut to log in. After successful login, the login mobile number
will be automatically registered as a user account. Enter the access address of HapyTeam in the browser address column,
such as: https://hapyteam.com/ , click the SMS shortcut login page, enter the mobile number, enter the verification code
after human-machine verification, and click to start using.
If you have registered an account, you can log in with the account password. Refer toUser login
If you forget the password of your account, please refer toUser loginPerform password reset operation
# 2.User Information
If user login for the first timeAfter entering the product homepage, user information maintenance is required.
# 1.Binding Mailbox
When the user is not bound to the mailbox, enter the user account information maintenance page, enter the mailbox account in the
click mail input box, click the Bind mailbox button, and wait for the prompt information.
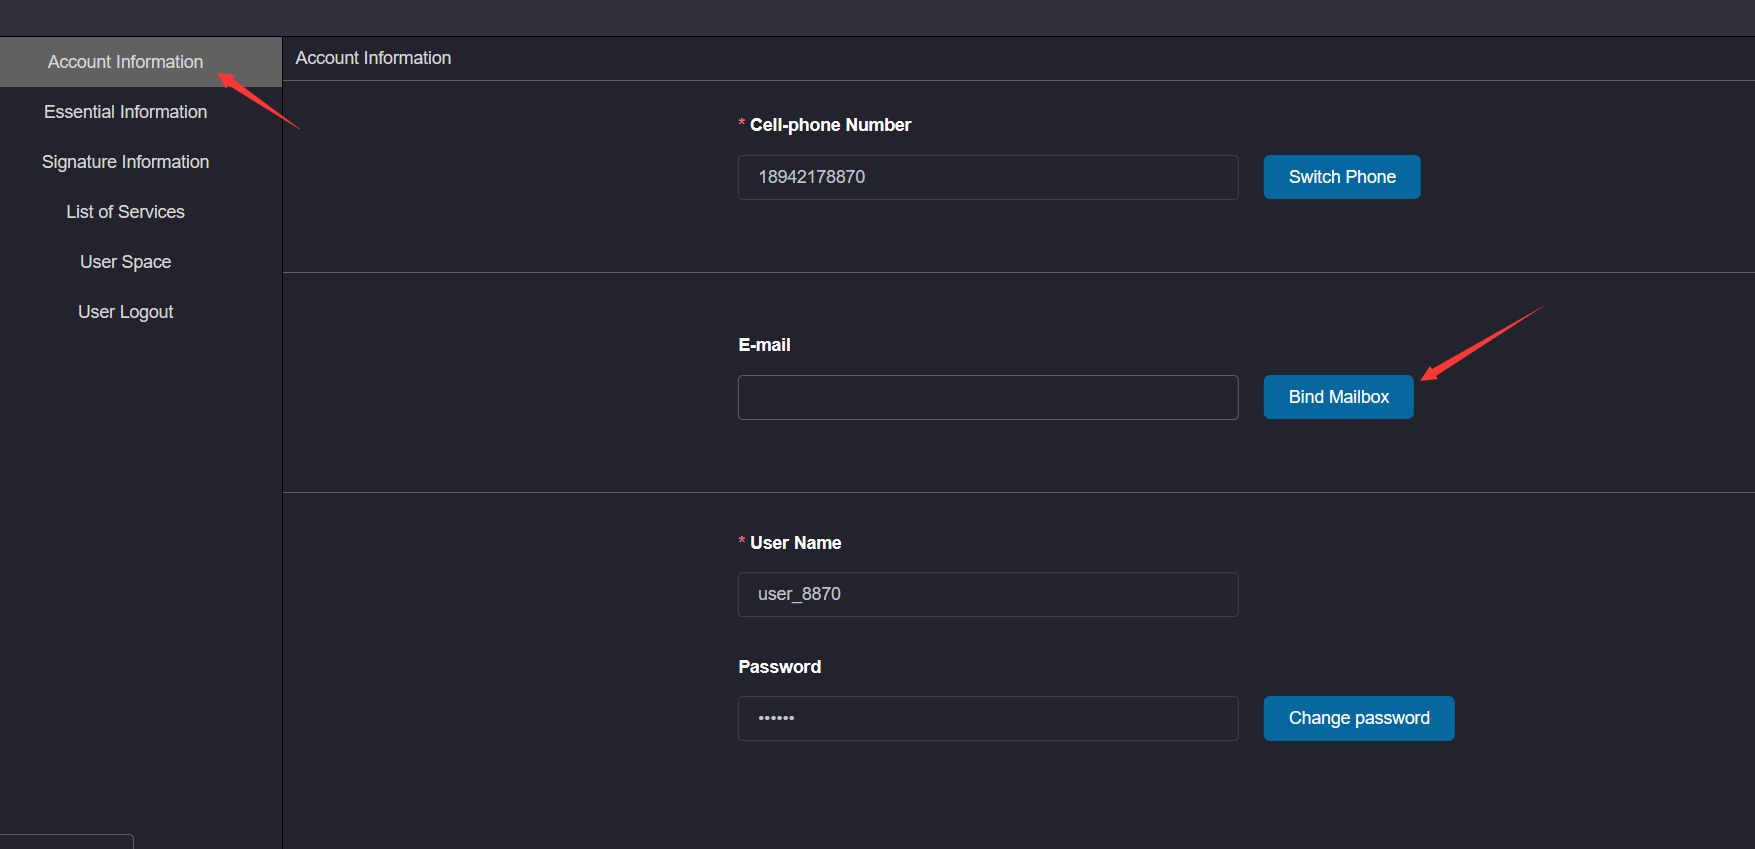
Enter the email and copy the link attached to the authentication email to the browser. If the user bound to the browser has already logged in, it will jump to the authentication success page.
Open the browser with the link in the authentication email, and only log in to the user bound to the mailbox or not 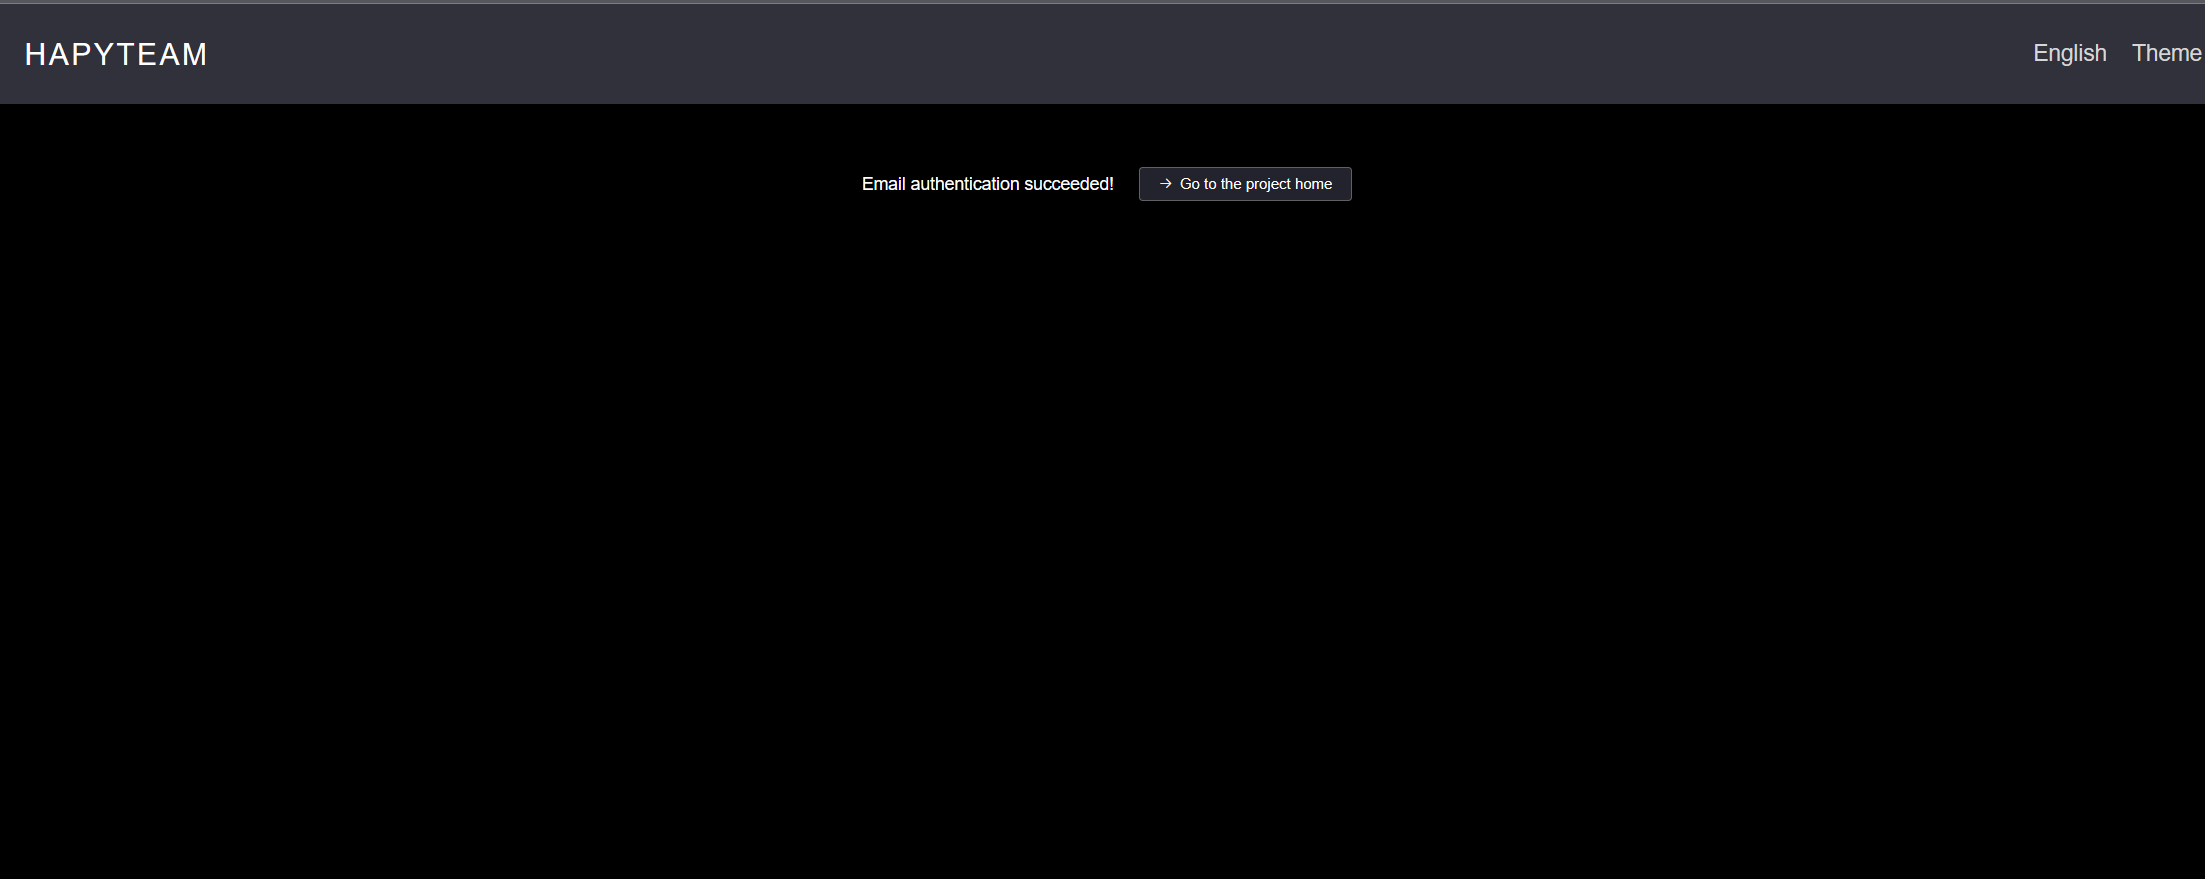
Enter the mailbox and copy the link attached to the authentication message to the browser. If no user is logged in to the browser, the page will jump to the login page. After logging in to the user bound to the mailbox, the page will jump to the authentication success page
After opening the authentication link, if the user is not logged in, they will automatically jump to the login page and can only
log in using the user bound to the email 

After binding the mailbox account, you can log in using the mailbox account/password combination only after the mailbox authentication workflow
# 2.Setting Username
Enter the user account information maintenance page, enter the username in the username input box, set the password, click the Save button, wait for the prompt information, and set the password as follows
The username can only be set once and cannot be changed after setting. The username is a string consisting of 4 to 16 characters
including letters, numbers, underscores, and minus signs 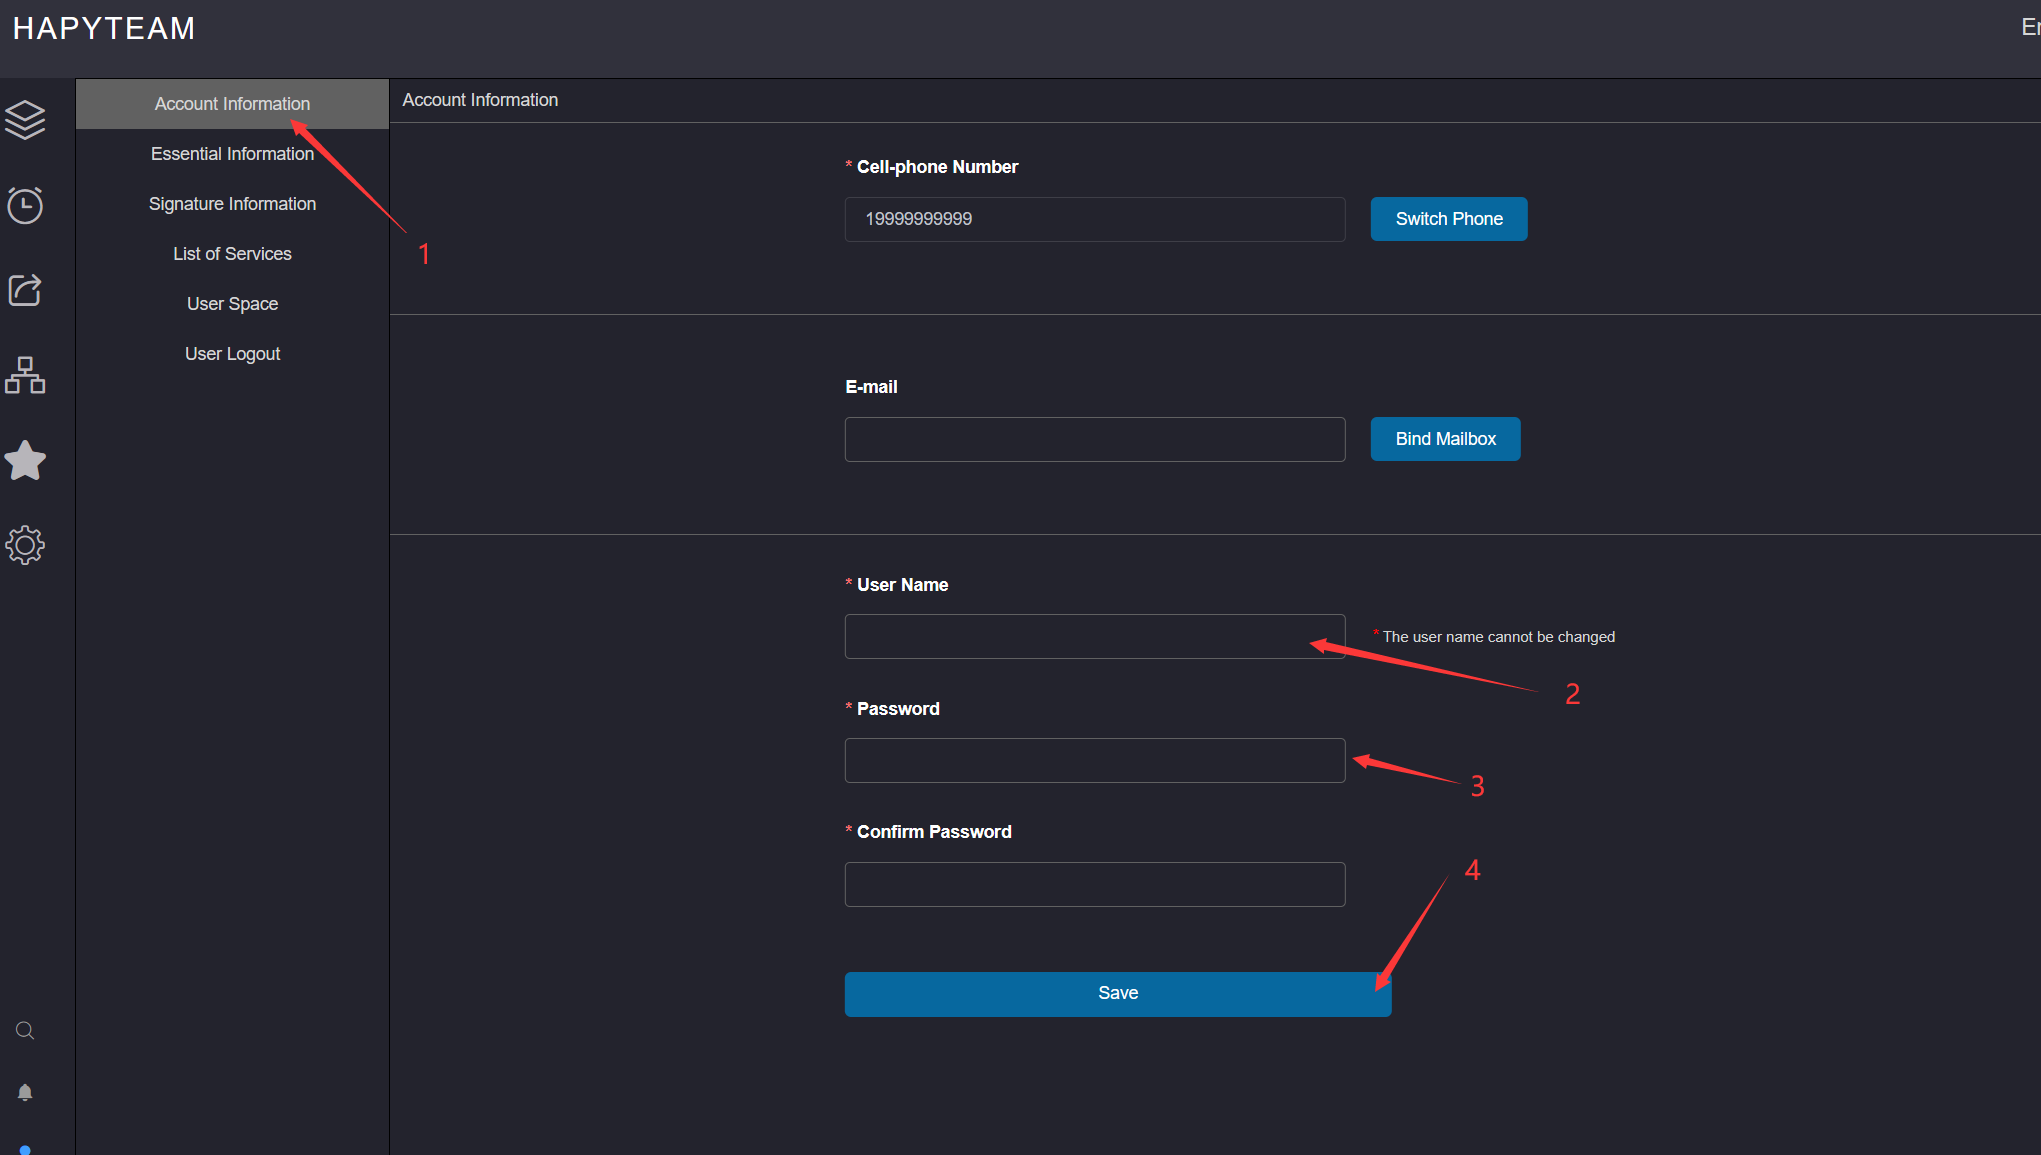
# 3.Setting Password
Enter the user account information maintenance page, enter the password and confirm the password, click Save, and wait for the prompt information
The password format includes letters, numbers and special characters, and is between 8-18 digits. The password input box supports
switching between ciphertext and plaintext display 
# 4.Setting Usernickname
The user nickname system is set to the user's login mobile phone number by default. After entering the user nickname, select the information to be entered on the user's basic maintenance page, and then click the * * Save * * button at the bottom
User nickname is required
User nickname is mainly used to display various project member lists, file and file directory creator, check in and check out person
and other information 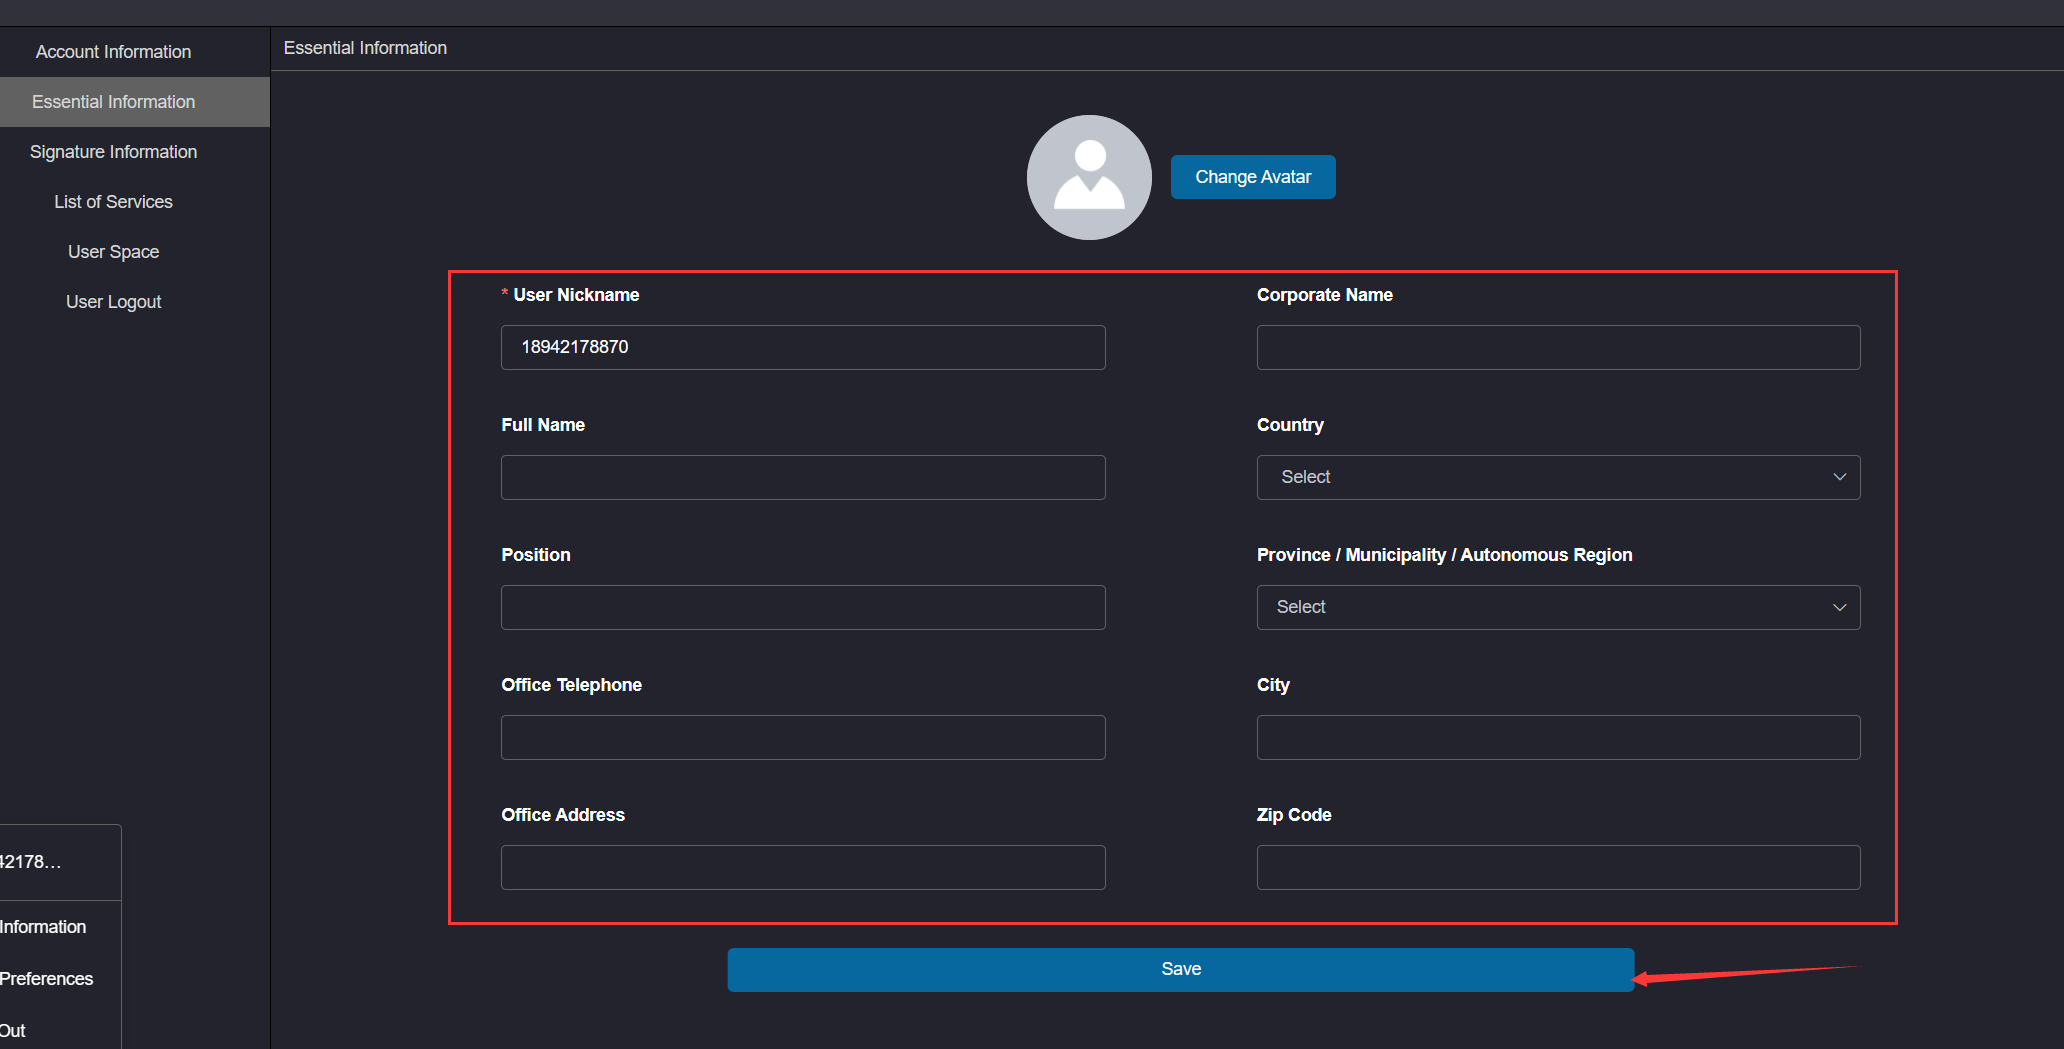
# 3.Create Project
On the project homepage, click the Create New Project card to enter the project creation page
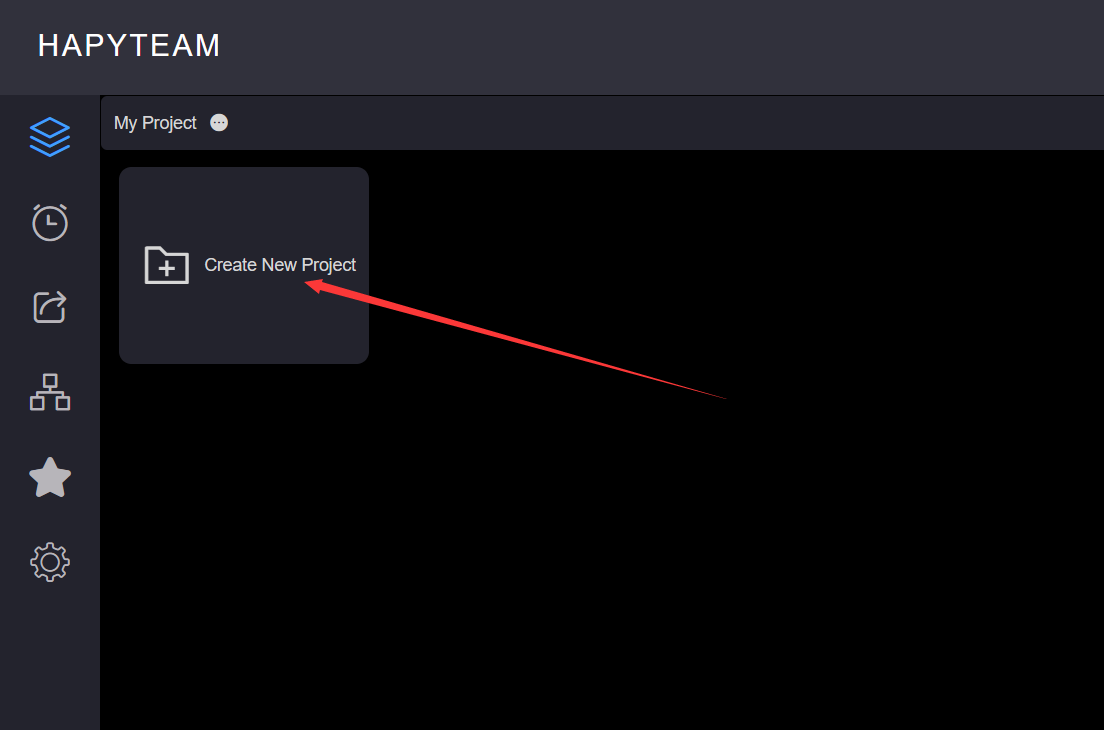
On the Create Project page, click the Create Project button to pop up the project name pop-up box, enter the project name, and click Submit to jump to the project setting page
The project name cannot contain /: * ?;<>| The length of equal characters and project names is between 1 and 100 digits 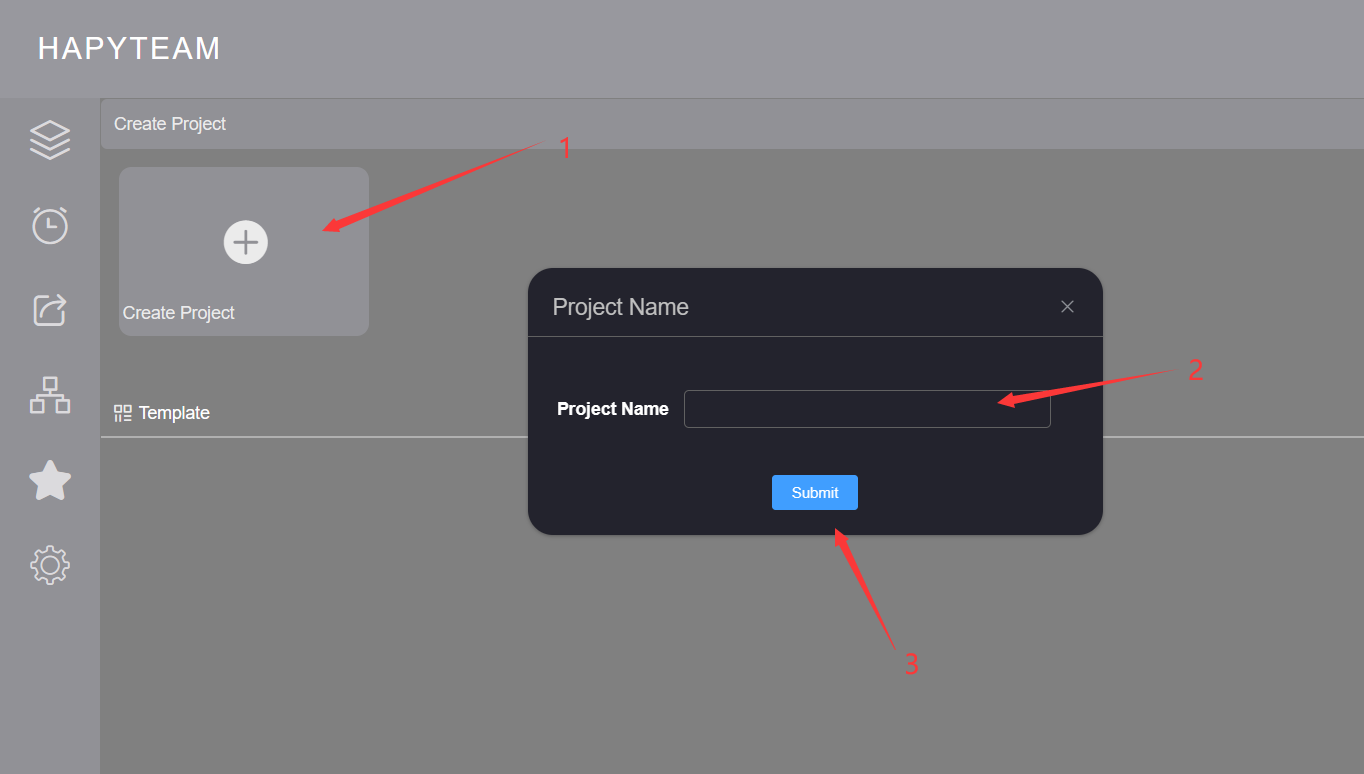
On the project setting page, you can set various properties of the project. For specific settings, refer toProject basic attribute settings 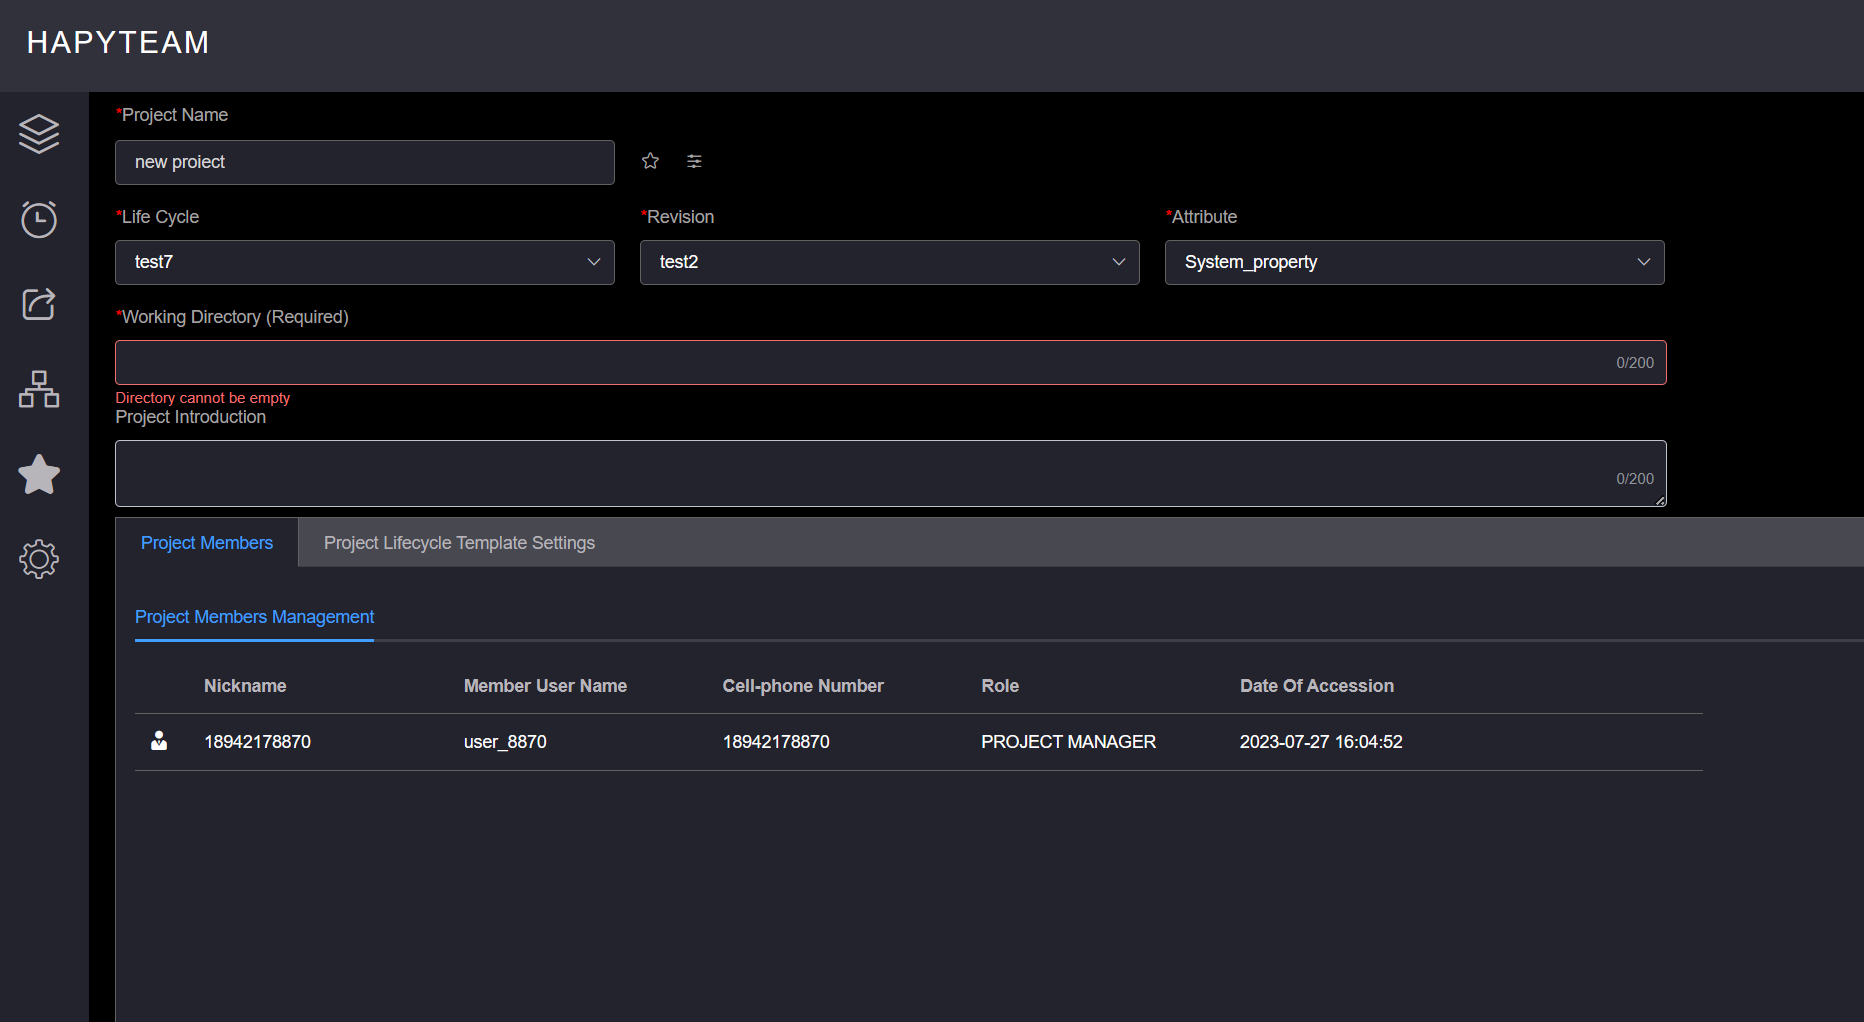
# 4.Invite Members
If the project you created needs to invite project members, please refer toInvite project members
# 5.New Folder
Select the level of file directory to create in the project structure tree on the left of the project file management page, and click
the New Folder button on the top right corner of the project file management page to pop up the new file directory pop-up box

Enter the file directory name in the pop-up box, click the Submit button, and wait for the prompt information
The directory name cannot contain /: * ?;<>|, And cannot exceed 25 characters 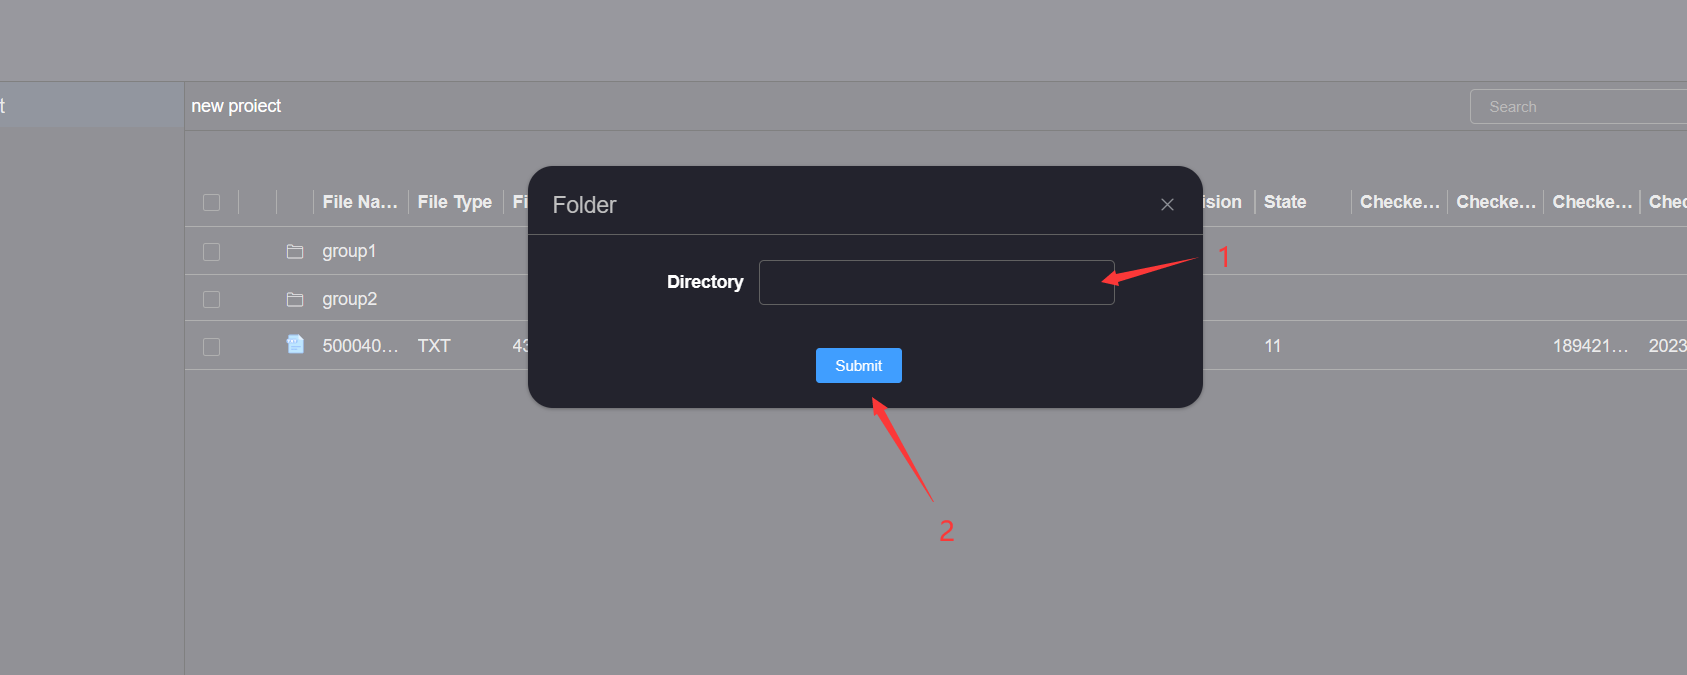
# 6.Upload File
In the project file management page left project structure tree, select the level of file directory to upload the file, click the
Upload button at the top right corner of the project file management page, and the upload file pop-up box will pop up
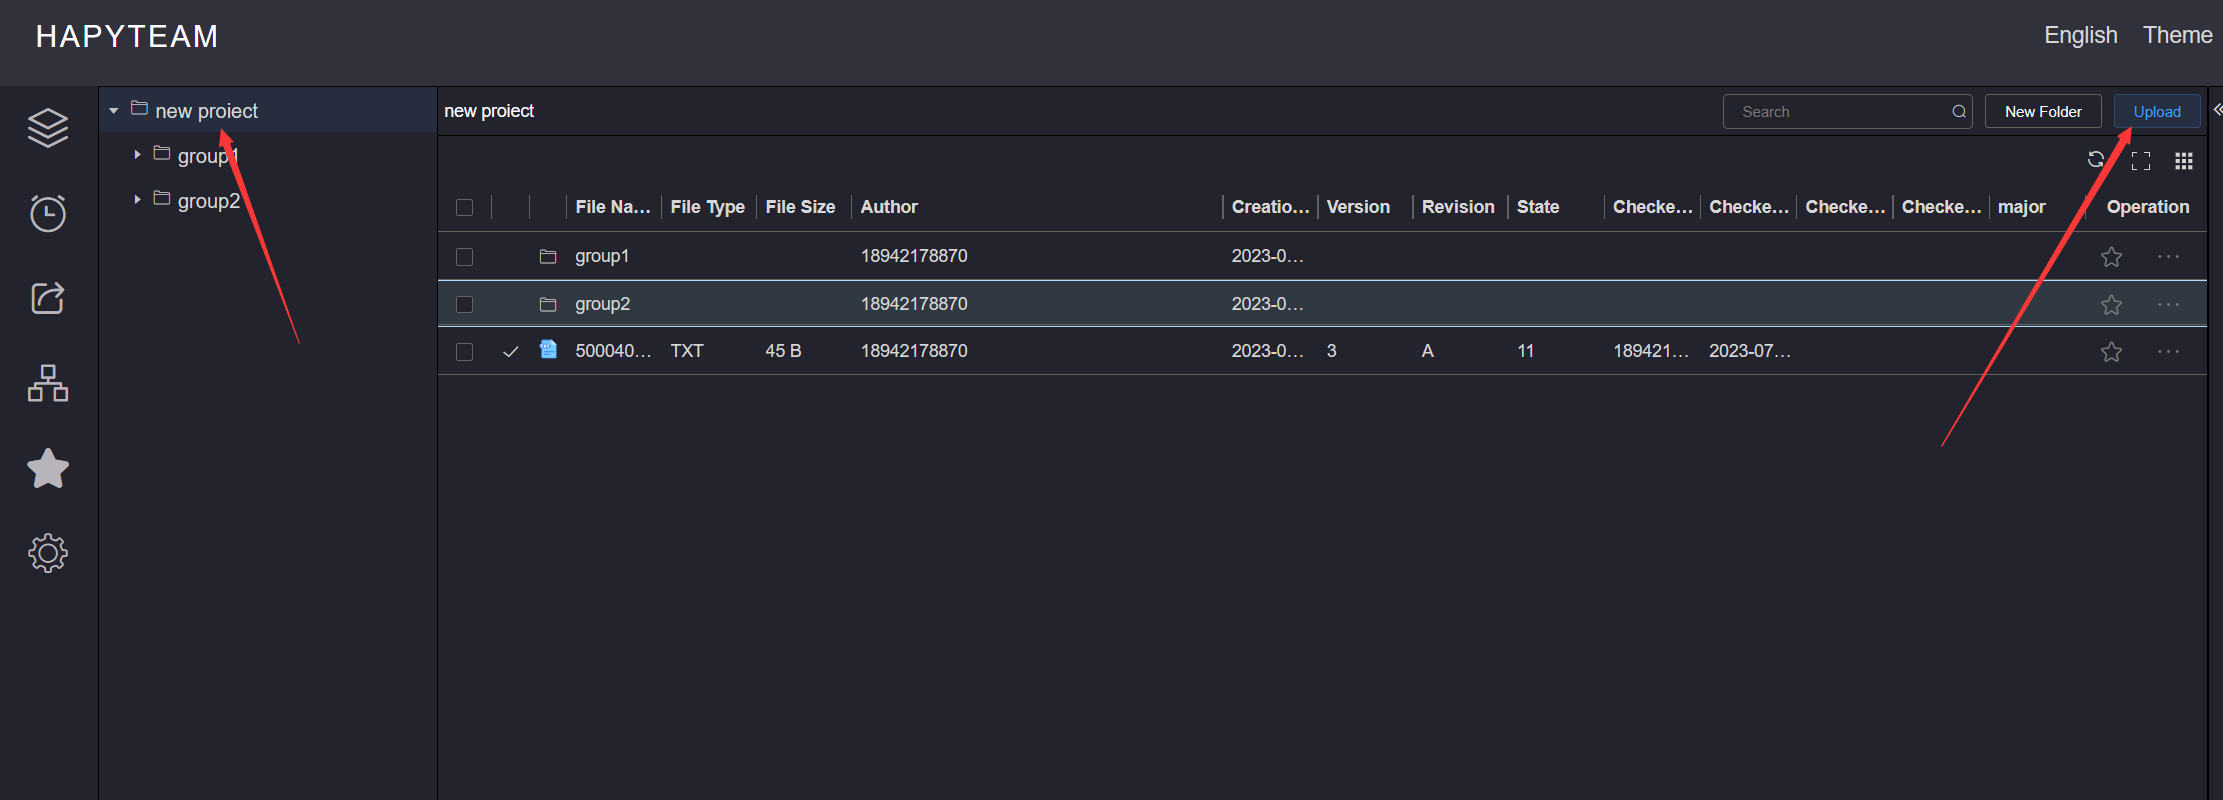
In the Upload File pop-up box, click Click Upload or drag the file directly to select the upload file
Up to 10 files can be uploaded at a time, and each file size should not exceed 32M (specific format files such as Dwg format
files for 3D software cannot be uploaded on the web page, and the corresponding software plugin must be used to complete the upload) 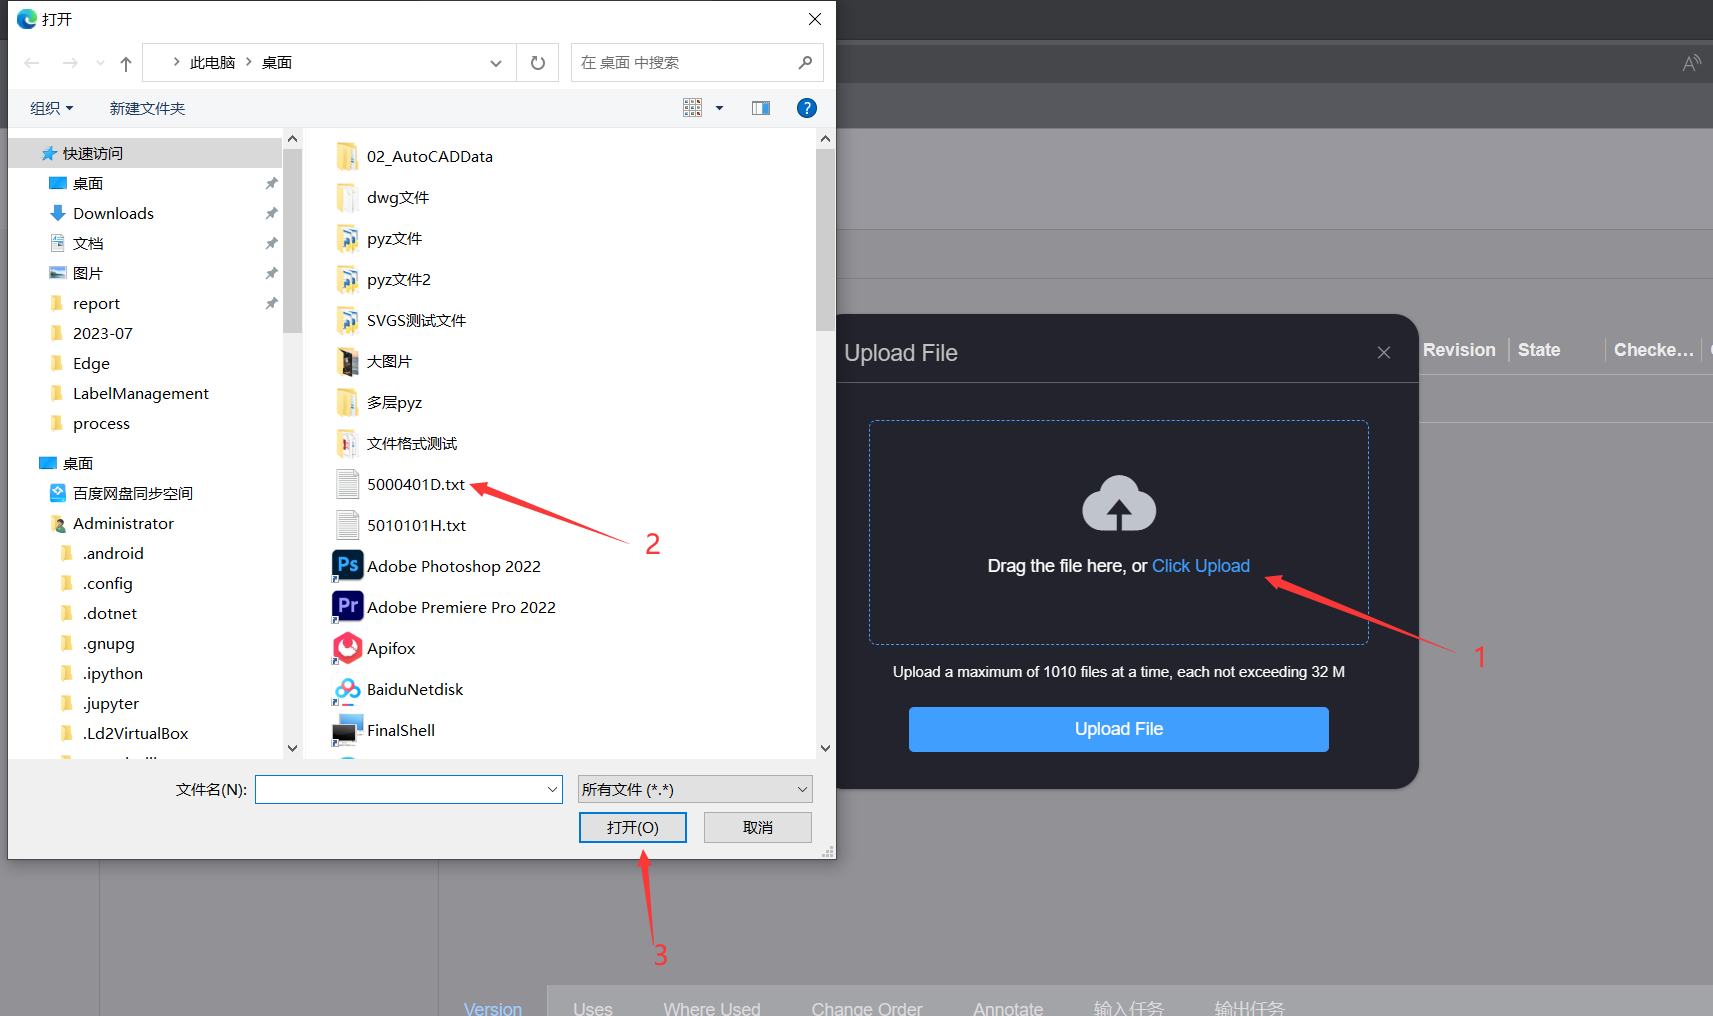
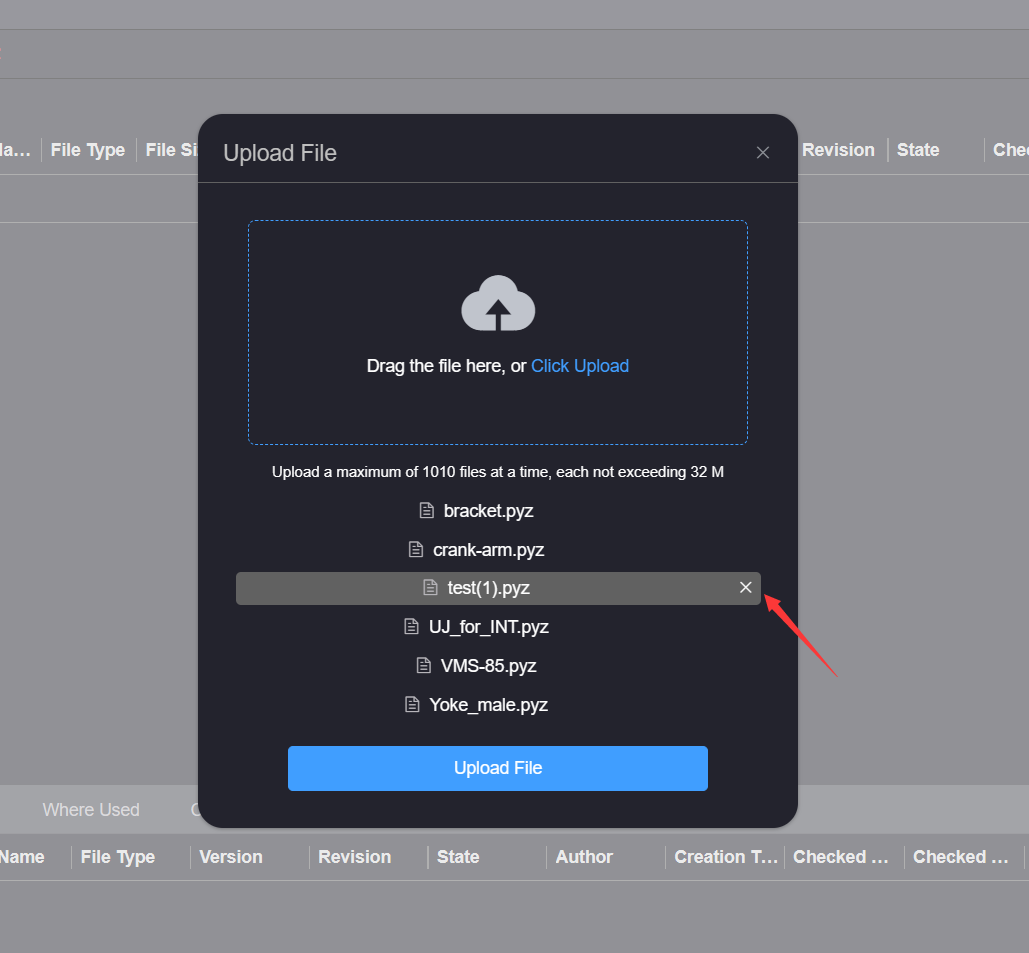
After selecting the file to be uploaded, a list of files to be uploaded will be generated in the Upload File pop-up box. You can deselect
the file to be uploaded by clicking the Delete button after the file to be uploaded
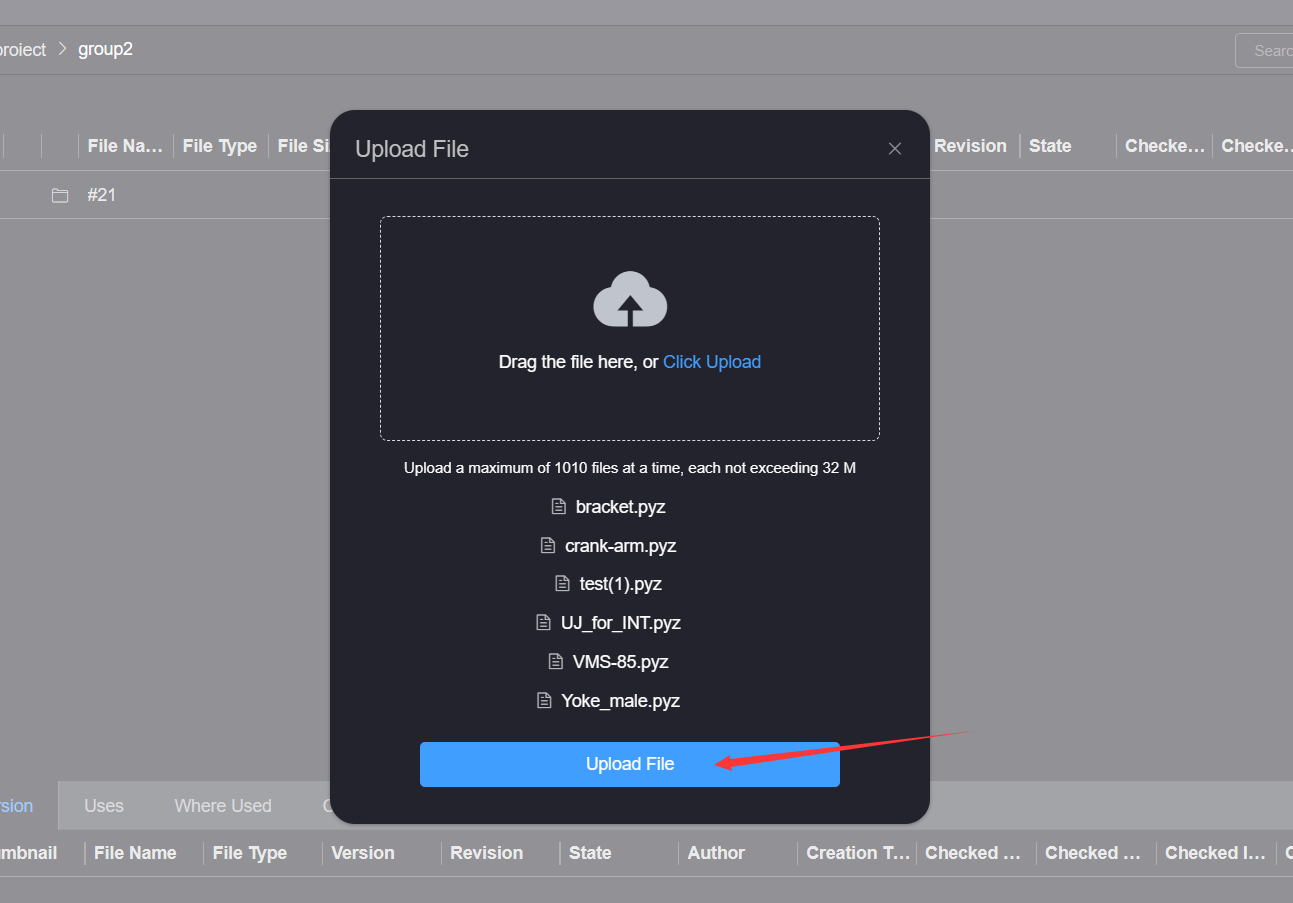
After managing the files to be uploaded, click the Upload File button in the Upload File pop-up box, and wait for the upload completion
prompt message
# 7.File Management
# 1.Check In
Click the More Operations button of the file to be checked in, and click the Check In button to pop up the check in file pop-up box
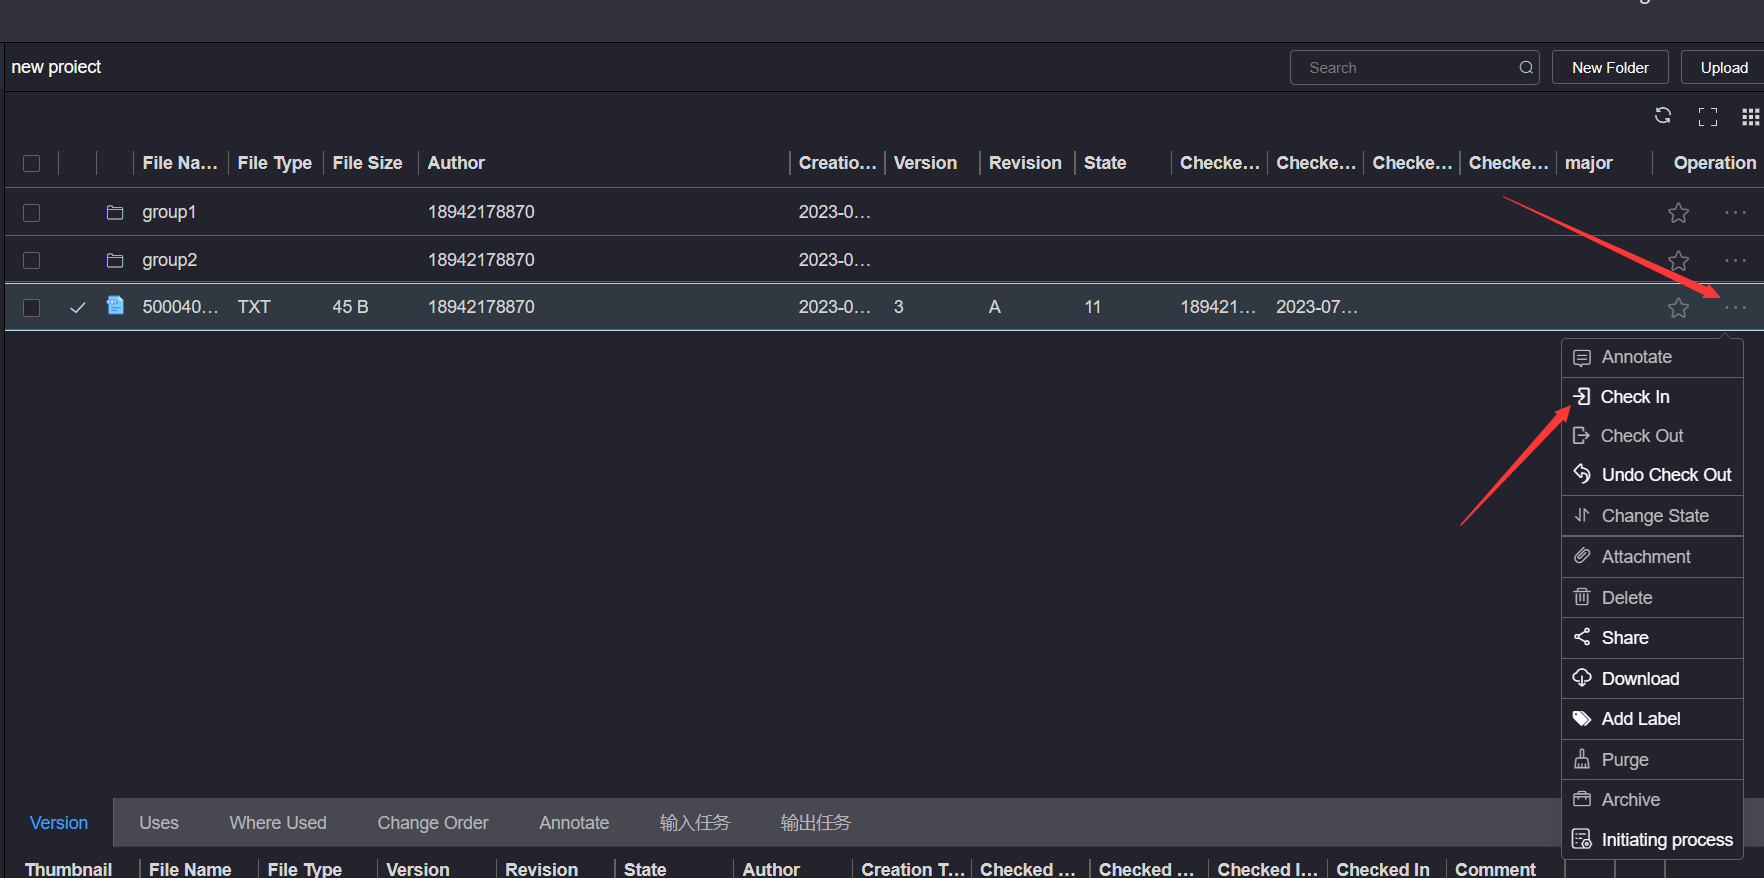
In the Upload File pop-up box, click Click Upload or drag the file directly to select the checked in file
When checking in a file, the checked in file must be a file with the same content as the checked out file name, and the size of the checked
in file must not exceed 100M 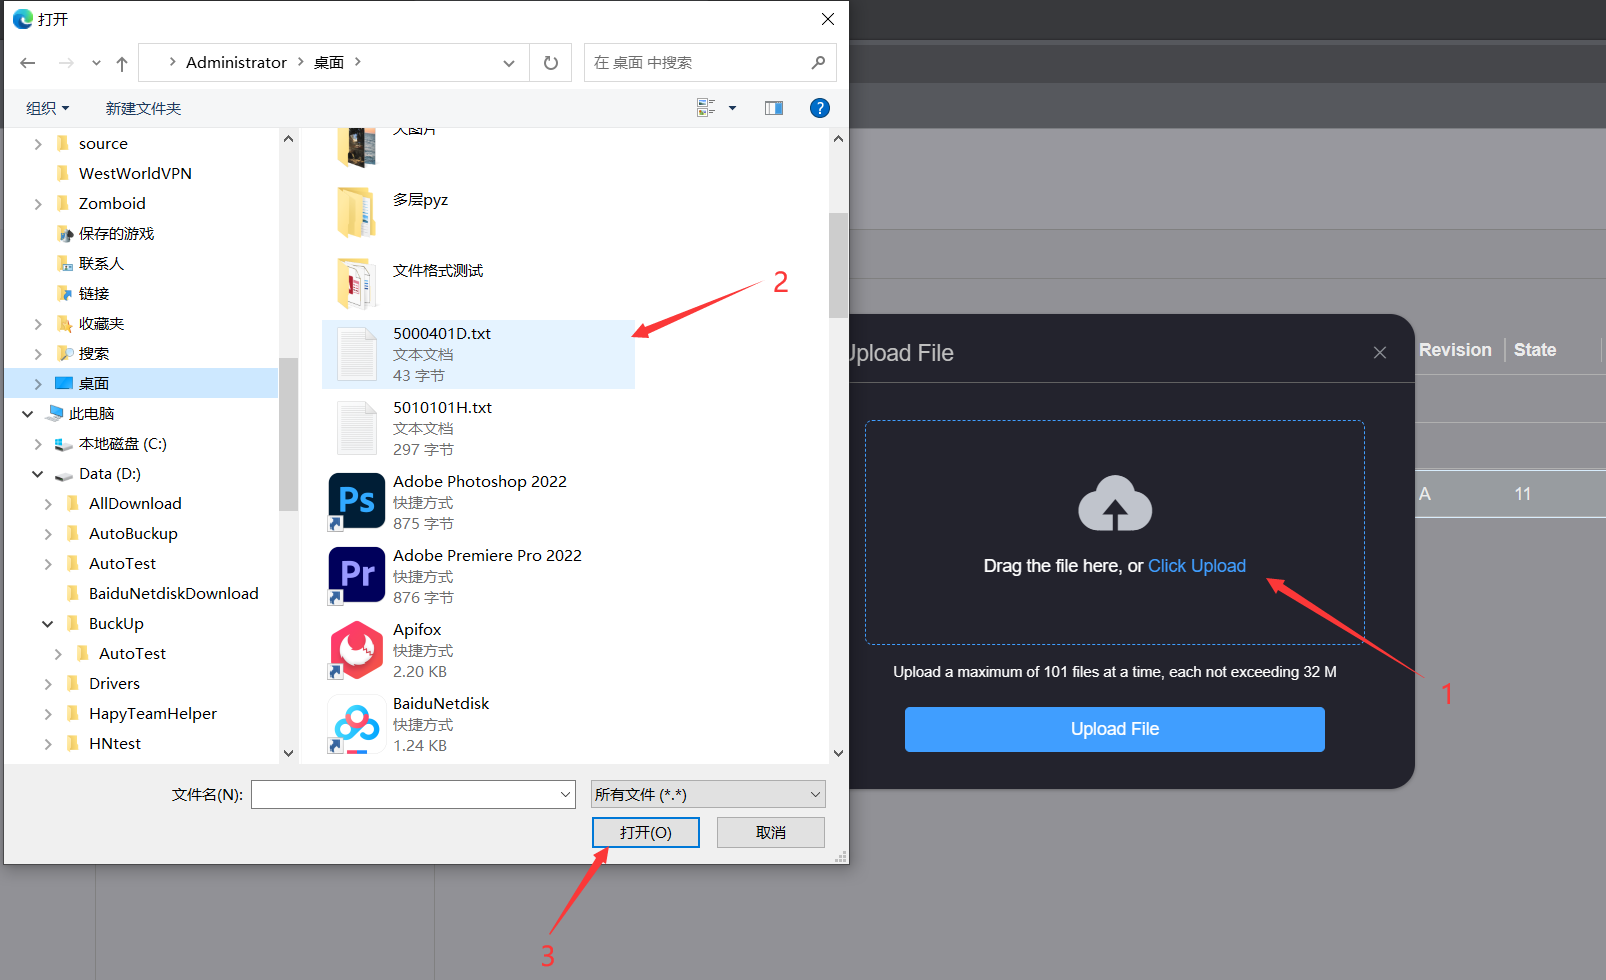
After selecting the file to be checked in, a list of files to be uploaded will be generated in the Upload File pop-up box. You can deselect
the file to be checked in by clicking the Delete button after the file to be uploaded
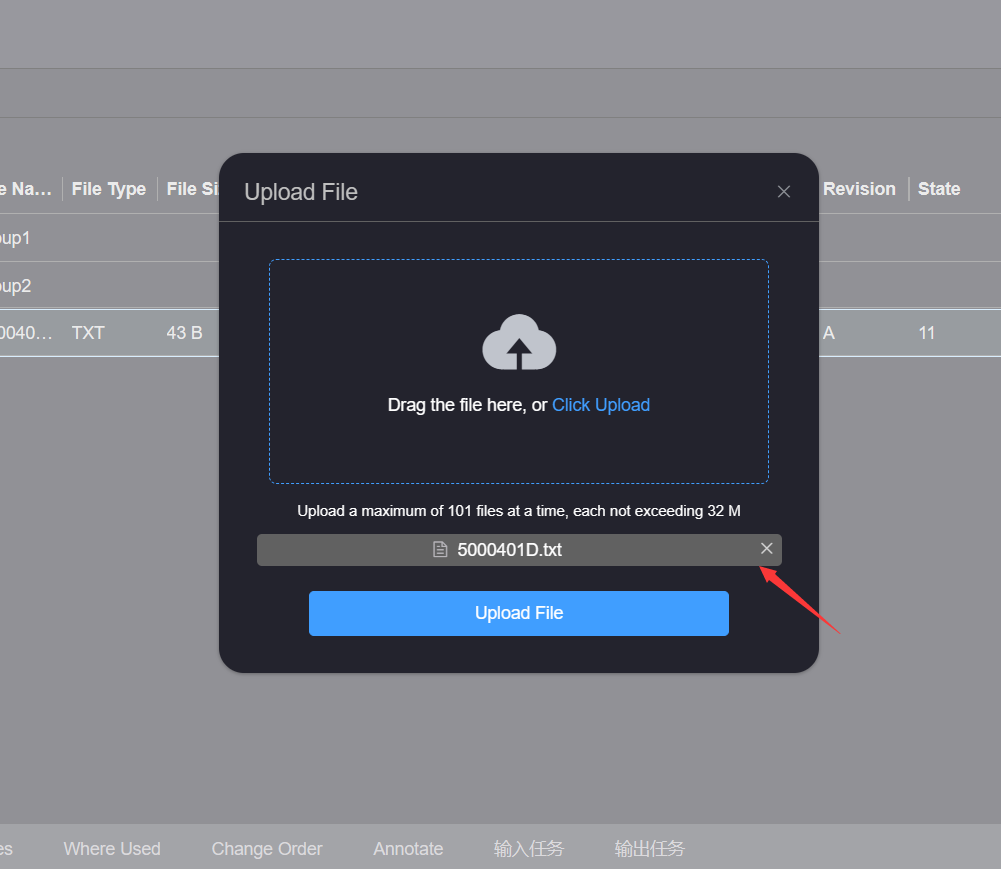
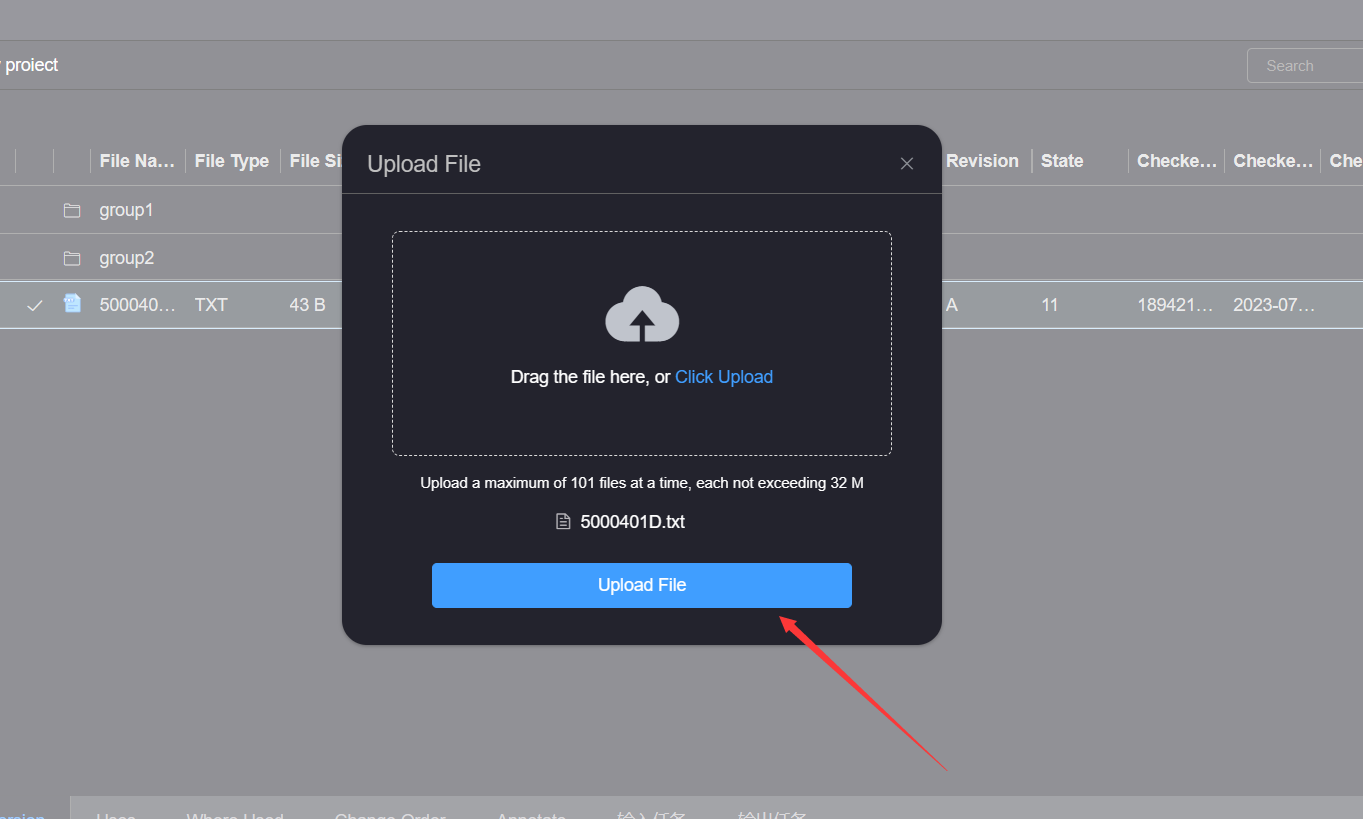
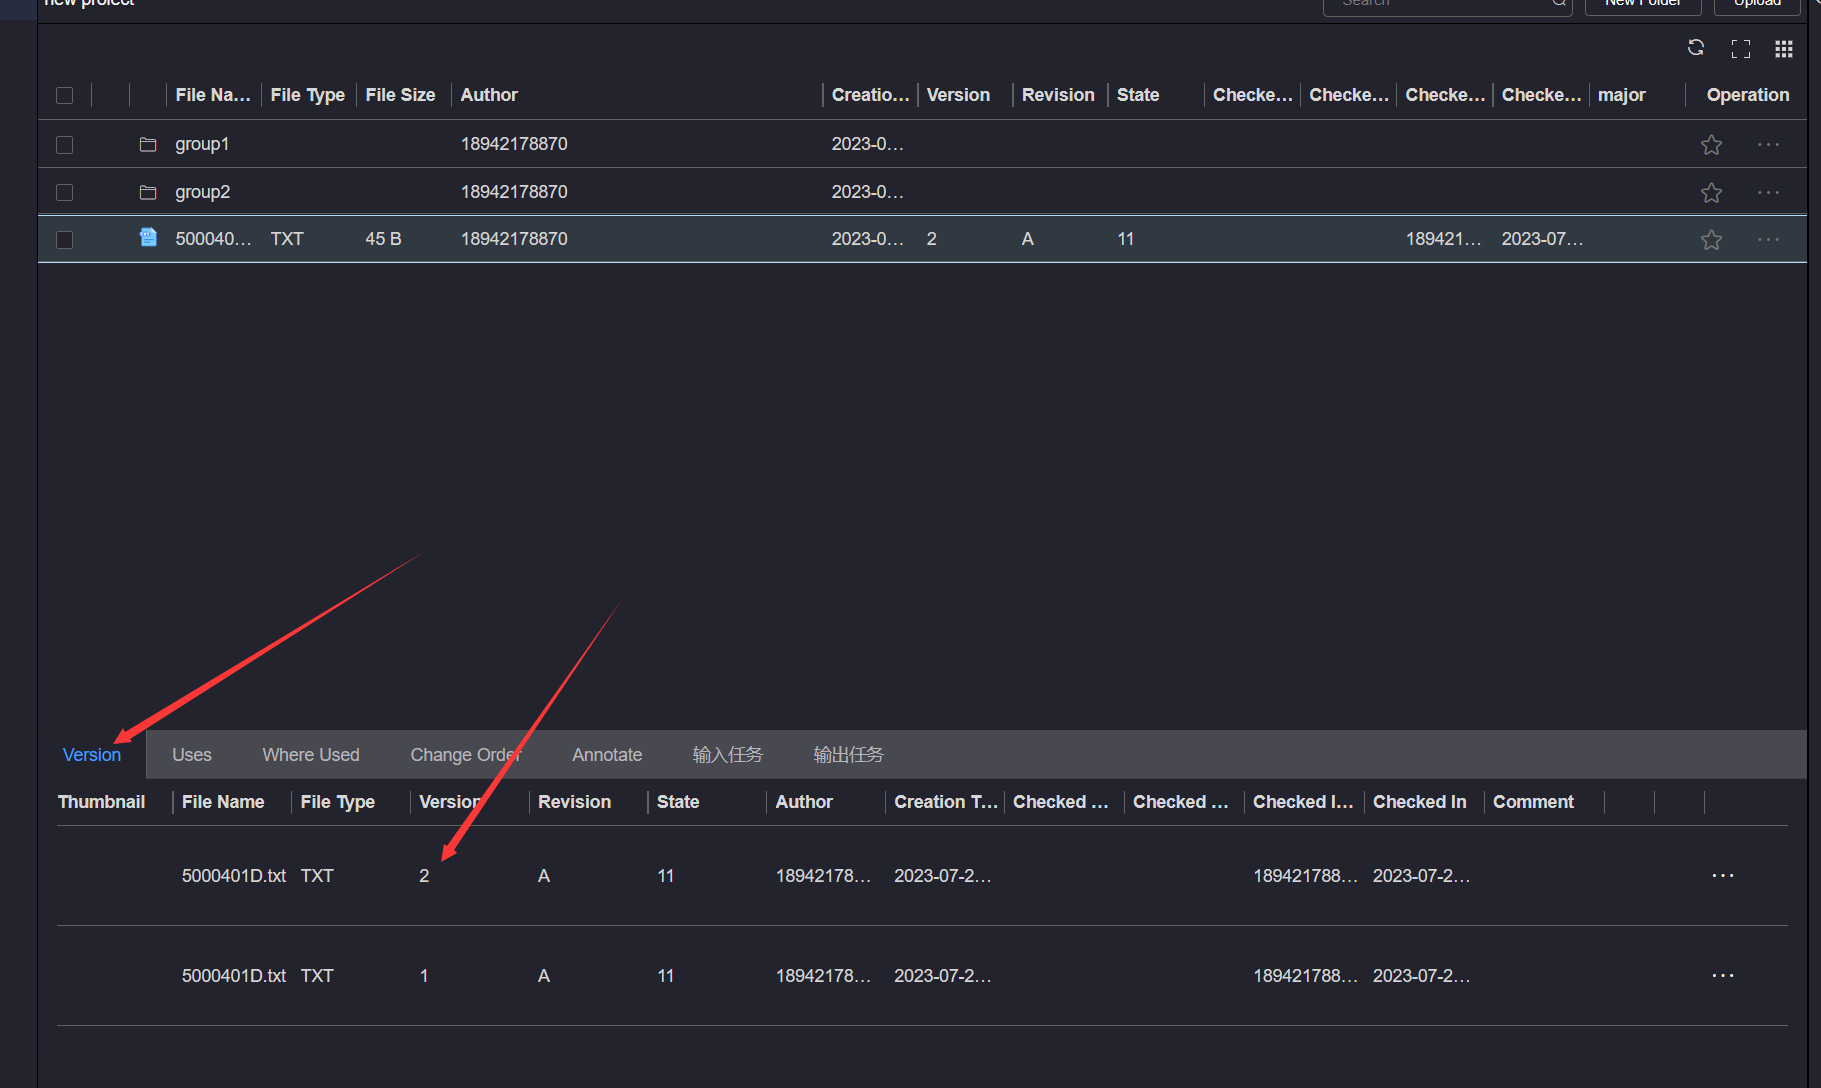
After organizing the files to be uploaded, click the Upload File button in the Upload File pop-up box, and wait for the upload completion
prompt message until the files are complete
# 2.Check Out
Users can complete the checkout operation through the menu corresponding to the file or directory. Click on the More Operations button of the file or directory to be checked out, and then click the Check Out button. After successful checkout, the resource will be downloaded
When checking out a file directory, if there are already checked out files in the file directory, otherwise the file directory error will be detected 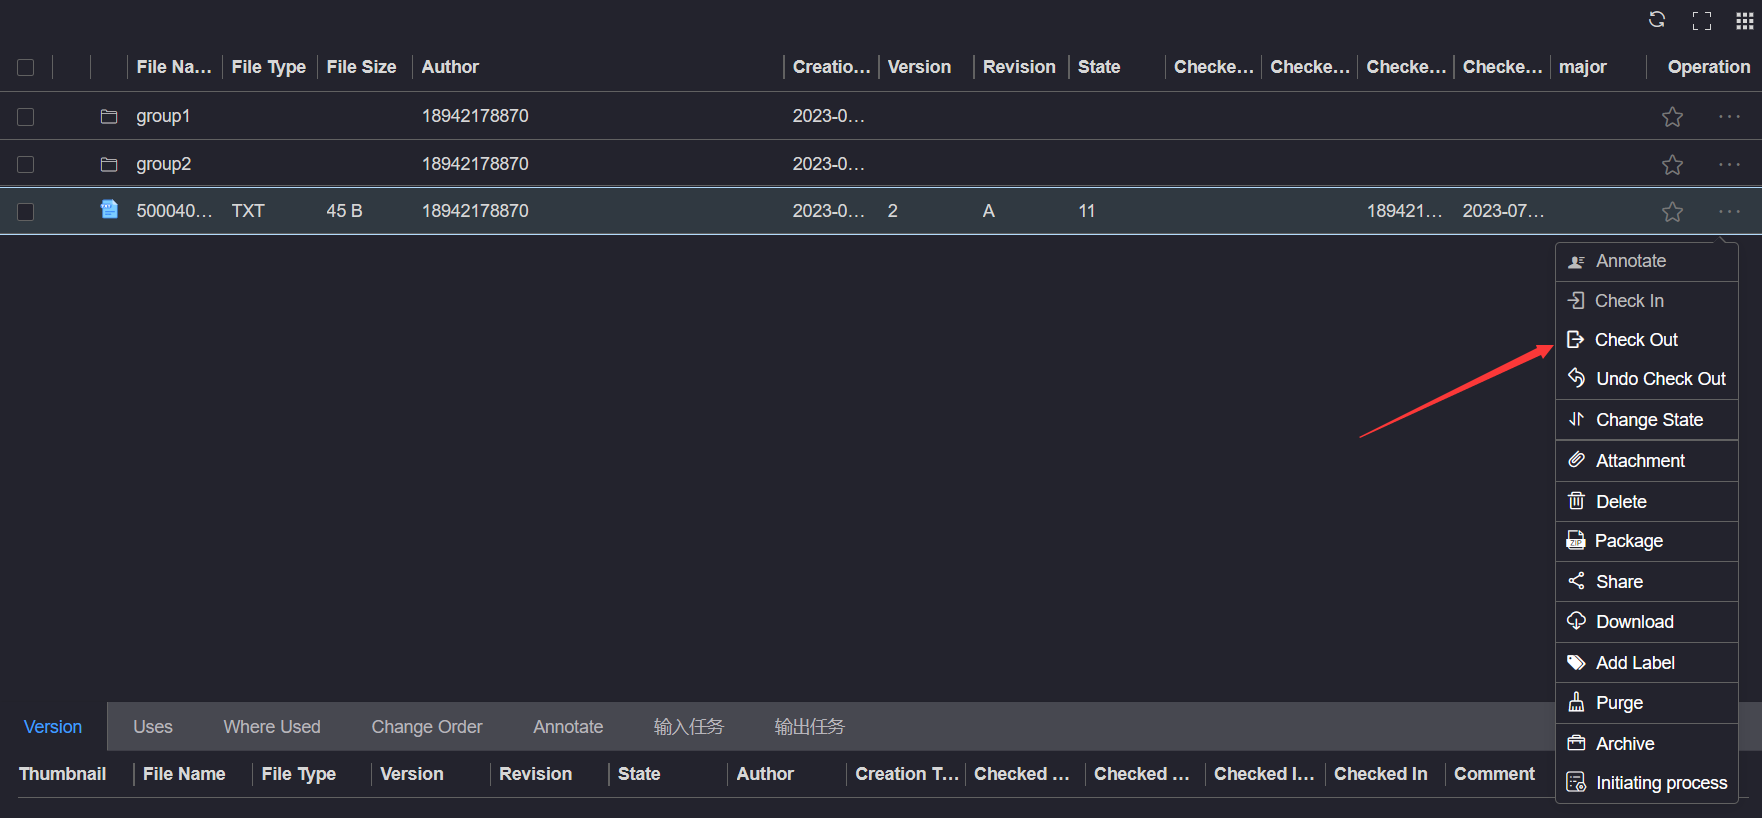
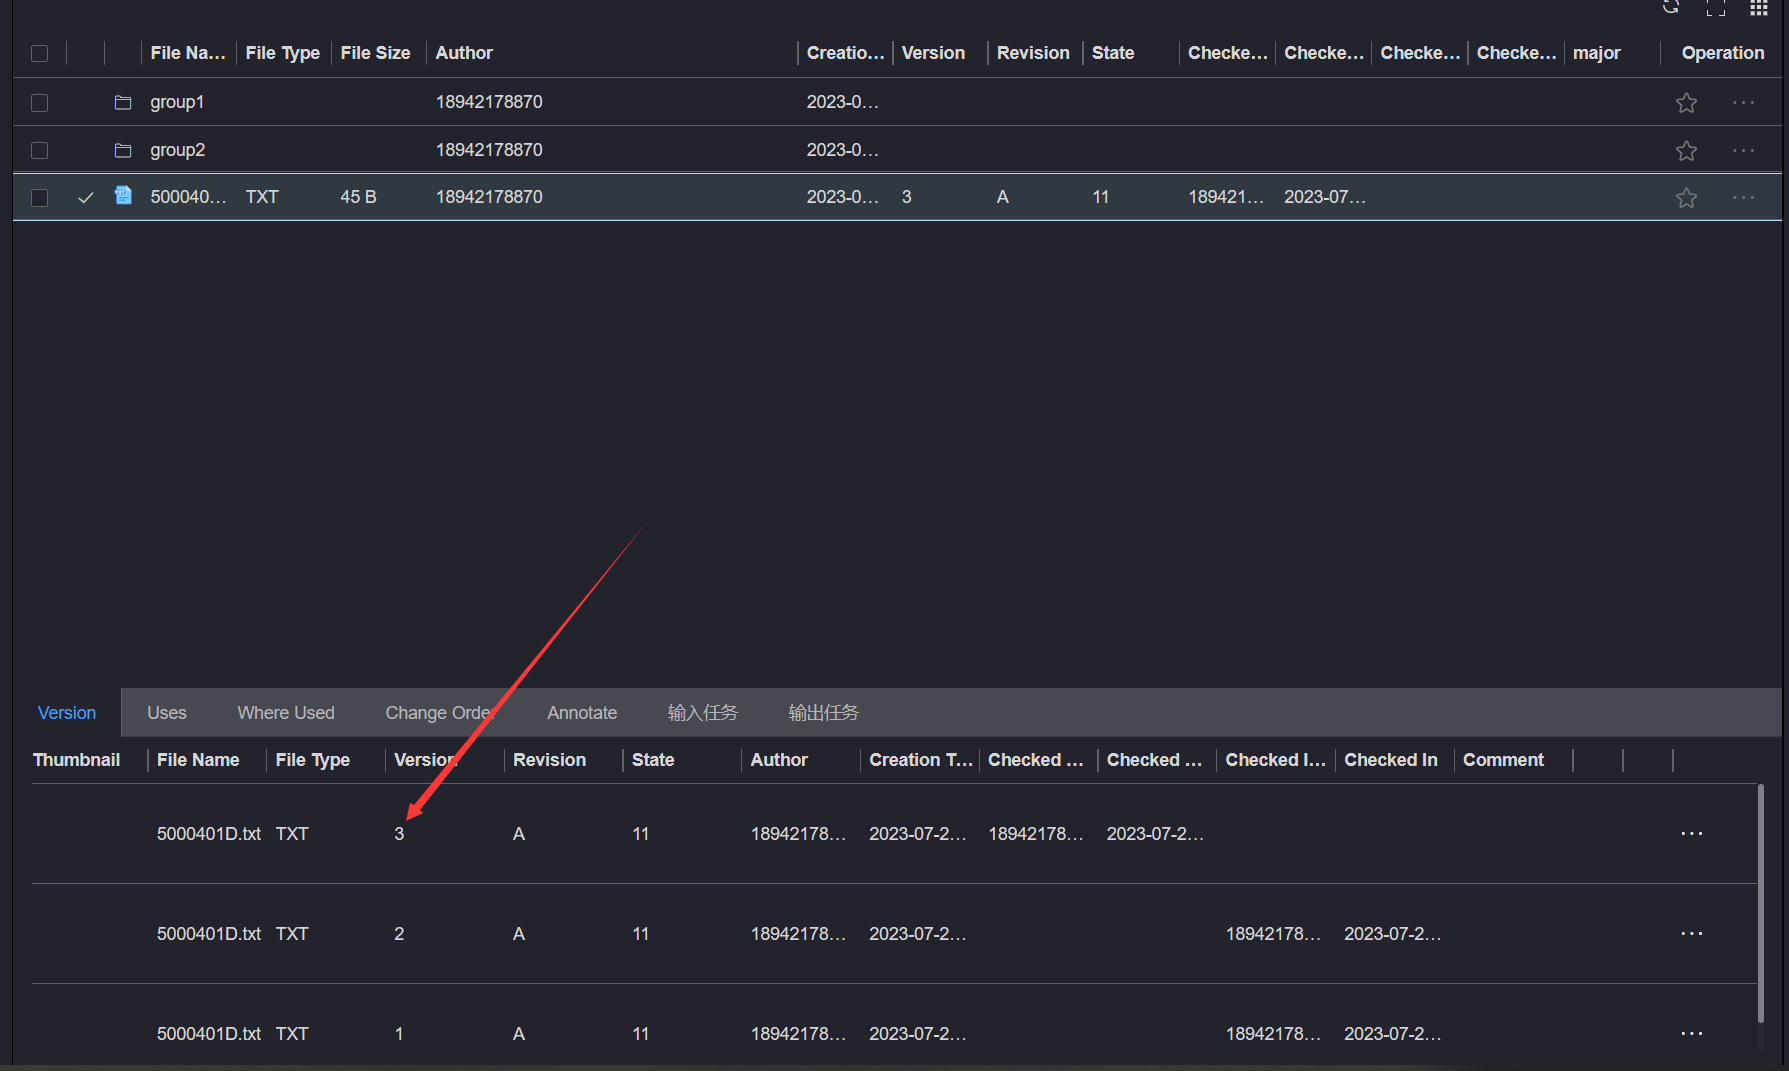
After the file is checked out, the version of the file will+1
If you have multiple files to check out, you can refer toCheck out
# 3.Change State
Click the More Operations button of the file to change status, and click the Change State button. If the lifecycle template is not set to cross nodes, the previous or next node of the current node of the file lifecycle will pop up on the left. If the lifecycle is set to cross nodes, all nodes after the current node in the lifecycle template will pop up on the left. For operations such as cross-node lifecycle, refer to [Lifecycle Node Management] (/pages_en/gostart/setup/Lifecycle% 20node% 20management. md)
When the lifecycle state changes from released to designed, the file version will automatically be upgraded 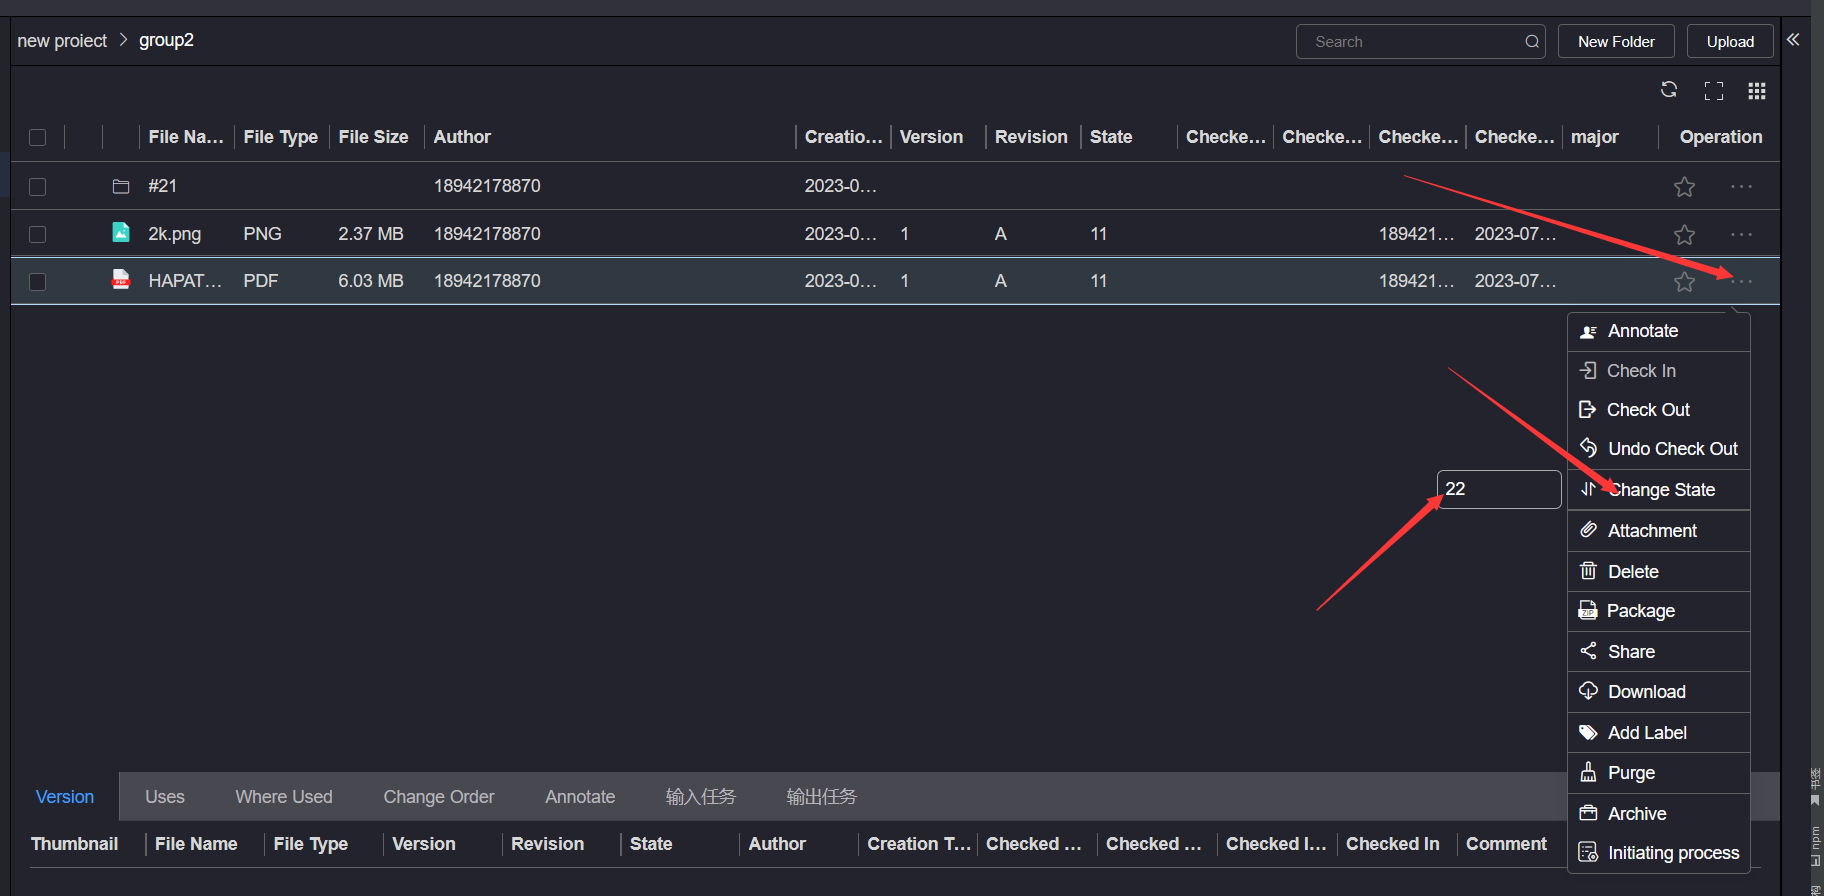
Click the Life Cycle Node button to enter, wait for prompt information, upgrade workflow of life cycle information, etc., refer toLifecycle node management
If the workflow to switch the status is consistent with the upgrade workflow of the life cycle, the version of the file will enter the next
node after changing the file status 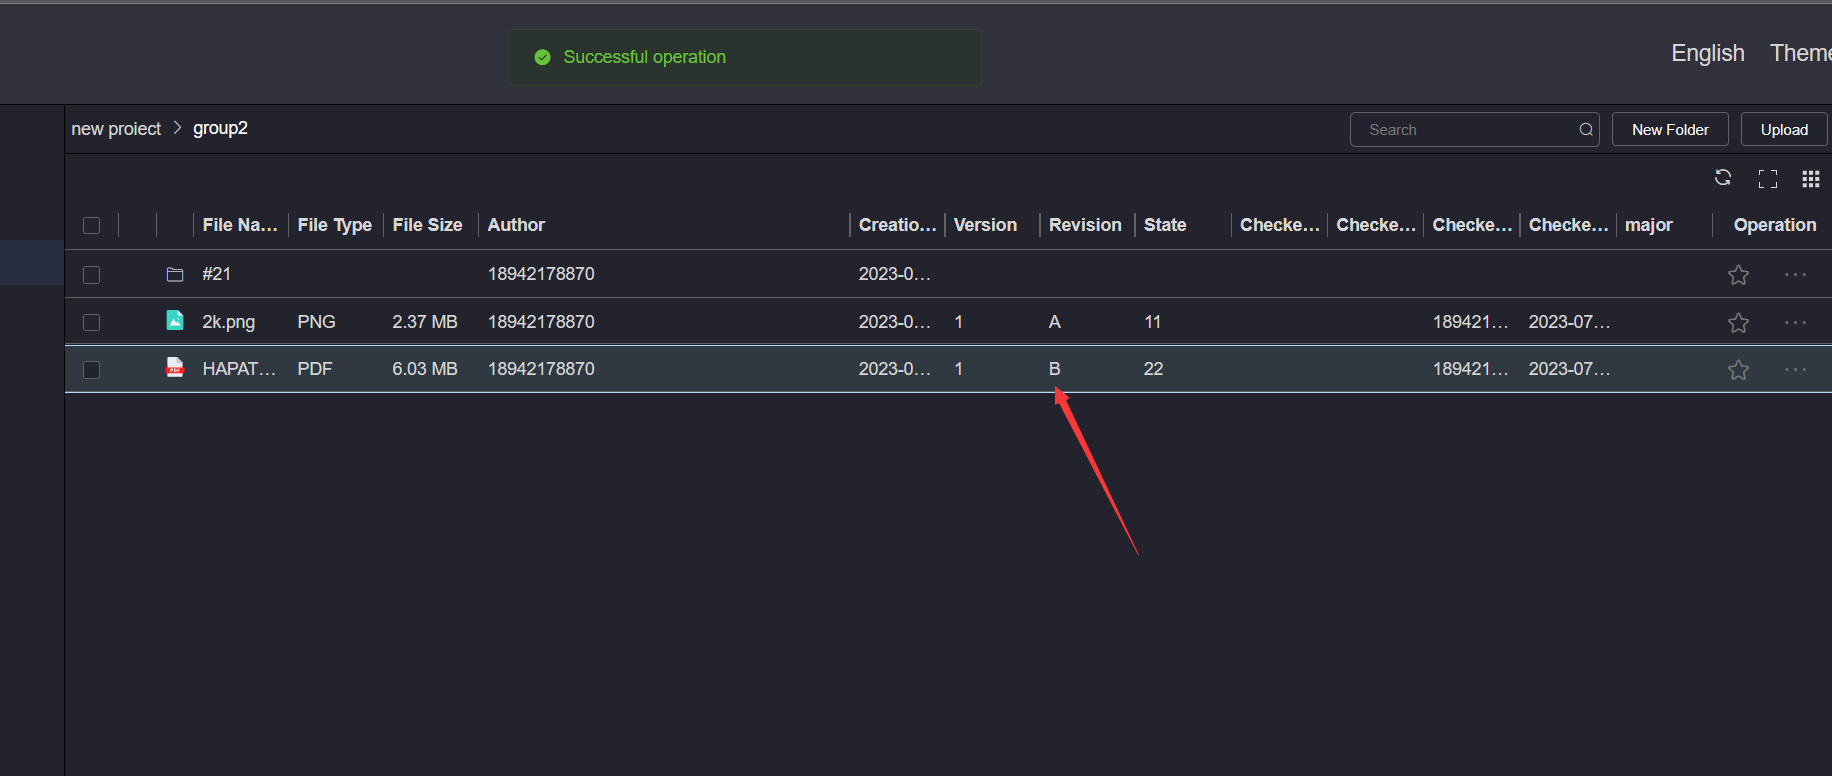
# 4.Attachment
Click the More Operations button of the file to be attached, and click the Attachment button to open the attached file interface
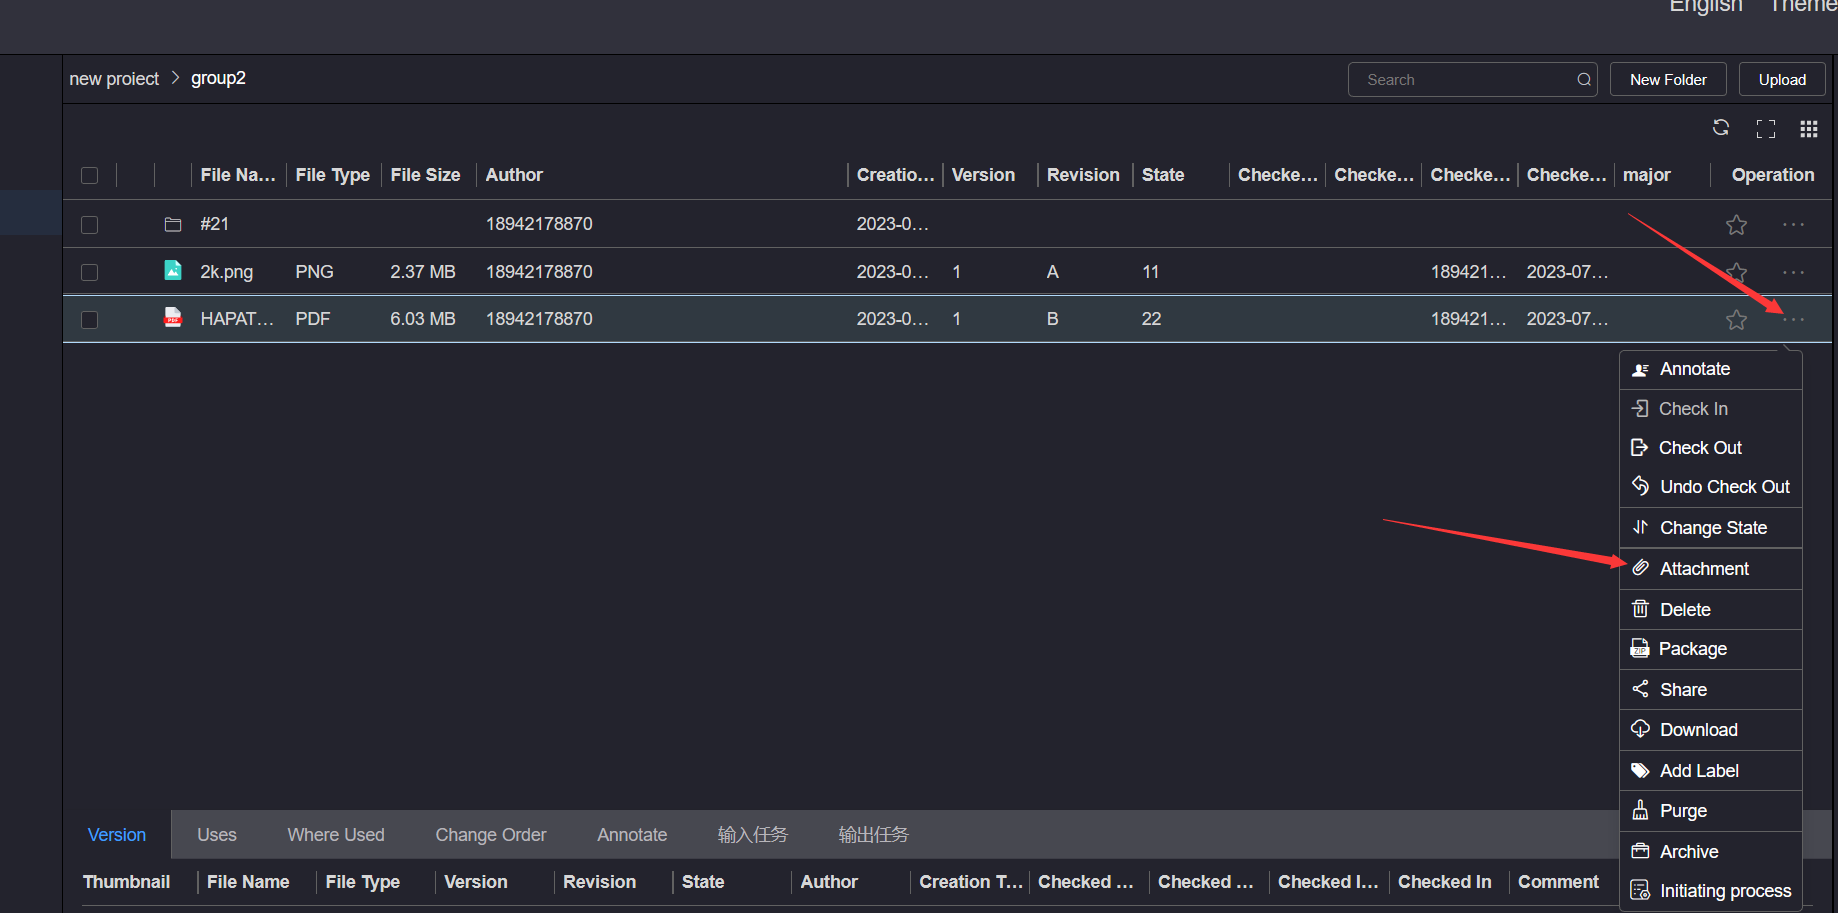
On the left side of the attached file interface, click to select the file directory where the attached file is located. In the file list on the right side, click Check box to select one or more files under the file directory as the attached file, click Attachment and wait for the prompt message
The attached files of the same version cannot be attached repeatedly, and the attached files of different versions can be attached; The
checked out file cannot be attached 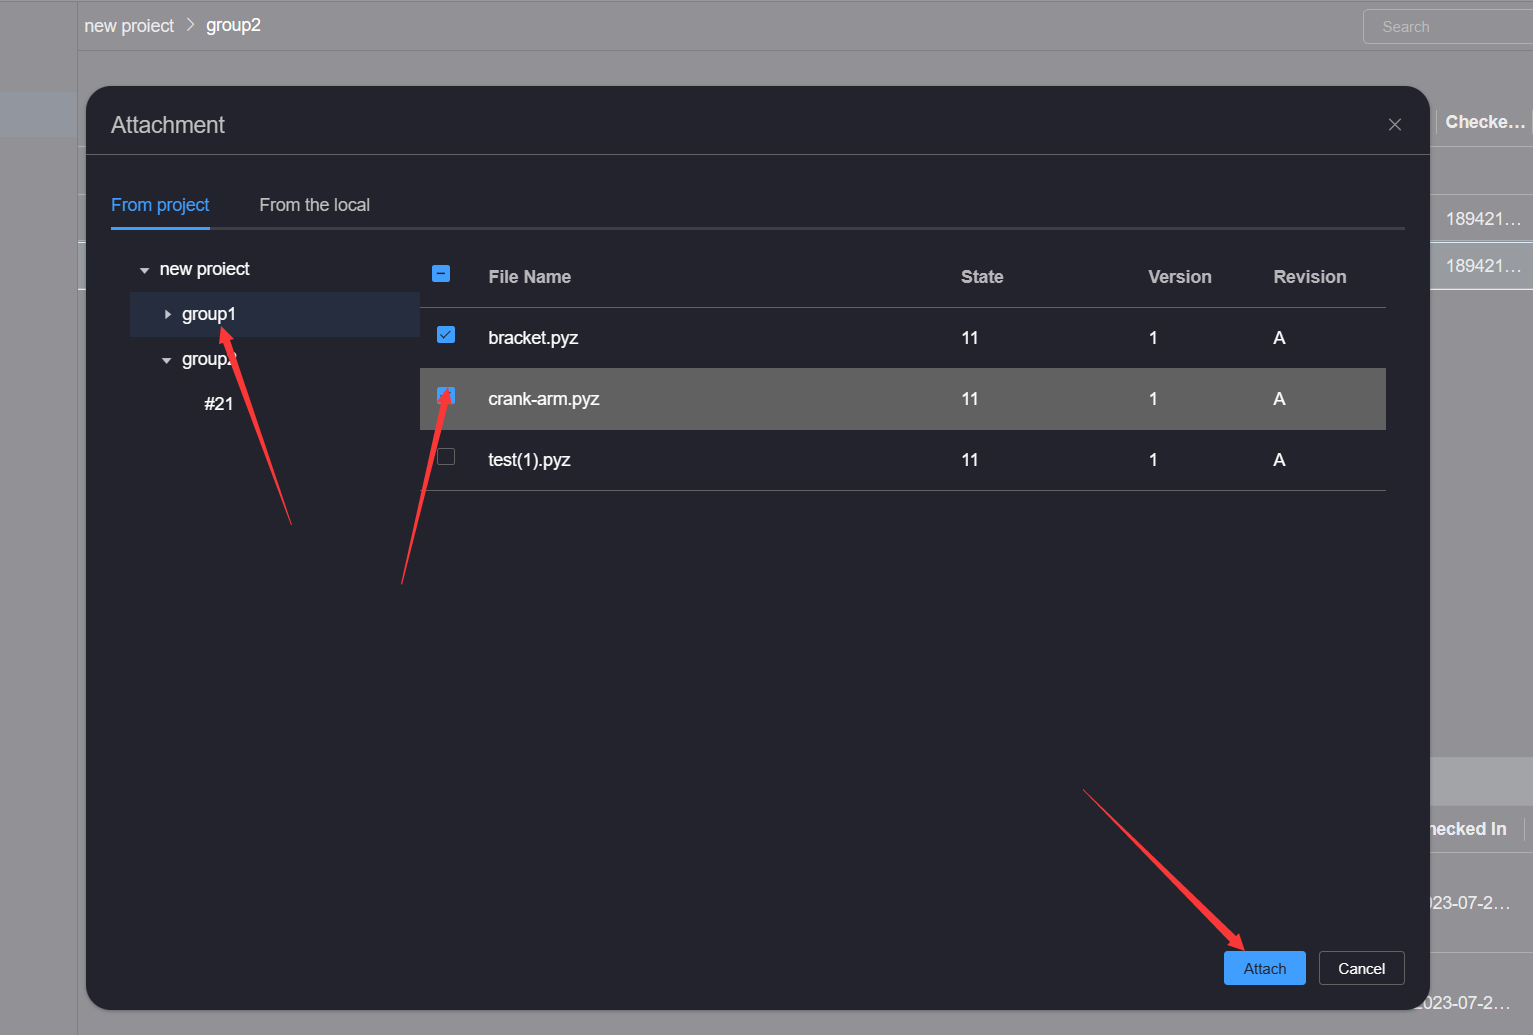
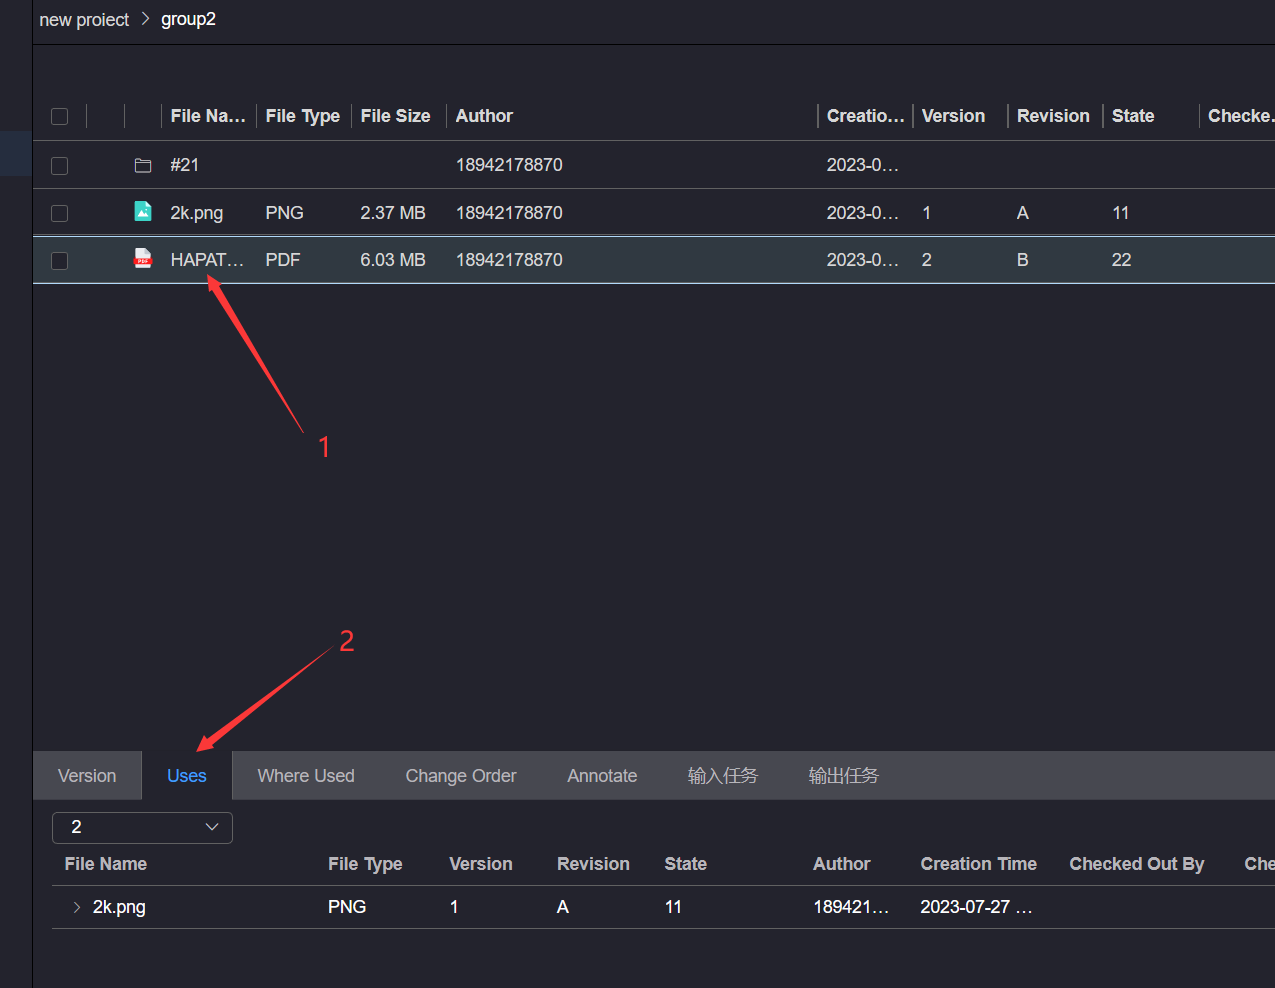
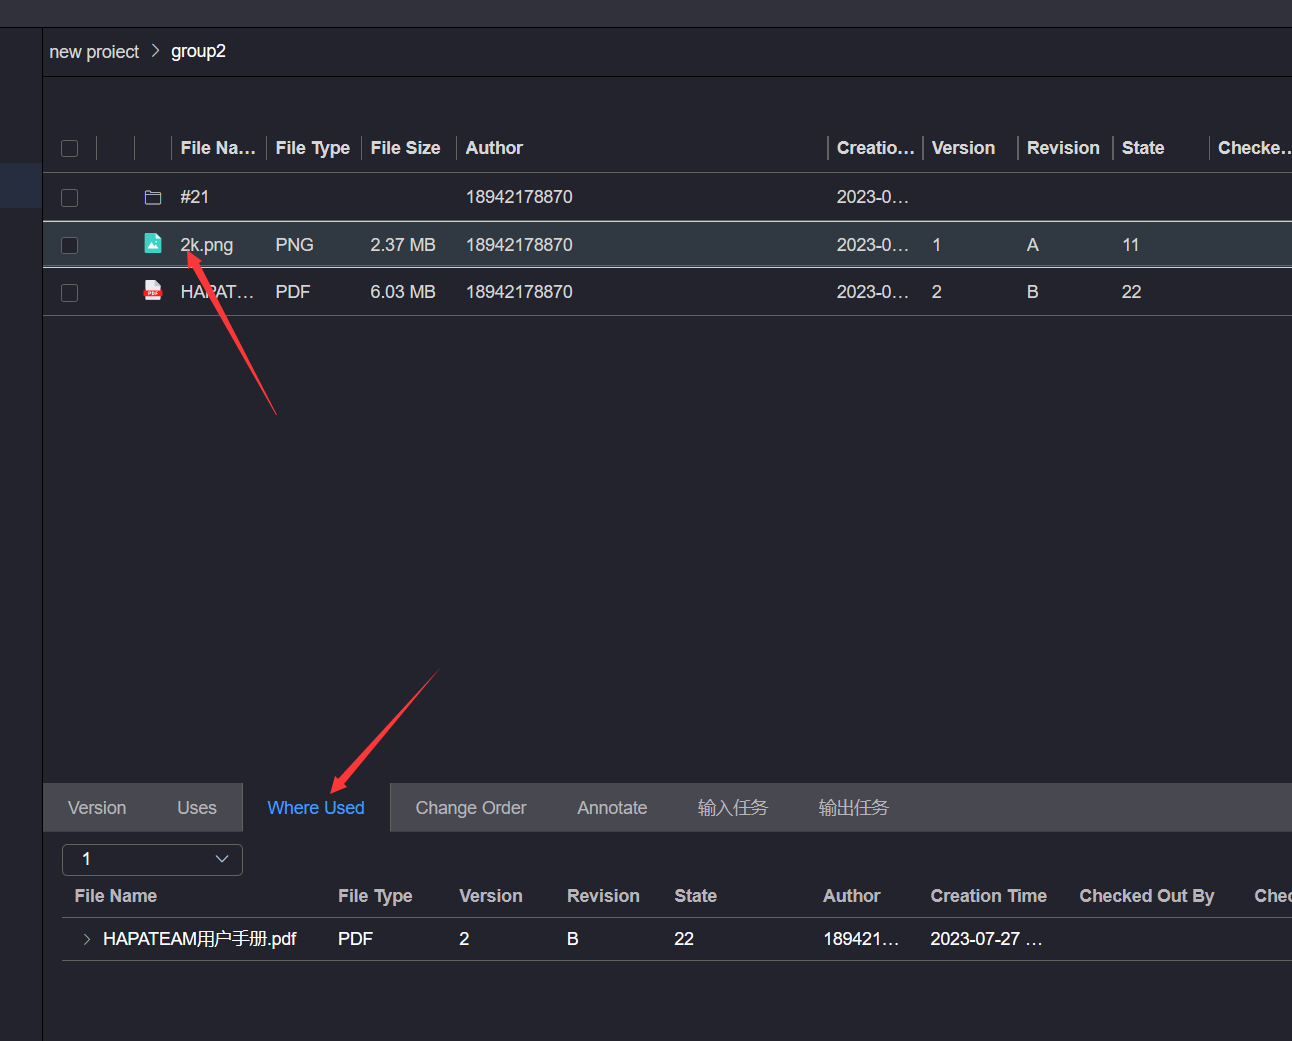
After the attached file is successful, you can view the information of the attached file on the Uses tab of the attached file, or
you can view the file information of the attached file on the Where Used page of the attached file
# 5.Delete
To delete a file or file directory, click the More Operations button of the file or file directory to be deleted, and click the Delete button to open the deletion confirmation dialog box
If the file directory is deleted, there must be no checked out files in the deleted file directory, otherwise the deletion will fail, Checked
out files cannot be deleted 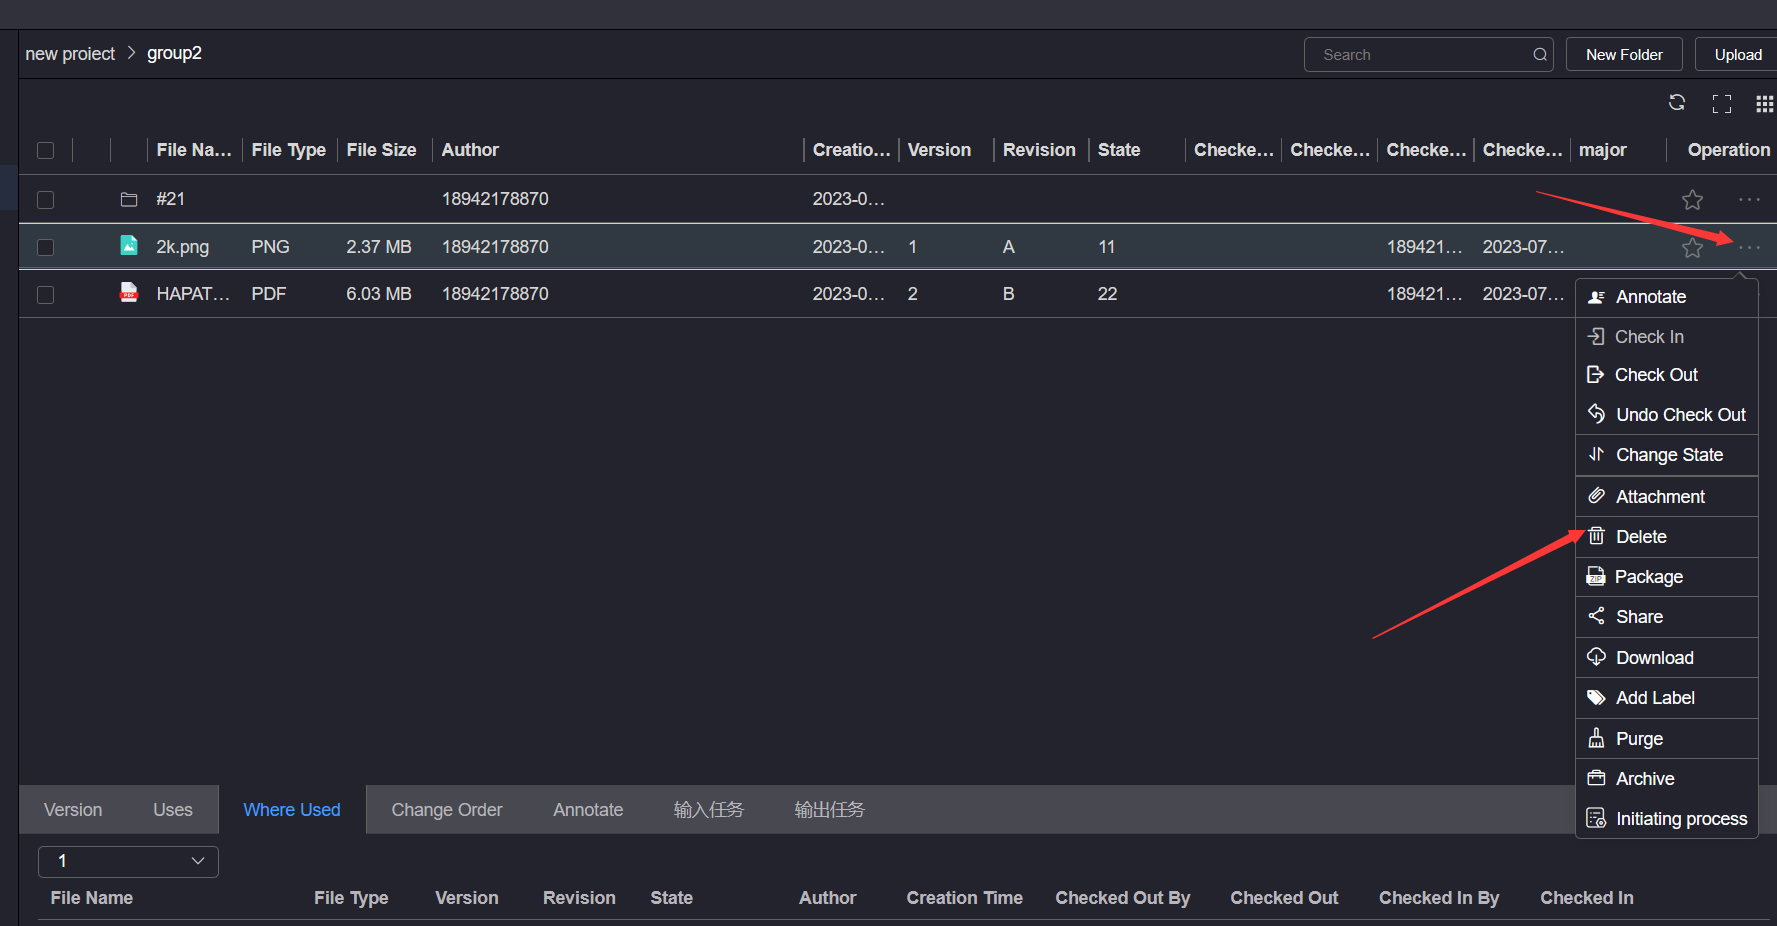
Click the Confirm button in the deletion confirmation dialog box and wait for the deletion completion prompt message
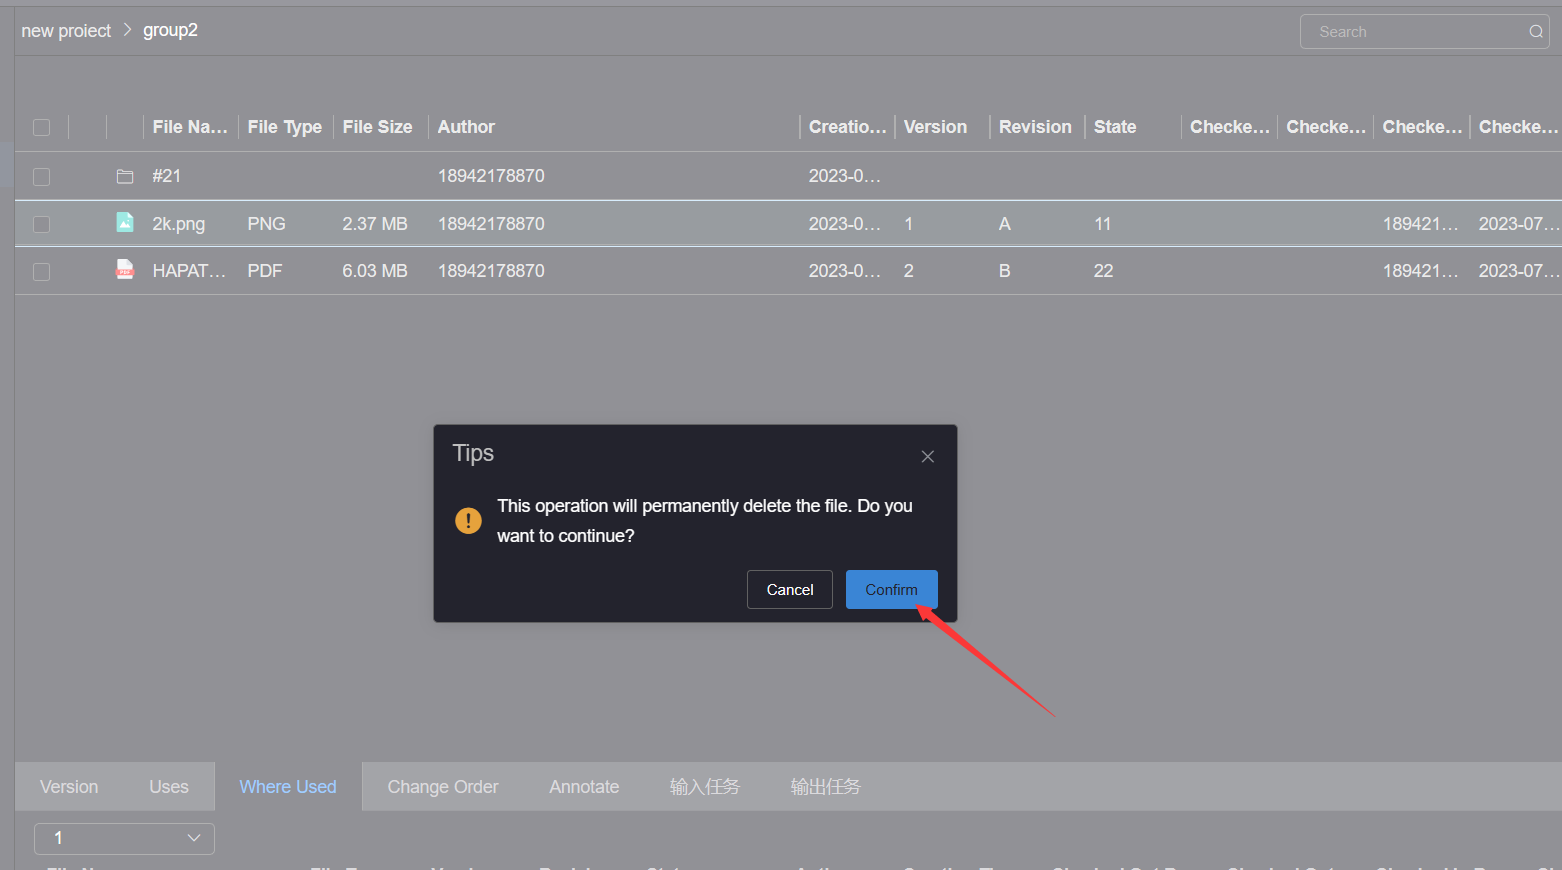
If you have multiple files to delete, you can refer toDelete file
# 6.Share
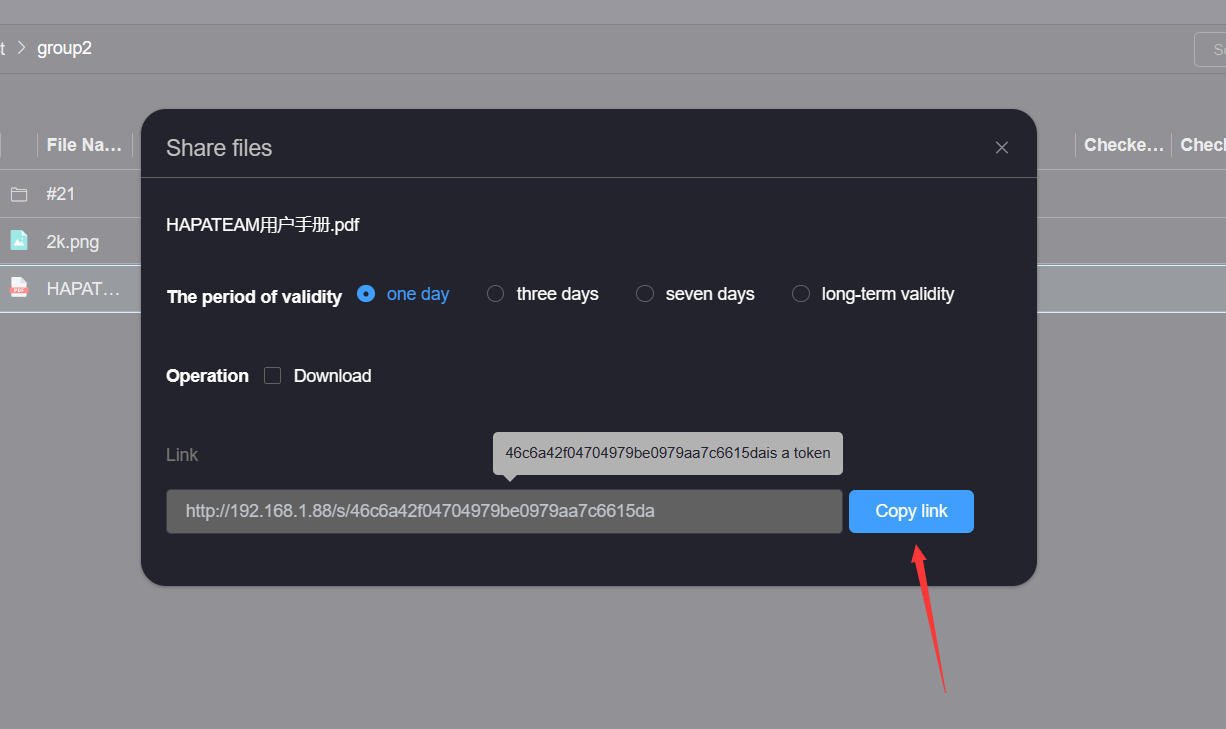
Click the More Operations button of the file to be shared, and click the Share button to pop up the file sharing pop-up window
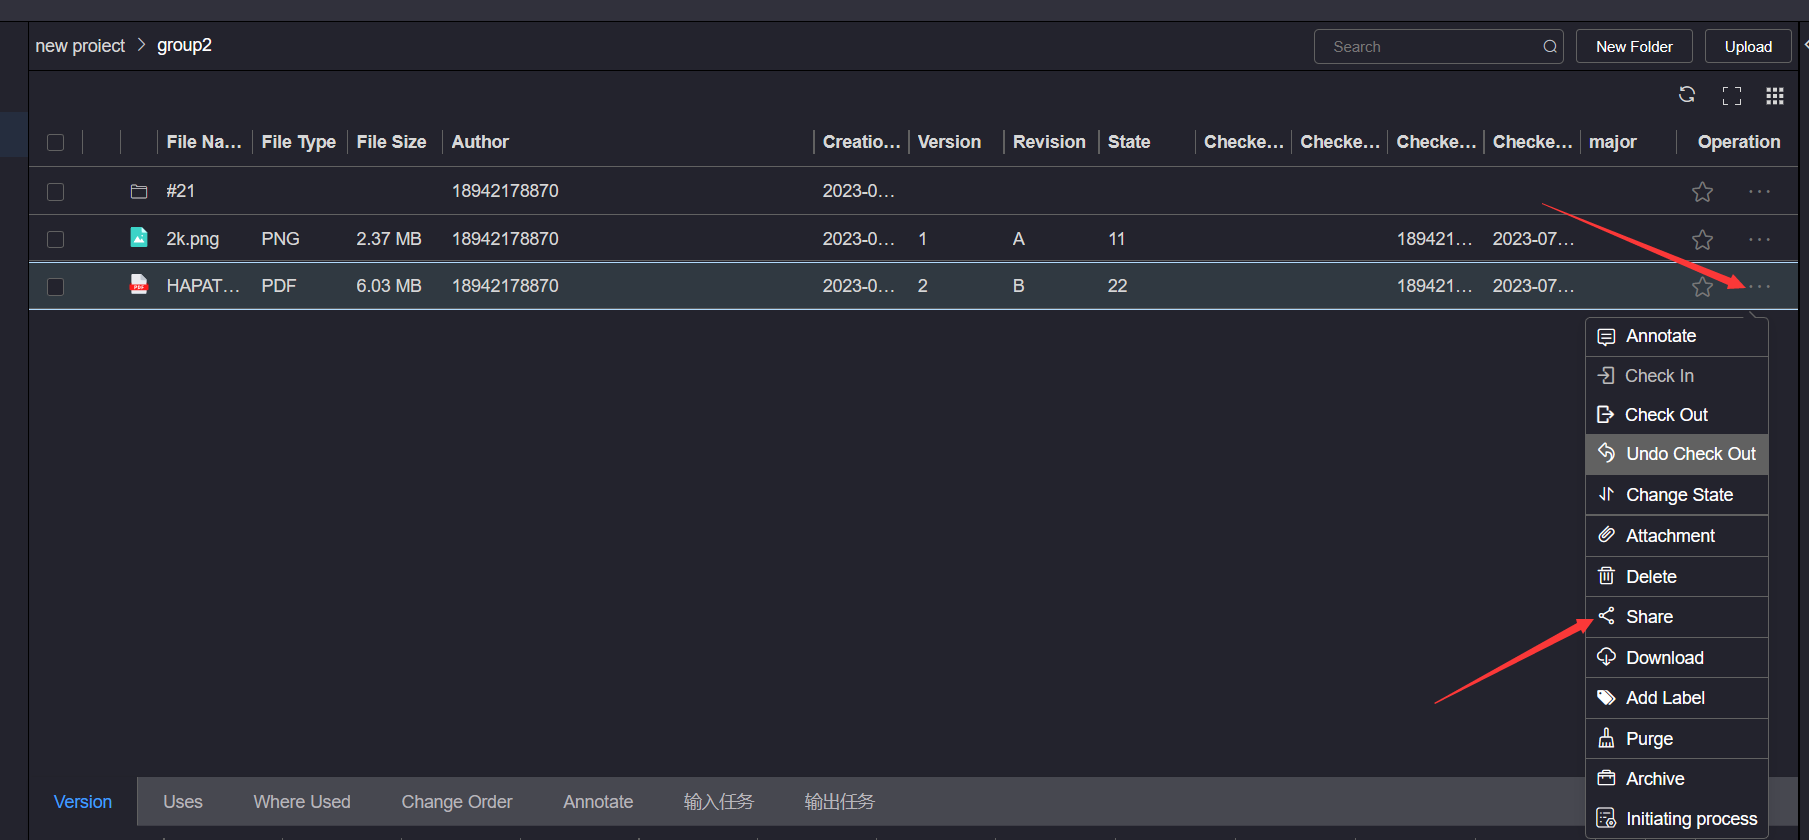
Set the The period of validity and Operation, and then click the The Link button, wait for the sharing link to be generated, and then click the Copy Link button
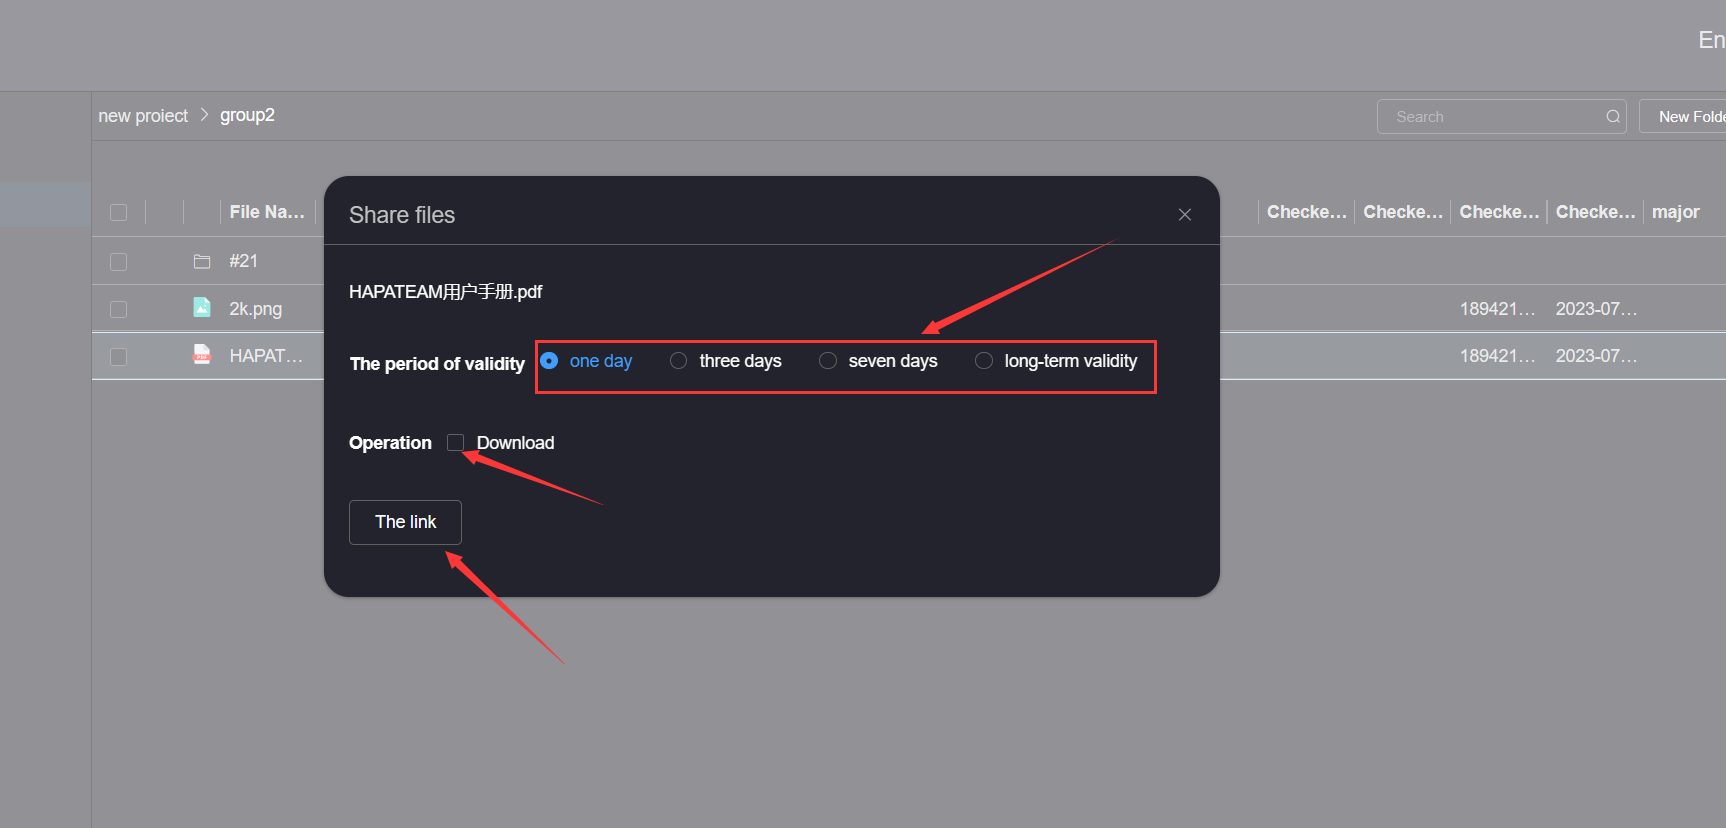
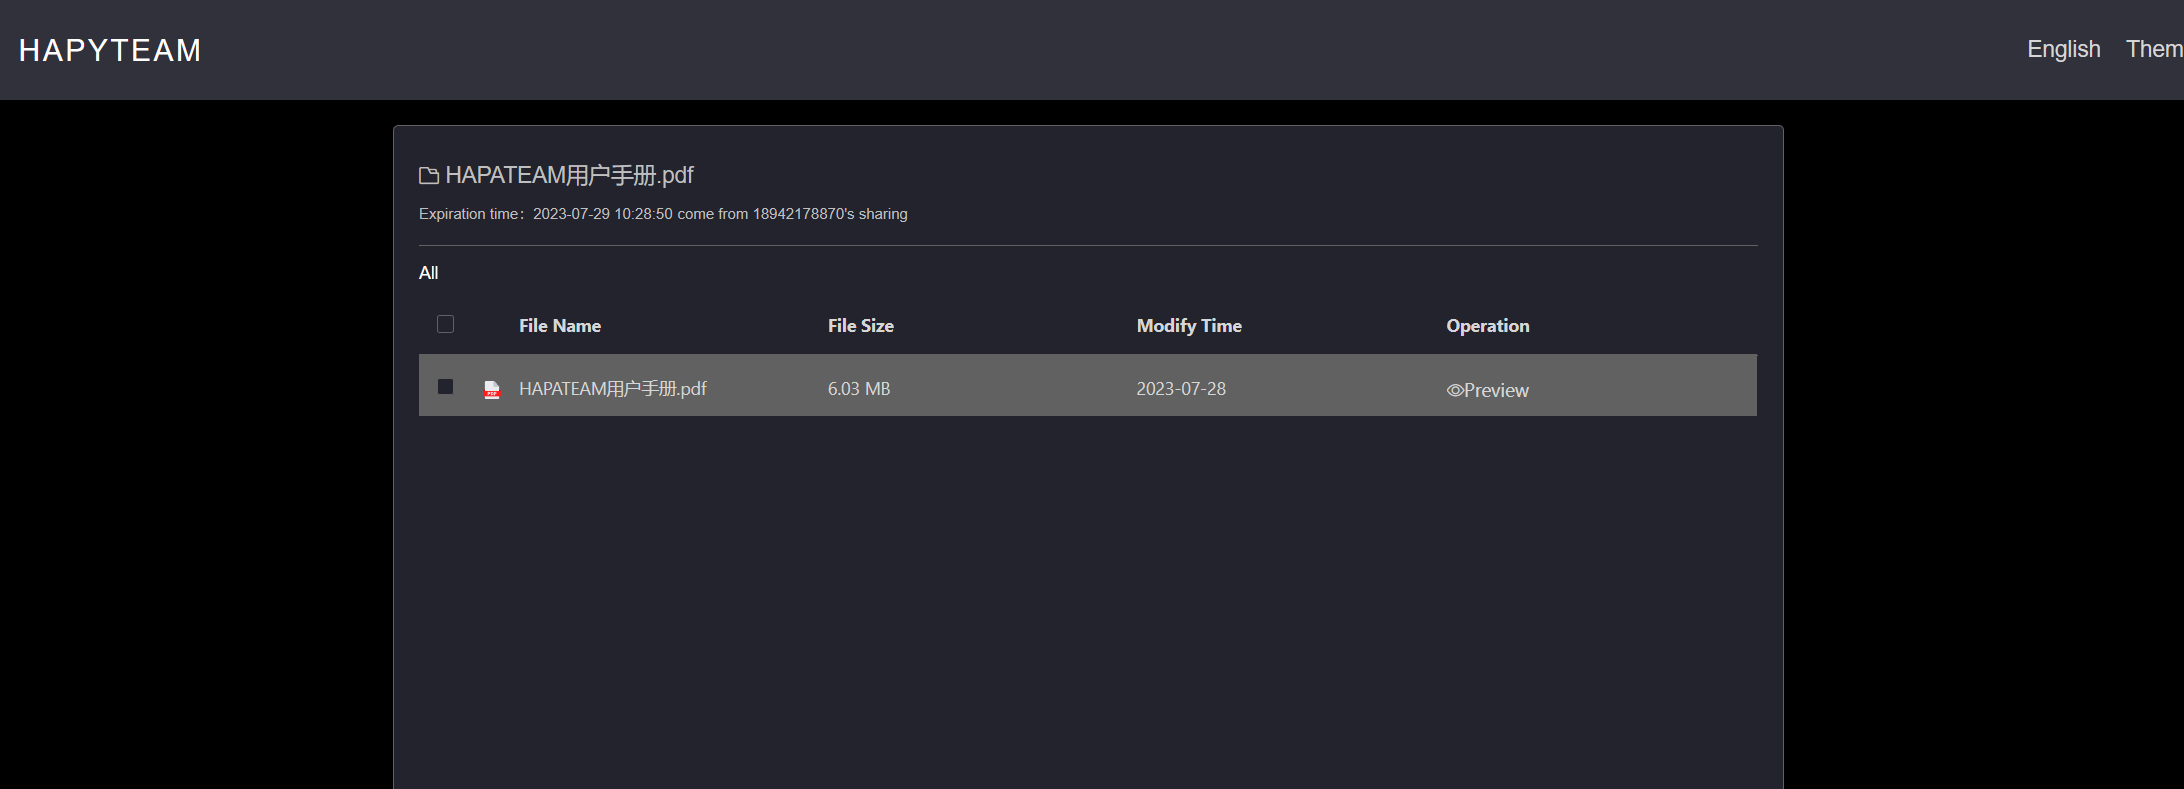
Open the link in the browser, log in to the user, wait for the download interface to pop up, and click the Preview button to Preview the
shared file
# 7.Download
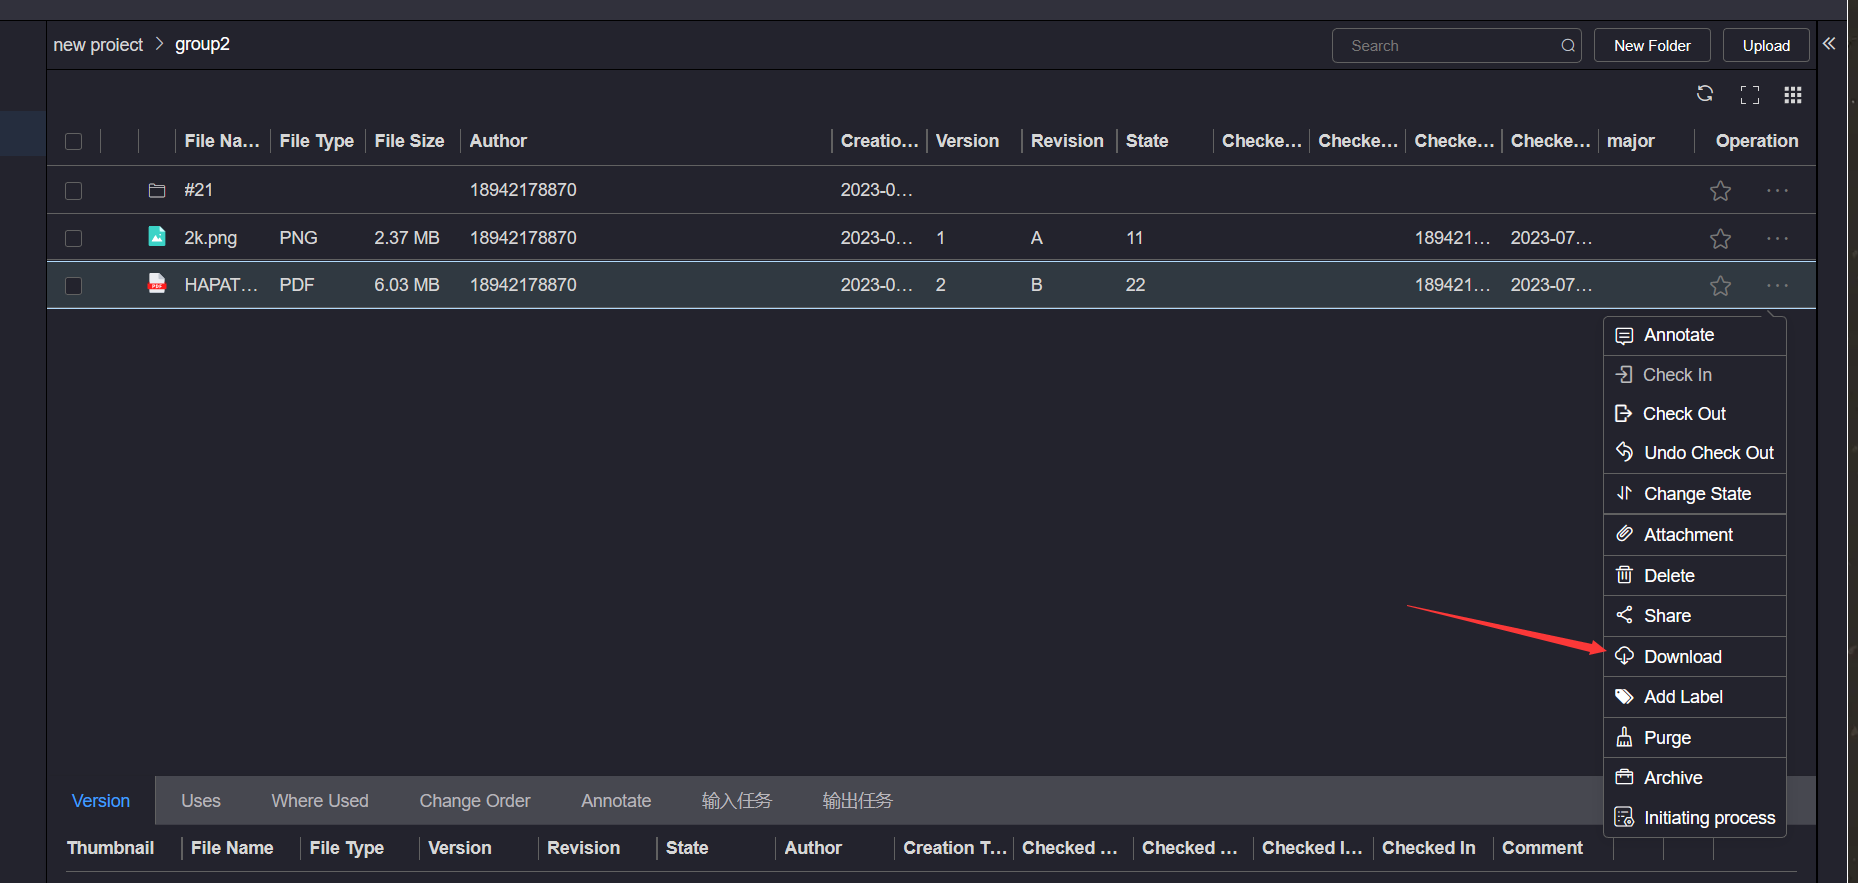
To download a file, click the More Operations button of the file to be downloaded, and click the Download button. The file will be downloaded
automatically after the operation is successful
# 8.Purge
The file cleaning version can clear the non-critical version of the file to facilitate the version management of the file pair; Click the More Operations button of the version file to be cleaned, and click the Purge button
If there is no cleanable version of the file, a prompt message that there is no cleanable version of the file will pop up
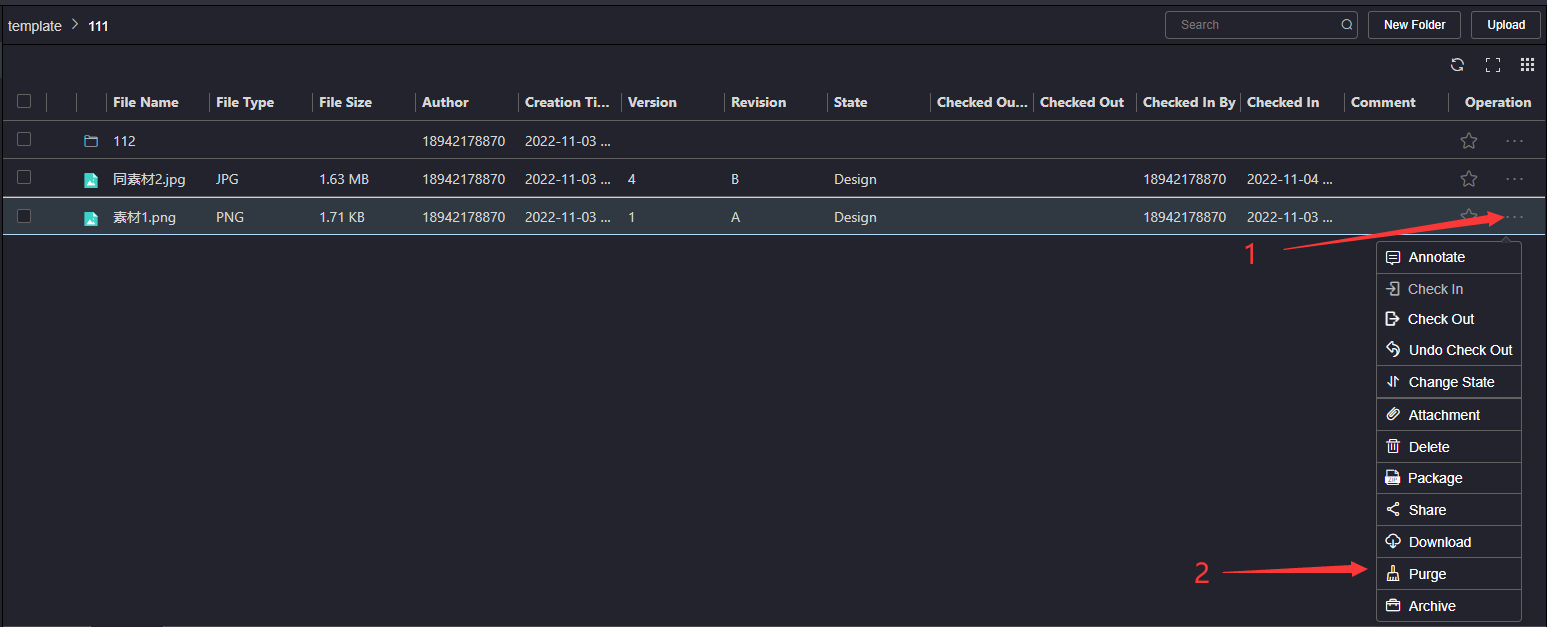
If there is a cleanable version of the file, the cleanable version pop-up window will pop up, click and check the version to be cleaned, click the Submit button, and wait for the prompt information
When a file has a version, the version cannot be cleaned
When a file has more than one version, other versions other than the latest version can be cleaned up
When a version file is referenced by other files, this version file cannot be cleaned up
When the version file lifecycle is in the upgrade workflow node of the lifecycle, this version cannot be cleaned up
When a version of a file is labeled, it cannot be cleaned up
# 9.Archive
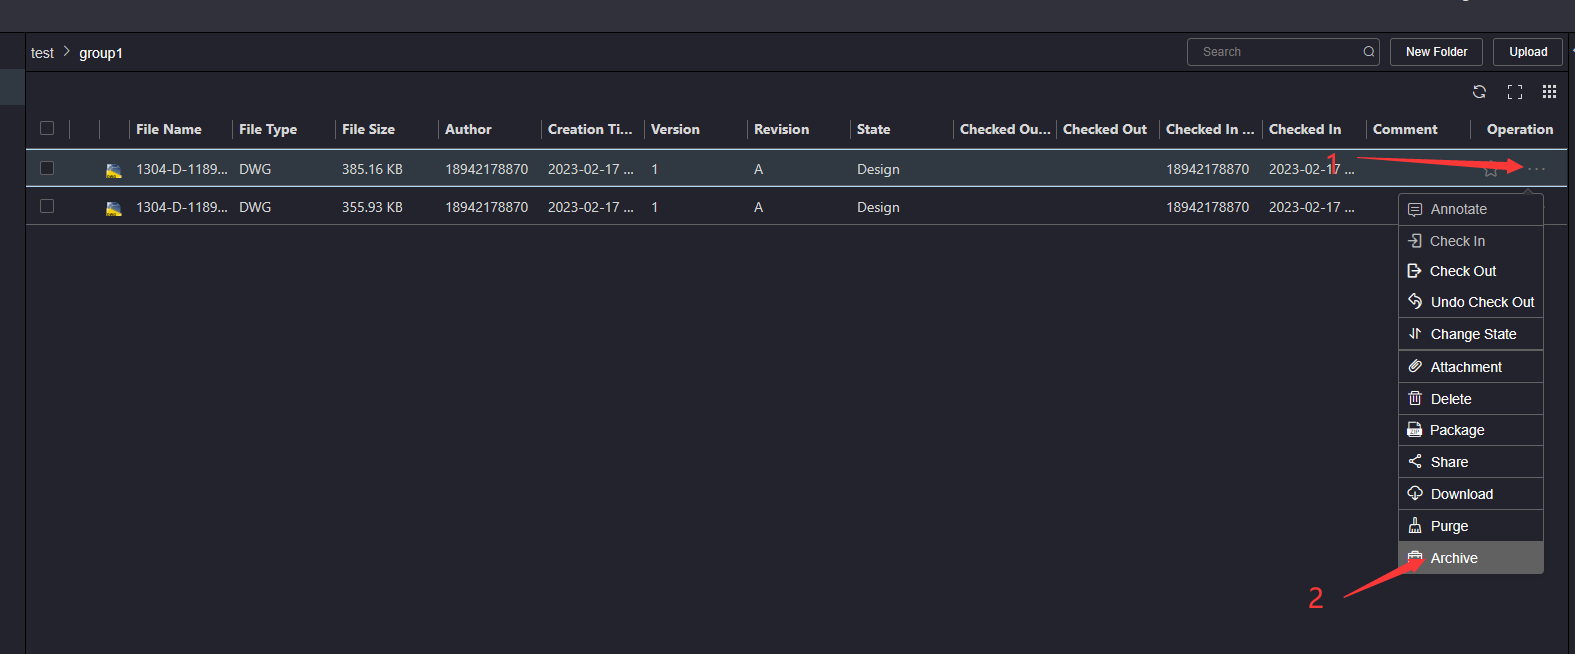
Click the More Operations button in the operation column of the file to be archived, wait for the operation list to appear, click the Archive option, and wait for the archiving completion prompt message
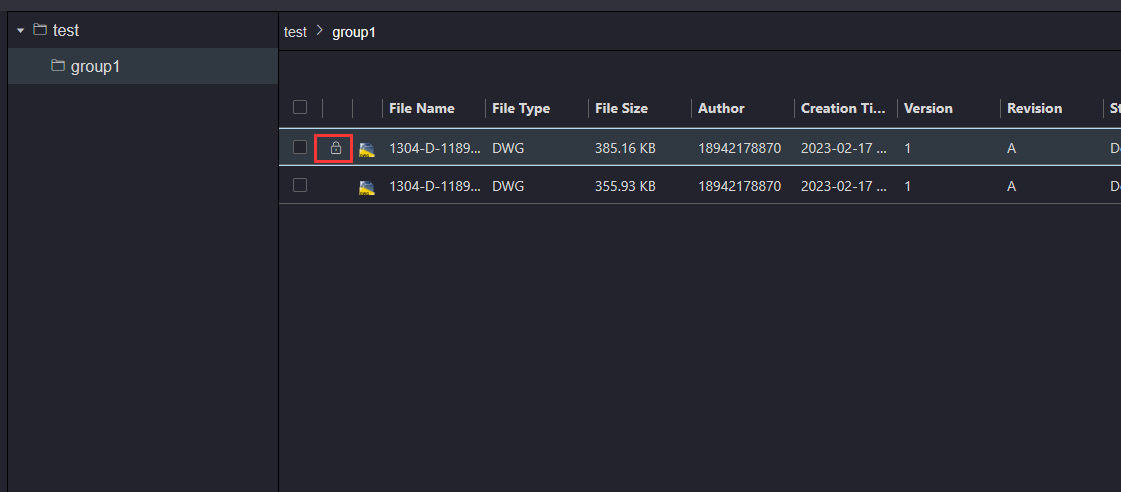
Only files that have not been checked out can be archived. After archiving, the file will appear with the archived status flag. The archived file can only be packaged, downloaded, shared, and archived
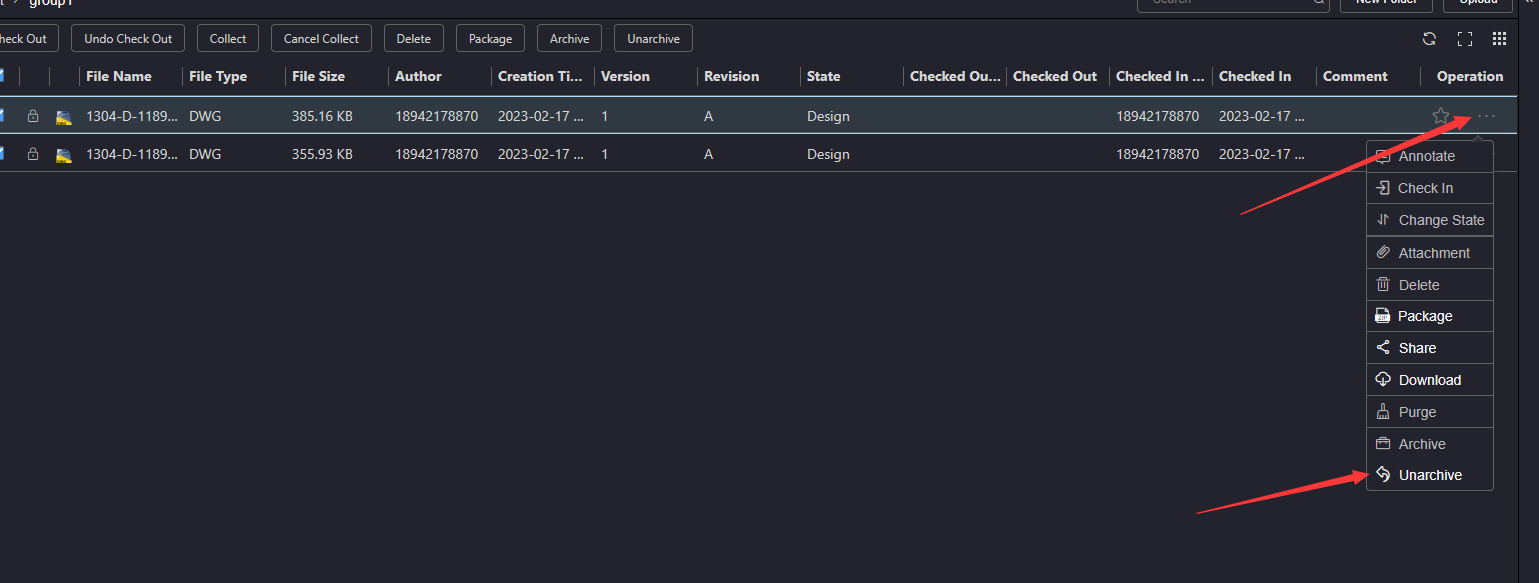
Click the More operations button in the operation column of the archived file line, wait for the operation list to appear, click the Unarchive option, and wait for the prompt message of completing the cancellation archiving
Only archived files can be undone
# 10.Add Label
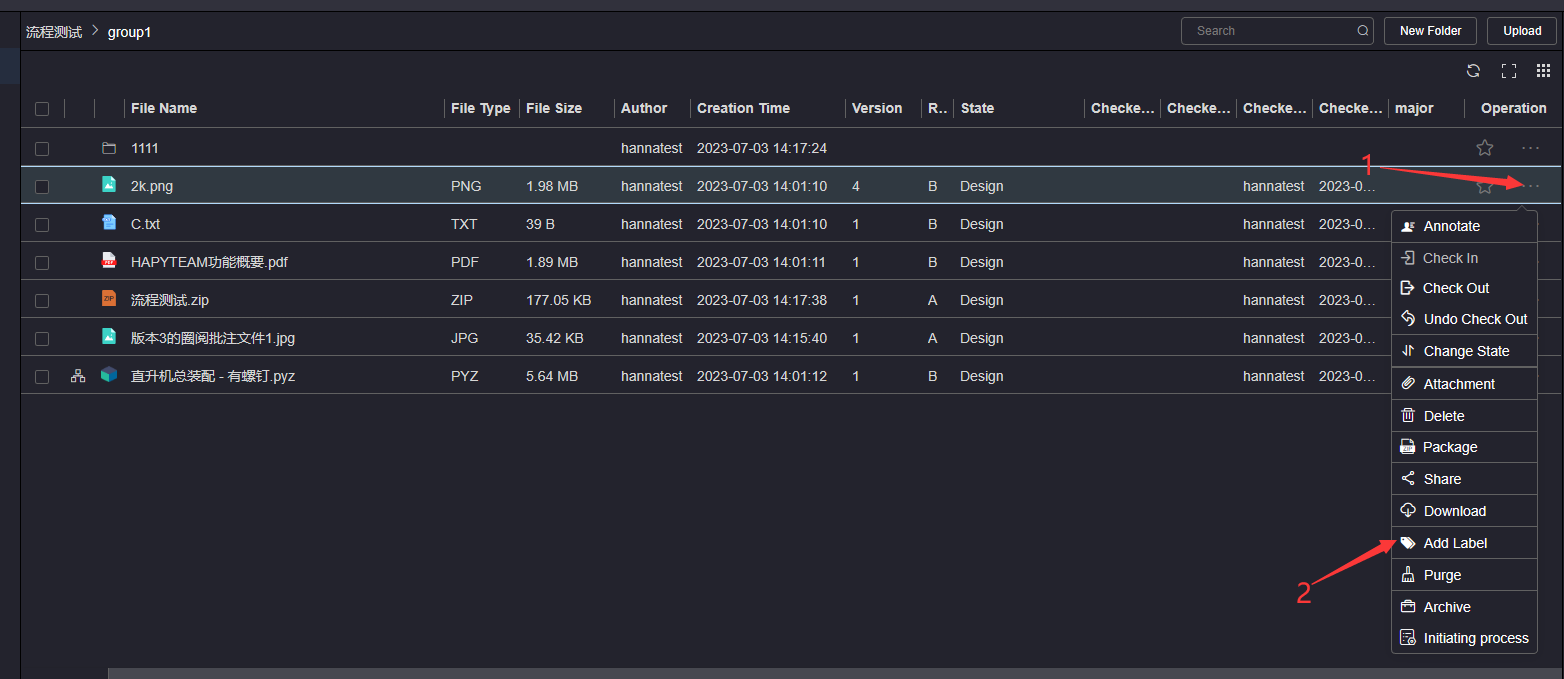
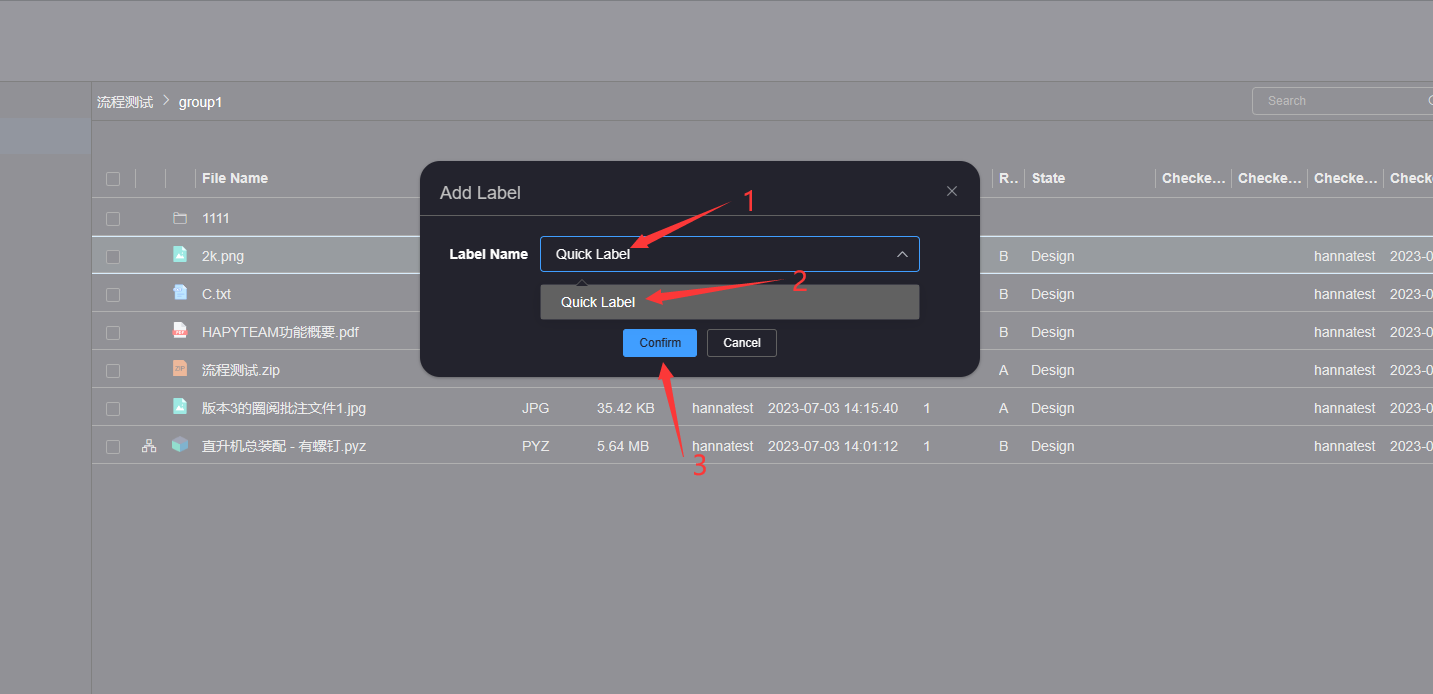
In the file list, click the More Actions button for the file you want to add a label to, click the Add Label,
and a pop-up window will pop up. After entering the label name, click the label name Then click the confirm
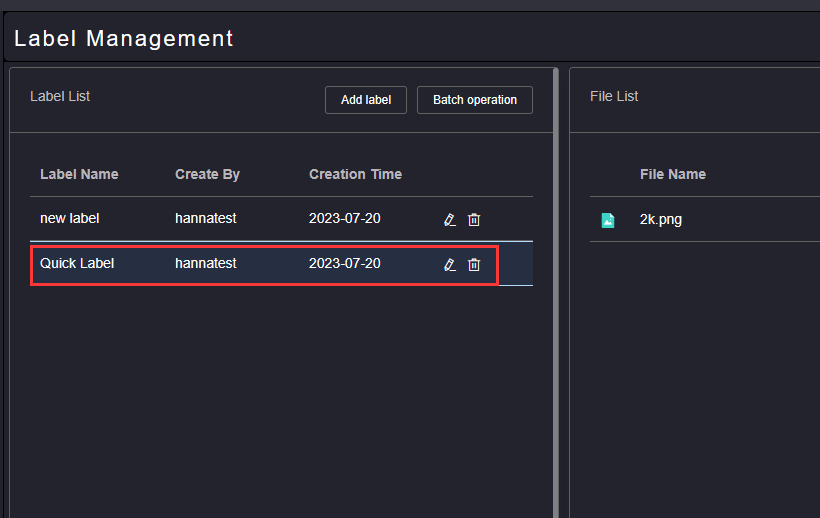
button, the label is successfully added, and the newly added label can be viewed in the label list
# 8.Annotate
Please refer to the operation of circling commentsCircle comments
# 9.WorkFlow
# 1.Maintain Lifecycle
If you are an enterprise user, you need to log in to the Enterprise Super Administrator or Regular Administrator account, click the Settings button on the left, and on the Life Cycle tab page, create or Maintain lifecycle templates,You can click Lifecycle Template Understand the detailed operation steps

# 2.Configure The Lifecycle In The Project
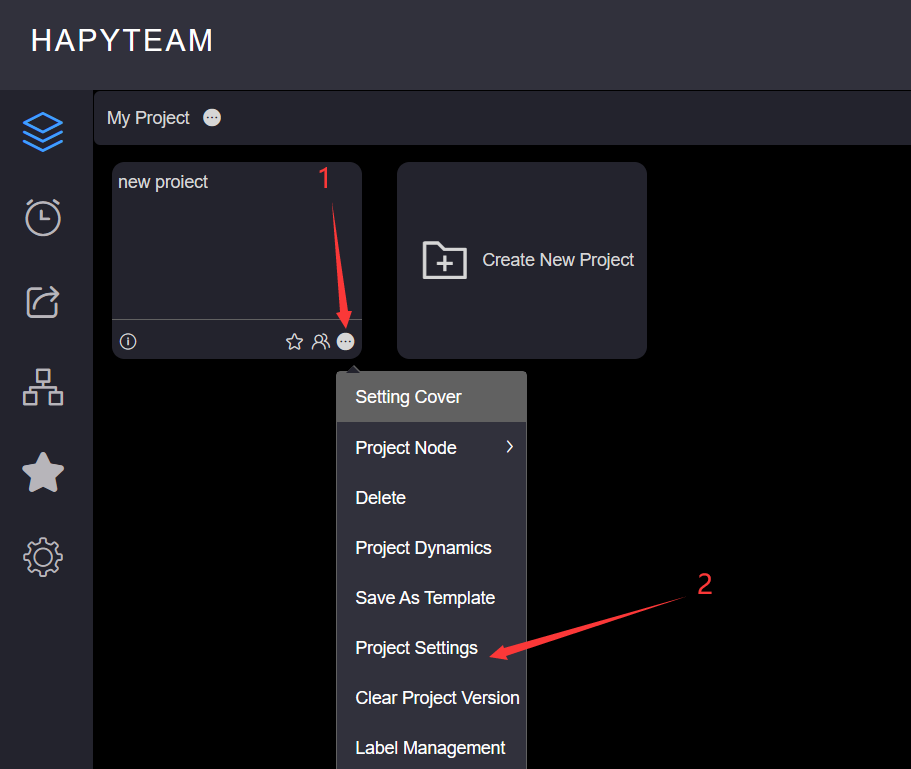
After maintaining the lifecycle template, you need to log in to your project manager account and configure this lifecycle template in Project Settings��You can click Configure The Lifecycle In The Project Understand the detailed operation steps
# 3.Configure Lifecycle On Directory
After configuring the lifecycle template in the project, you also need to configure the lifecycle template and lifecycle node approver you need to use on the specific project directory�� You can clickConfigure Lifecycle On Directory Understand the detailed operation steps

# 4.Initiate The Process
At this point, your process configuration has been completed. When initiating the process, if you have configured a lifecycle node approver in step 3, the approver will automatically fill in the personnel you have configured; If you did not configure in step 3,If the lifecycle node controller initiates the process, you need to manually designate the process approval personnel;You can click Initiate The Process Understand the detailed operation steps
# 10.Task order initiation and processing (Enterprise)
# 1.Configure professional and task roles
Log in to the enterprise administrator account and maintain the profession in enterprise management. The maintenance profession can refer to Specialty

Then maintain the role, which can refer to the Task Role Definition
For the configuration of any role, we recommend that you directly use the three built-in task roles in the system. If you need to customize or modify task roles, please contact Hapyteam technicians for technical guidance to prevent damage to your data

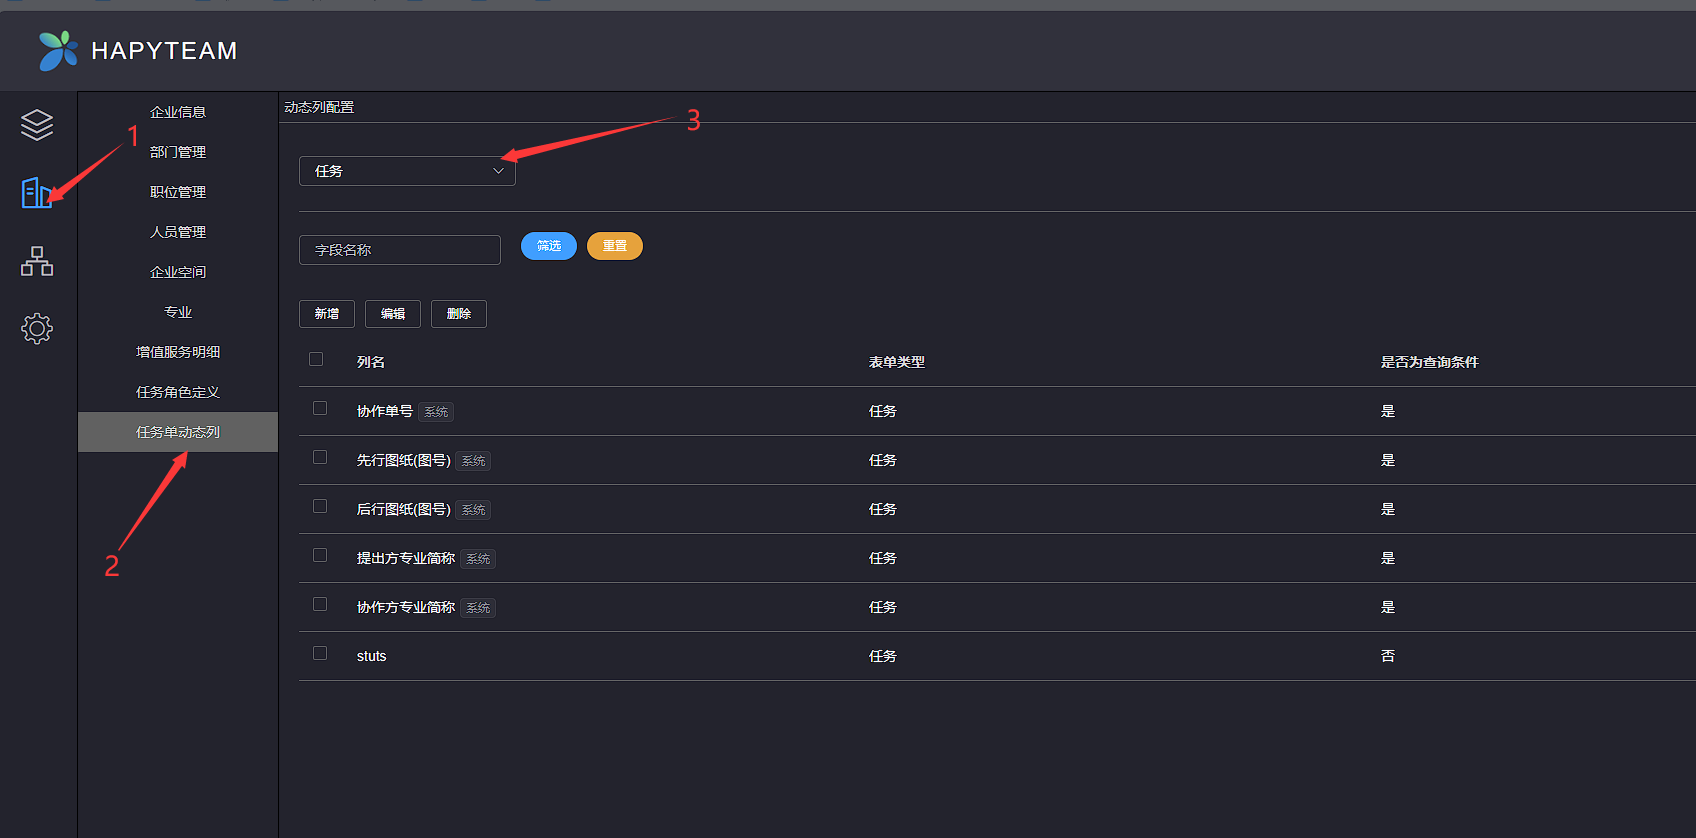
Then maintain the dynamic columns of the task sheet and the drawing plan, which can be referred to as the Task Sheet Dynamic Column��Dynamic Column of Drawing Plan
# 2.Configure project member specialties and roles
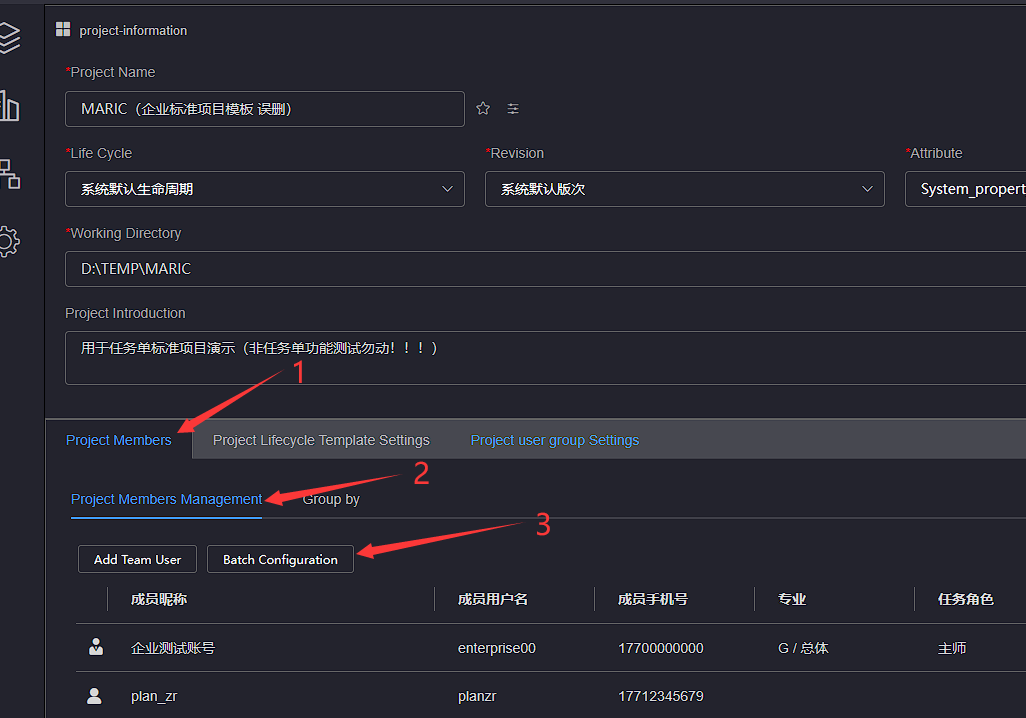
Configure the specialties and roles of project members in the member management section of the project settings page, refer to Batch Configuration of Users
# 3.Professional Profile Directory
On the file directory setting page within the project, configure the file directory profession

# 4.Upload files
Upload the first or second line drawings corresponding to the task order in the corresponding file directory within the project

# 5.Upload task sheets and match files
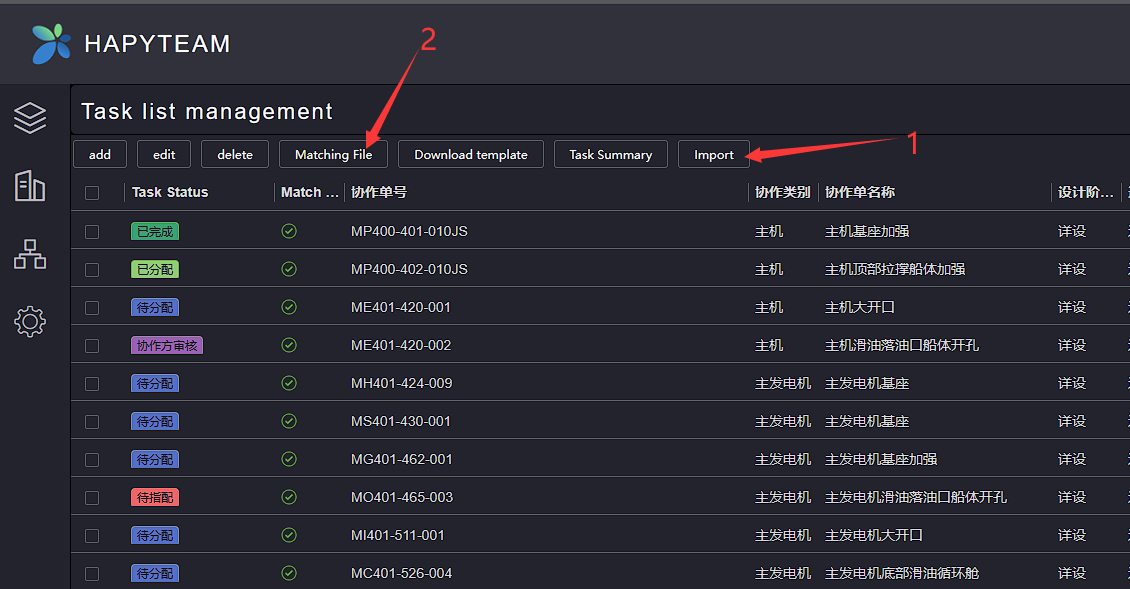
On the task list management page, download and maintain the task list content, then upload the task list and match the file; Upload Task Sheet Reference Upload Task Sheet,Matching file reference Matching file
# 6.Originating Task
Click to enter the file directory where the project's preliminary drawings are located, click to select the output task tab of the file, and you can view the task list that matches the file

Click the Initiate operation button on the right side of the task sheet to initiate a collaborative task Only task roles with task assignment permissions can initiate collaborative tasks

# 7.Upload or download task attachments
After the task is initiated, you can view the pending collaborative tasks on the to-do page of the assigned task handler. Click the Process button to enter the task processing page

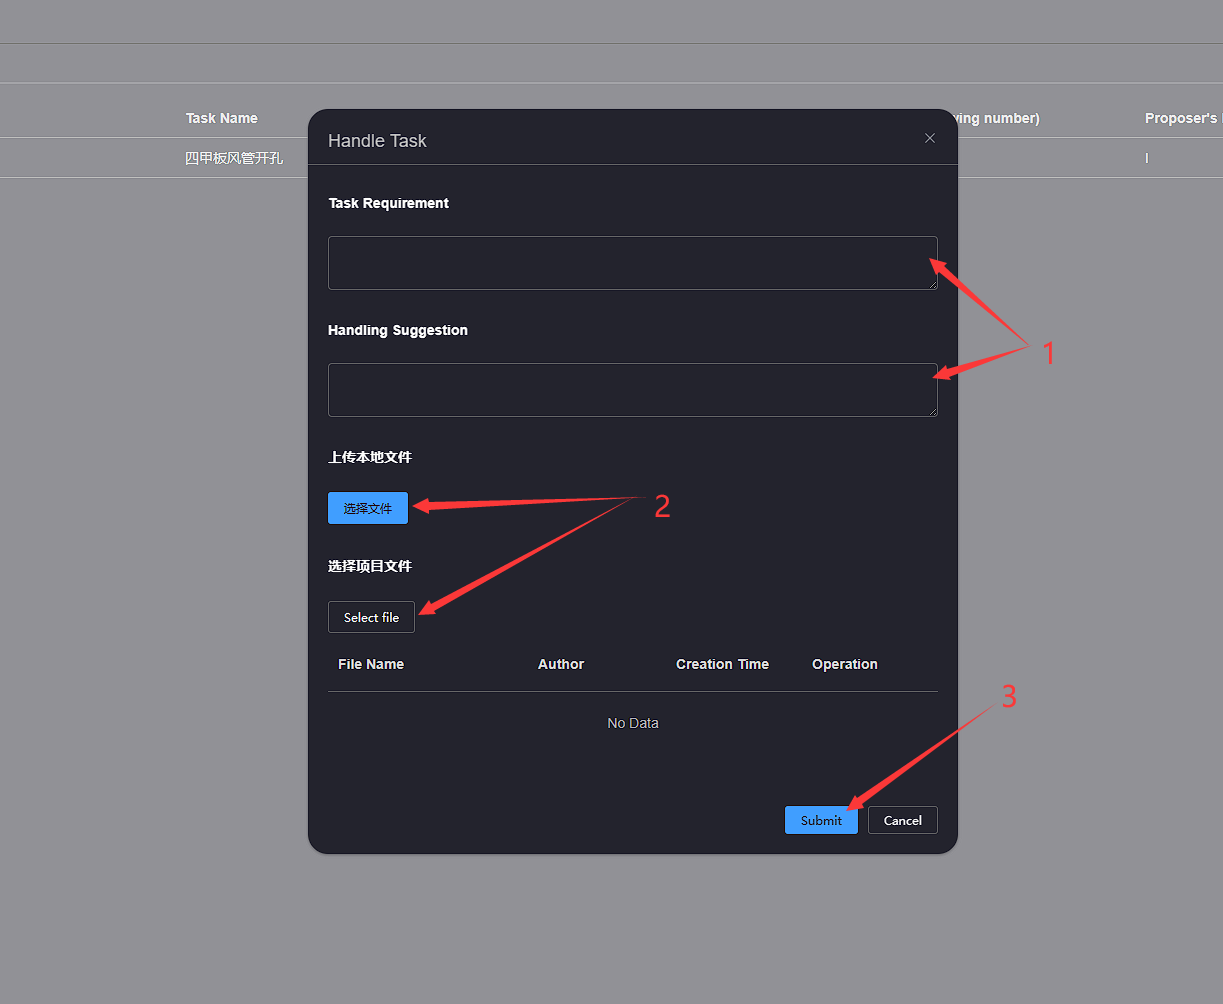
On the task processing page, you can choose to upload local files or directly select files within the project as task attachments
On the to-do page, click the Task History button to enter the task list history page. Check the task list file you want to download, then click the Batch Download button and wait for the download to complete
If the current user does not have permission to download files within the project, these files will not be downloaded when downloading the task attachment


# 8.Abandon and reset tasks
In any state of the task sheet, click the Operation button on the right side of the task sheet, and click the Abandon option to discard the task sheet. After discarding the task sheet, it will be in an abandoned state

Click the Operation button on the right side of the abandoned task order, and click the Reset option to reset the task order status to pending allocation Only roles with task abandonment and task reset permissions can abandon and reset task orders

# 11.Initiate And Processing Quick Collaboration
# 1.Create Quick Collaboration Template
Enterprise users can log in to their enterprise administrator or super administrator accounts, while regular users can log in to their personal accounts. They can create quick collaboration templates in Setting - Rapid Collaboration, which can be referenced for creating quick collaboration templatesCreate Quick Collaboration Template
# 2.Create Quick Collaboration
Log in to the project member account, create a quick collaboration in the project menu Quick Collaboration, and create a quick collaboration referenceCreate Quick Collaboration
# 3.Processing Quick Collaboration
After creating a quick collaboration, the default handler for the starting node is the creator of the quick collaboration, while the handlers for other nodes are the ones specified by the user; Login to quickly collaborate with the current node processor account, in the project menu Quick Collaboration Processing Quick Collaboration, Processing Quick Collaboration Reference Processing Quick Collaboration
# 4.Change State
When the quick collaboration flow reaches the end node, it is necessary to reset the quick collaboration from the end node to the start node. The quick collaboration creator account needs to be logged in to change the current status of the quick collaboration from OPEN to CLOSED. Changing the task order status can be done referenceChange State
# 5.Reset Quick Collaboration
When Quick Collaboration is abandoned or the Quick Collaboration status is set to CLOSED, log in to the Quick Collaboration creator account, reset Quick Collaboration in the project menu Quick Collaboration - Processing, and reset Quick Collaboration Processing Quick Collaboration
# 12.Security Levels Config And Use��Enterprise��
# 1.Enable And Configure Security Levels
To use the enterprise version feature with a security level, you need to first log in to the enterprise administrator or super administrator account, and enable and configure the security level in Enterprise - Security levels and other. Please refer toClassification management
# 2.Set User Security Level
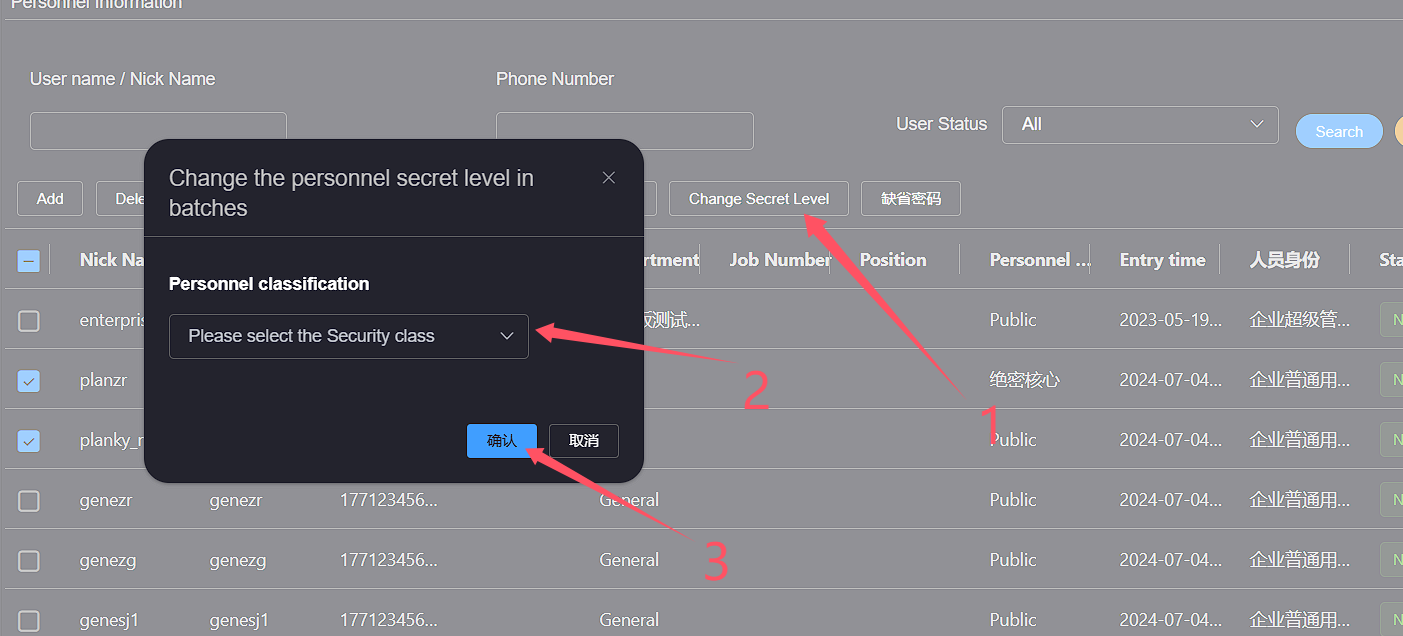
After enabling and configuring the security level of the enterprise, log in to the enterprise administrator or super administrator account, click the Enterprise button on the left, and then click the Personnel Management option to enter the enterprise personnel management page, in the enterprise personnel list You can view the corresponding confidentiality level of enterprise personnel
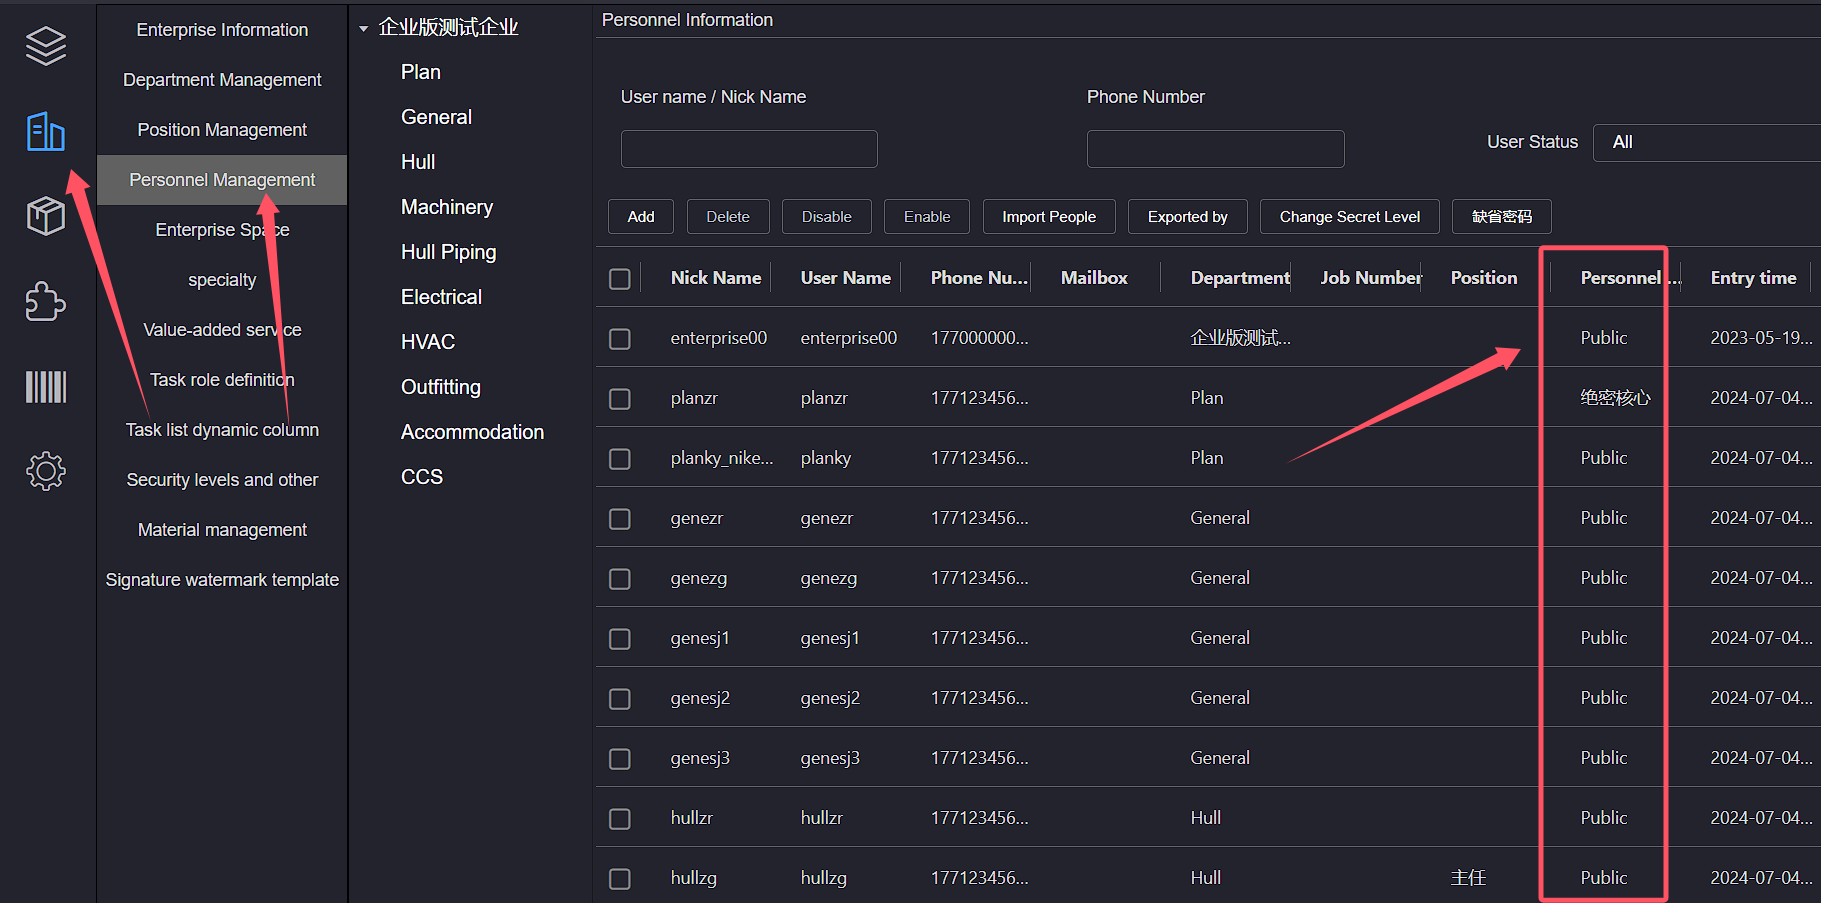
Select the personnel to set the security level, then click the Change secret Level button on the top toolbar to bring up a pop-up window for modifying the security level. Then click the Personnel classification list box, select the security level, and click the Confirm button to change the personnel security level Setting successful
The default confidentiality level for enterprise personnel is level one, which is public
# 3.Set File Security Level
After the enterprise activates the security level and sets the user's security level, the user logs into the account and uploads files in the project. In the file upload interface, click on the Select Security Level list box, select the corresponding security level, and then click the Upload File button Waiting for file upload to complete
The default confidentiality level for project files is level one, which is public
Be careful!!! Once the file confidentiality level is set, it cannot be modified. Please operate with caution
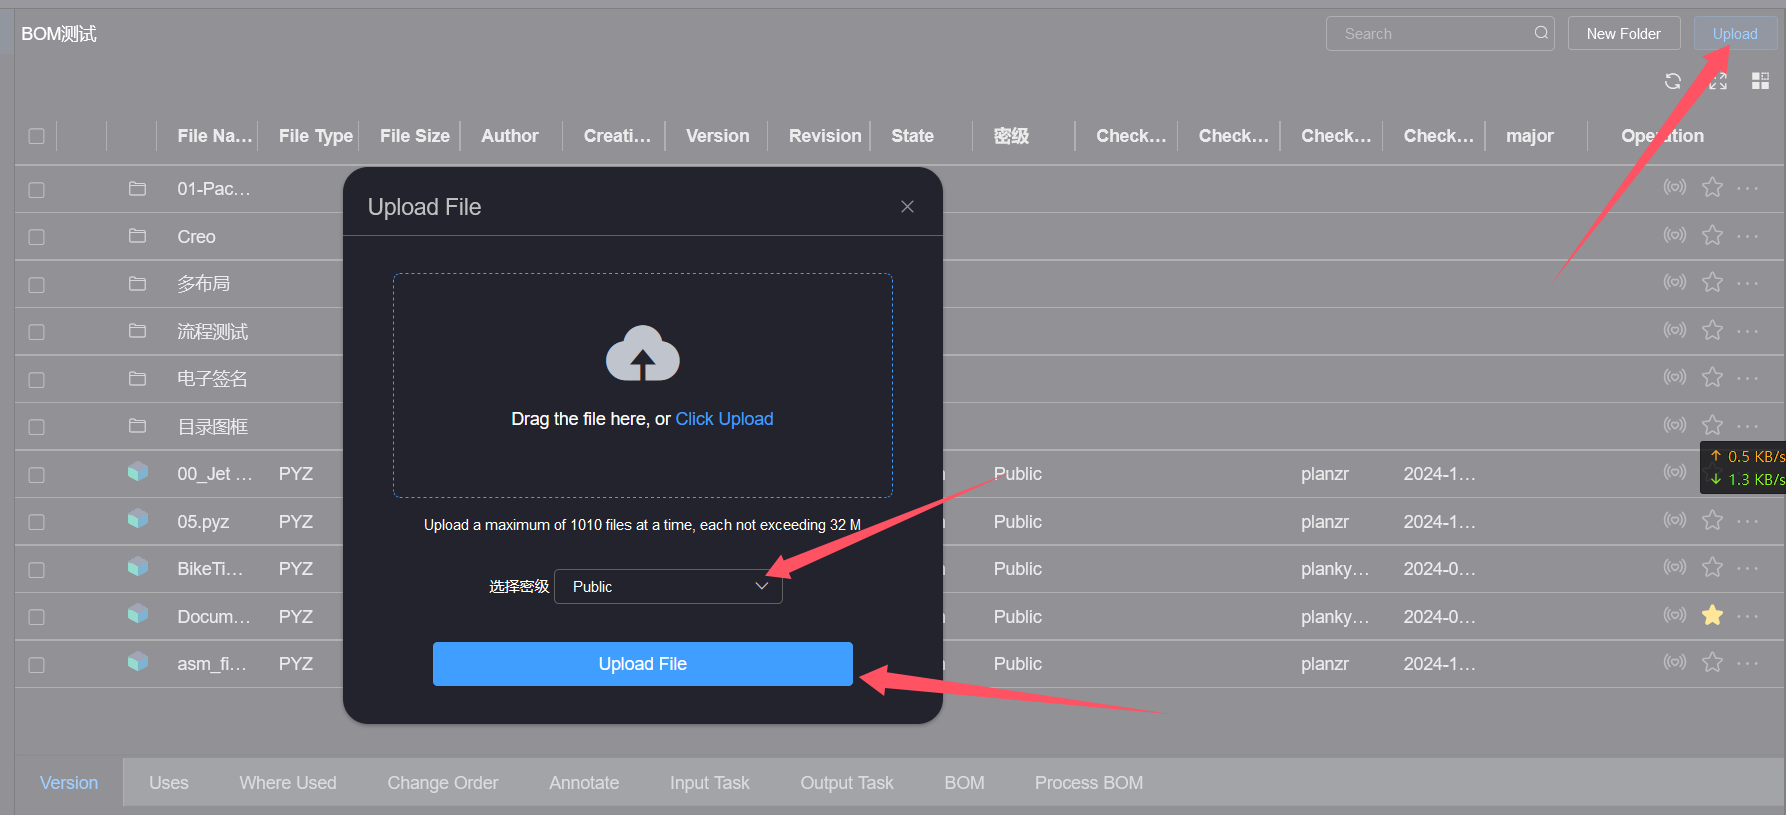
After uploading, you can view the corresponding confidentiality level of the file in the file list
Users can only view files with a confidentiality level less than or equal to their own

# 13.Set Enterprise Administrator(Enterprise)
Enterprise administrator is a role of enterprise super administrator that removes the permission to delete projects. Apart from not being able to delete projects, there is no other difference between enterprise administrator and enterprise super administrator
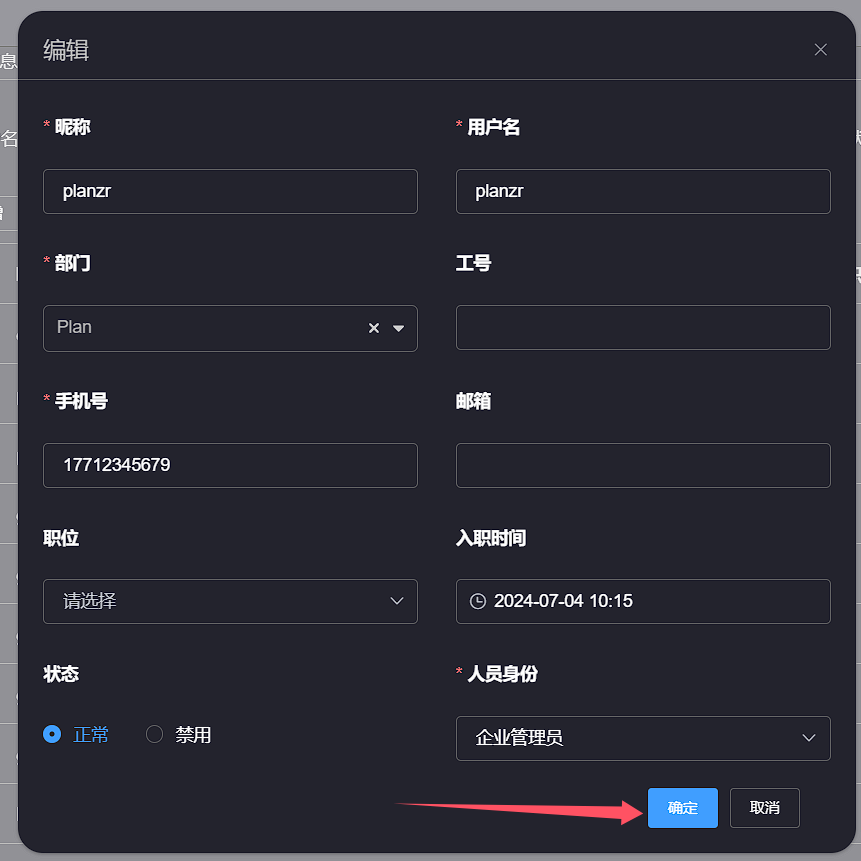
Log in to the enterprise super administrator account, click on the Enterprise button on the left, then click on the Personnel Management option. In the personnel list on the right, click on the Edit button on the right operation bar of the personnel you want to specify as the enterprise administrator, and a personnel editing window will pop up
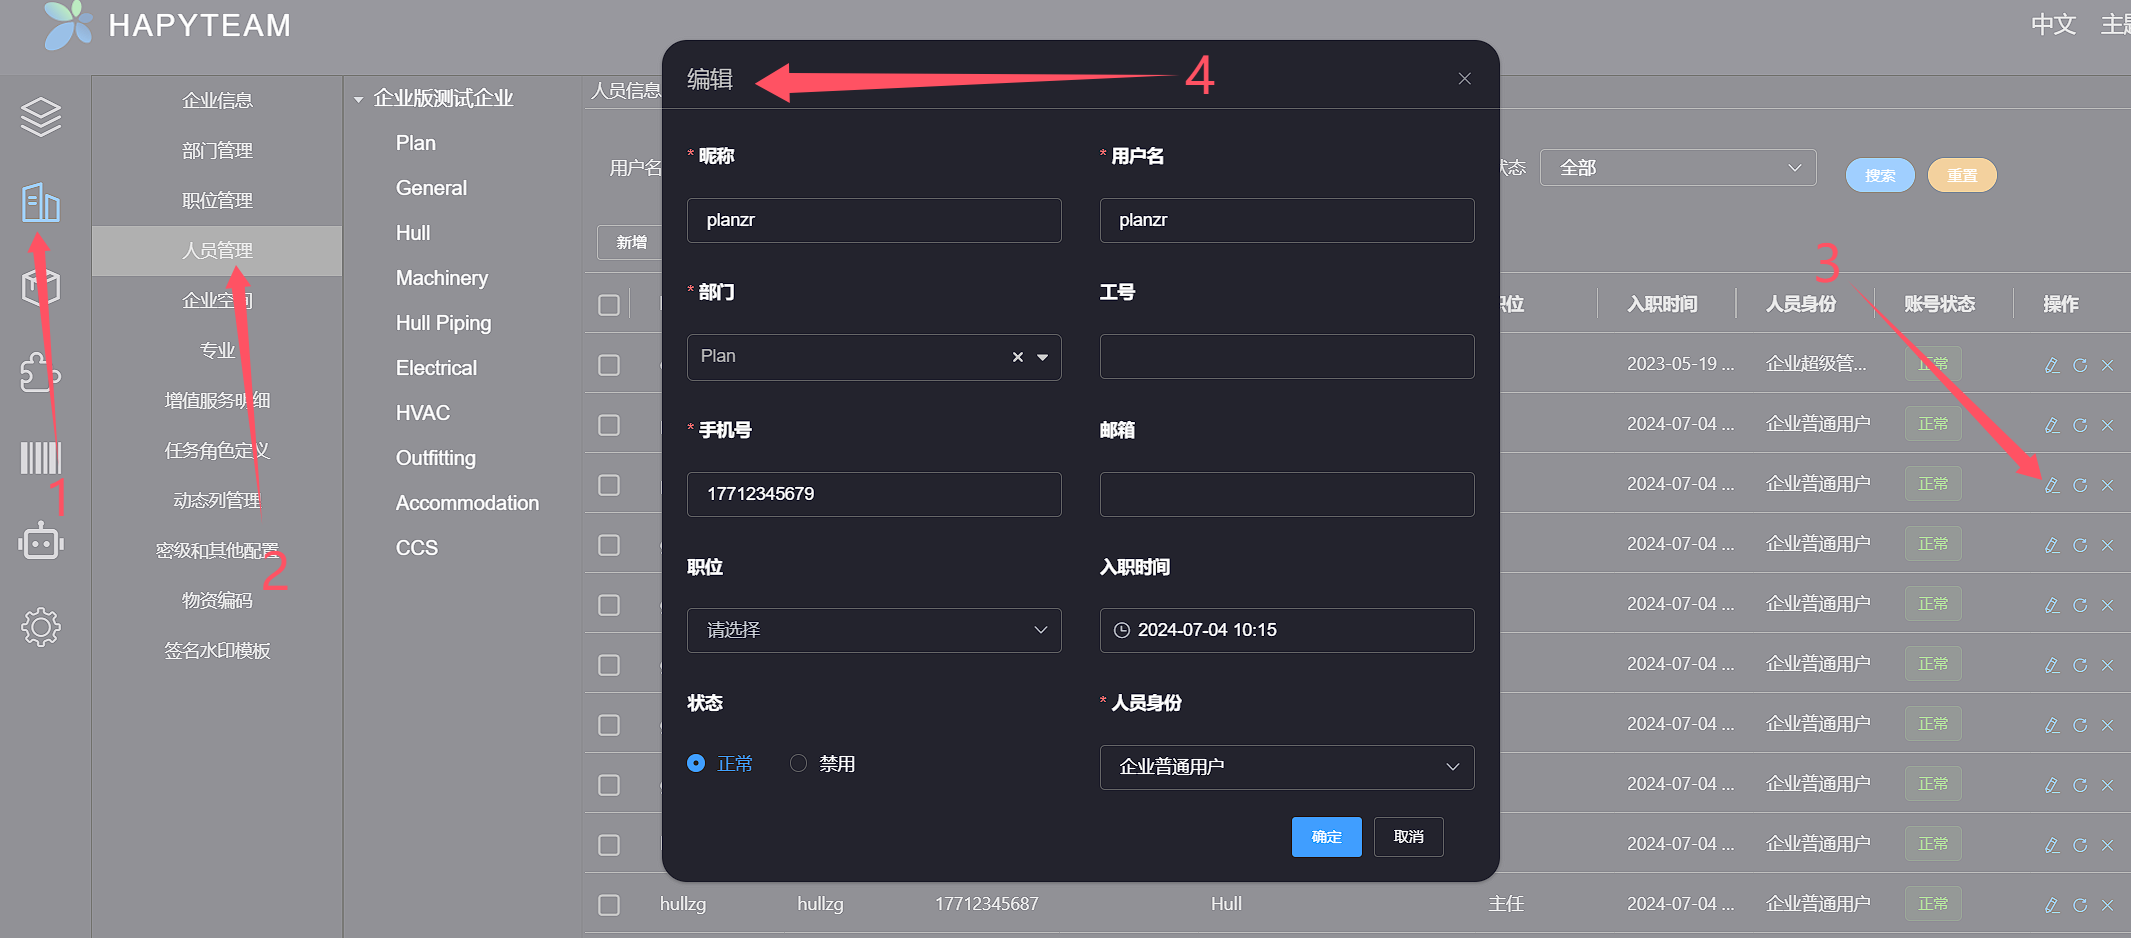
Editor Personnel Identity dropdown list in the bottom right corner of the editing window, click on the Enterprise Administrator option
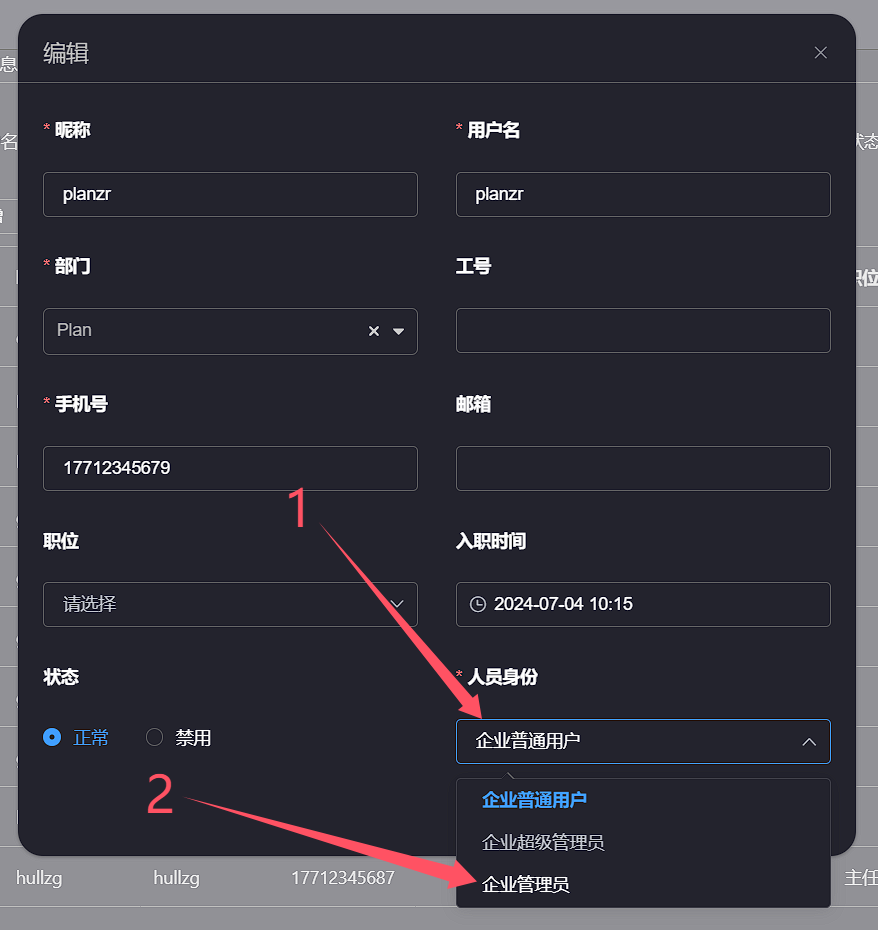
After setting the personnel identity, click the Confirm button and wait for a successful operation prompt message to pop up. The enterprise administrator has completed the setting
