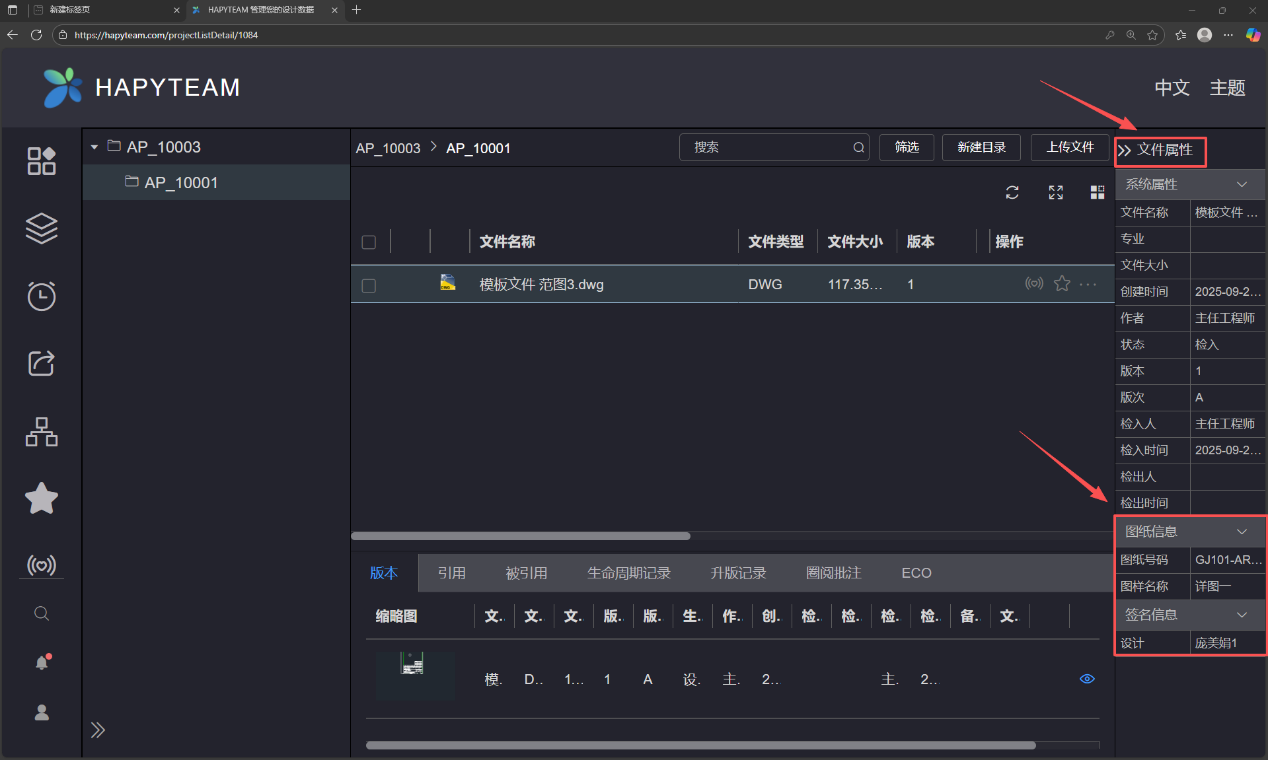
# HAPYTEAM 2D CAD Application Getting Started
# 1. Download and Installation Applications
From the hapyteam.com homepage, scroll down, menu: Technical Support -> Downloads,
 Or you can directly find the corresponding 2D CAD software from https://hapyteam.com/download (opens new window) to
download the latest version.
Currently, HAPYTEAM supports three 2D CAD platforms: AutoCAD /ZWCAD/ GStarCAD .
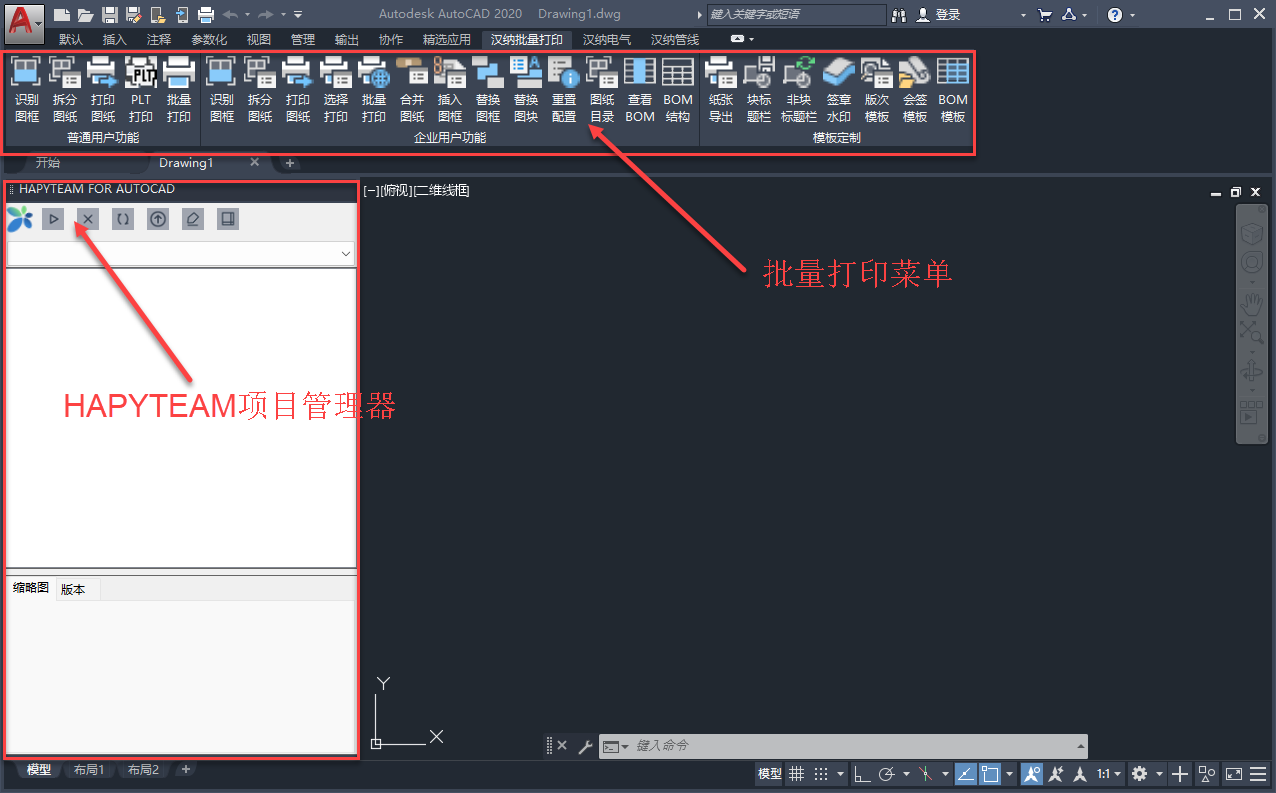
 After the installation is complete, restart the corresponding CAD and you will see the following Batch Plot menu and HAPYTEAM Project
Manager. The operations of the three CAD platforms are exactly the same. AutoCAD platform will be used in the following introduction.
# 2. Log in
Click the Login button of the Hapyteam Project Manager.

The program will pop up the following dialog box
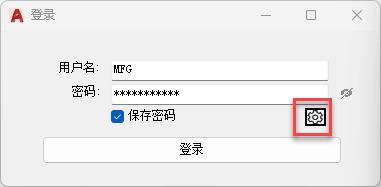
Under normal circumstances, enter the user name and password, and the program will automatically log in to the HAPYTEAM server. If it
is a private deployment, click the settings button in the lower right corner.
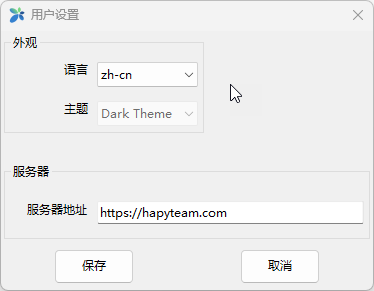
Enter the IP address of the company's server , such as 192.168.1.8. If you need to switch the theme and language, select the
corresponding option.
After logging in, the program will automatically switch to the project you were working on during the last login.
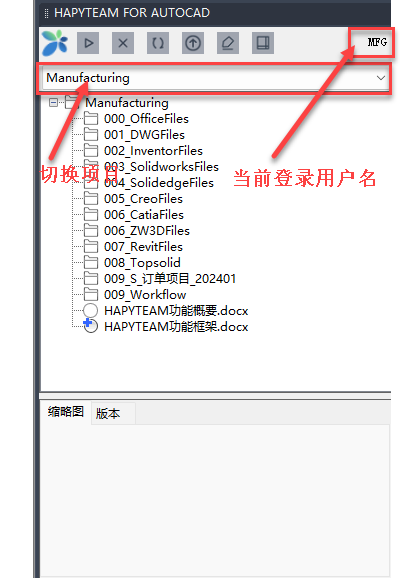
Explanation:
- If the user has multiple projects, you can switch projects from the drop-down selection box.
- In the project file list, if a DWG file is selected, the thumbnail of the file will be displayed in the thumbnail window, and all versions of the file will be displayed in the version list
# 3. Understanding the working folder
HAPYTEAM uses the object-oriented storage system MinIO for file storage. All files are stored in a fragmented manner. There is no concept of folders or directories. Therefore, by setting the working folder of each project, it is automatically mapped to the local working folder.
For personal projects, the creator is the project administrator. For enterprise projects, an enterprise administrator is required
to create the project and at least assign a project manager.
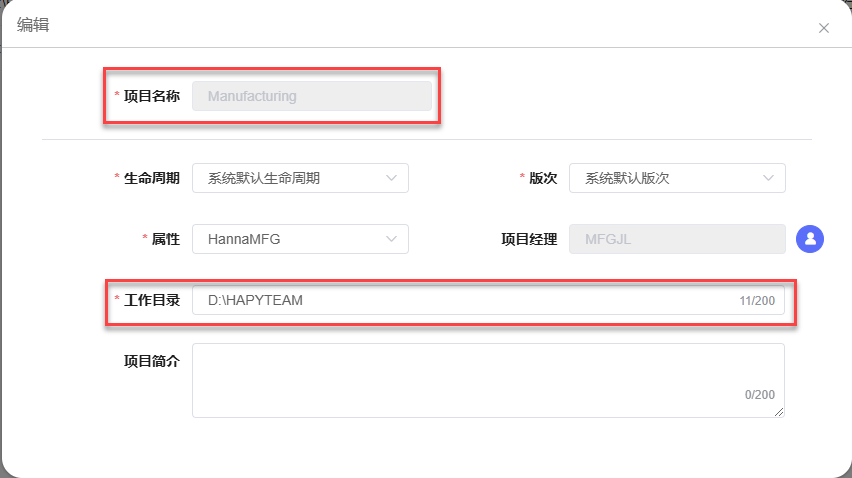
In the above figure, the project name is Manufacturing and the working folder is D: \ HAPYTEAM. Then all local files of all users
of this project correspond to D:\HAPYTEAM\Manufacturing.
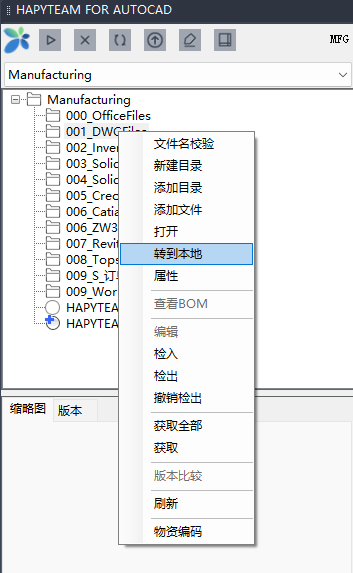
If the project manager has created the corresponding folder on the server, then through the right-click menu on the file or folder
in HAPYTEAM Project manager for CAD, such as the right-click menu of 001_DWGFiles in the project folder, "Go to Local", the program
will automatically check whether there is D:\HAPYTEAM\Manufacturing\001_DWGFiles locally. If there is already such a folder, directly
open the Windows Explorer and automatically switch to the folder. If there is no such folder locally, the program will automatically
create this folder. This function can automatically create a folder that exists on the server but not locally, so as to avoid manual
creation and input errors.
# 4. Commands about the Project Manager
![]()
The icons above are, from left to right: open HAPYTEAM homepage, log in, log out, refresh project, get software updates from server,
annotation, drawing frame list
Log in
User logs in to the HAPYTEAM serverSign out
User logged out from the serverRefresh Project
Refresh the project list and file statusGet updates
Get the latest version from hapyteam.com/downloadAnnotation
Users create review comments in CAD or get review comments related to the file from the server, and modify the drawings based on the comments.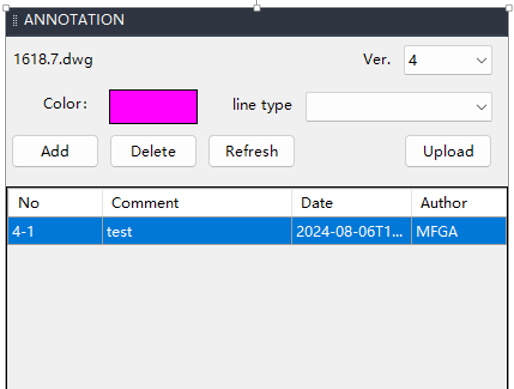
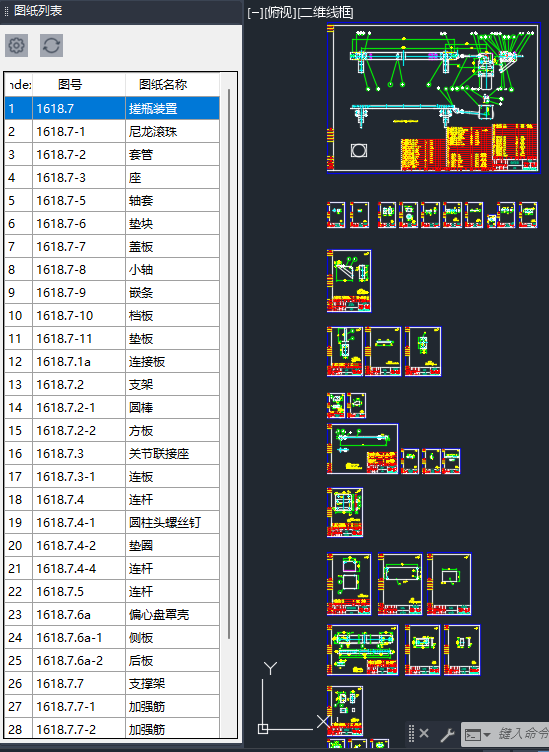
Frame List
If the user has defined the title block (or drawing label) template of the drawing, and defined the corresponding attributes to be extracted from the title block of the drawing, such as drawing number, drawing name, material, weight, etc., they can all be displayed in the drawing list.When the user double-clicks the line, the program will automatically switch the area corresponding to the drawing to the current window and enlarge it to the maximum size, making it convenient for the user to browse and switch the drawing frames.
# 5. Check in and Check out files
Each file in the CAD project manager has a file status. This file status is the superposition of the server and local files. The file
status icon list is as follows
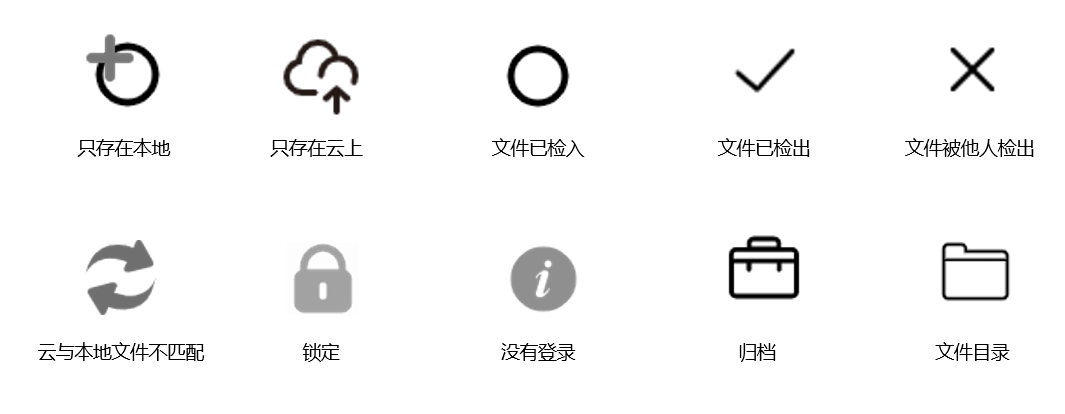
The status of the file is explained as follows:
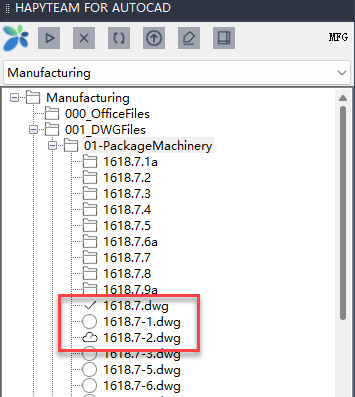
For the above three files, for 1 618.7, the file is checked out by the log-in user. For 1 618.7-1, the file exists both locally and on
the server, and the status is the same. For 1 618.7-2, the file only exists on the server.
If another user logs in, the status of the file list is as follows:
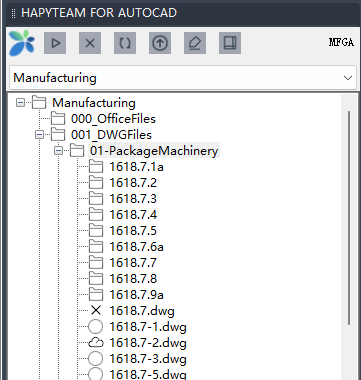
At this time, for the 1618.7 file, it means that the file has been checked out by other users.
# 5.1 Check in files
File check-in is the process of checking local files into the server. At this time, the latest local files are uploaded to the server, and the local files are automatically changed to read-only status.
There are two states: never checked in, and files checked out from the server and checked back in. For files checked out by others, users can only view the previous version and cannot check out or check in.
When a DWG file is checked in, the program will automatically determine whether the file has an external reference file. If so, it will automatically add the file to the check-in list to facilitate the user to check it in together.
If a file's external reference is checked out, modified, and then checked in again, the file's status will indicate that it needs to be updated. At this time, you need to check out the file, update the external reference, save it, and check it in again.
# 5.2 Check out a file
Only files on the server that have not been checked out by others and for which the user has edit permissions can be checked out by the user.
The checkout process actually downloads the latest version of the file from the server, changes the status of the file on the server to checked out, and removes the read-only attribute of the local file to facilitate users to open and edit it.
Similarly, associated files will also be listed in the check-out dialog box to facilitate users to check them out together.
# 6. Other right-click menus
Folder and file right-click menu
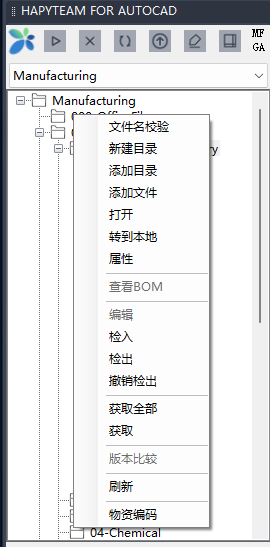
File name verification
This function automatically converts full-width spaces in Chinese file names into half-width spaces in batches.Create a new folder Create a subfolder under the selected folder
Add a folder Batch copy the selected folder, subfolder and files in those folders to this working folder
Add Files Copy files from other directories to the local folder
Open
Go to Local Open the resource manager and automatically switch to the local folder corresponding to the folder
property Open the file properties, similar to the "Properties" in the right-click menu of Windows
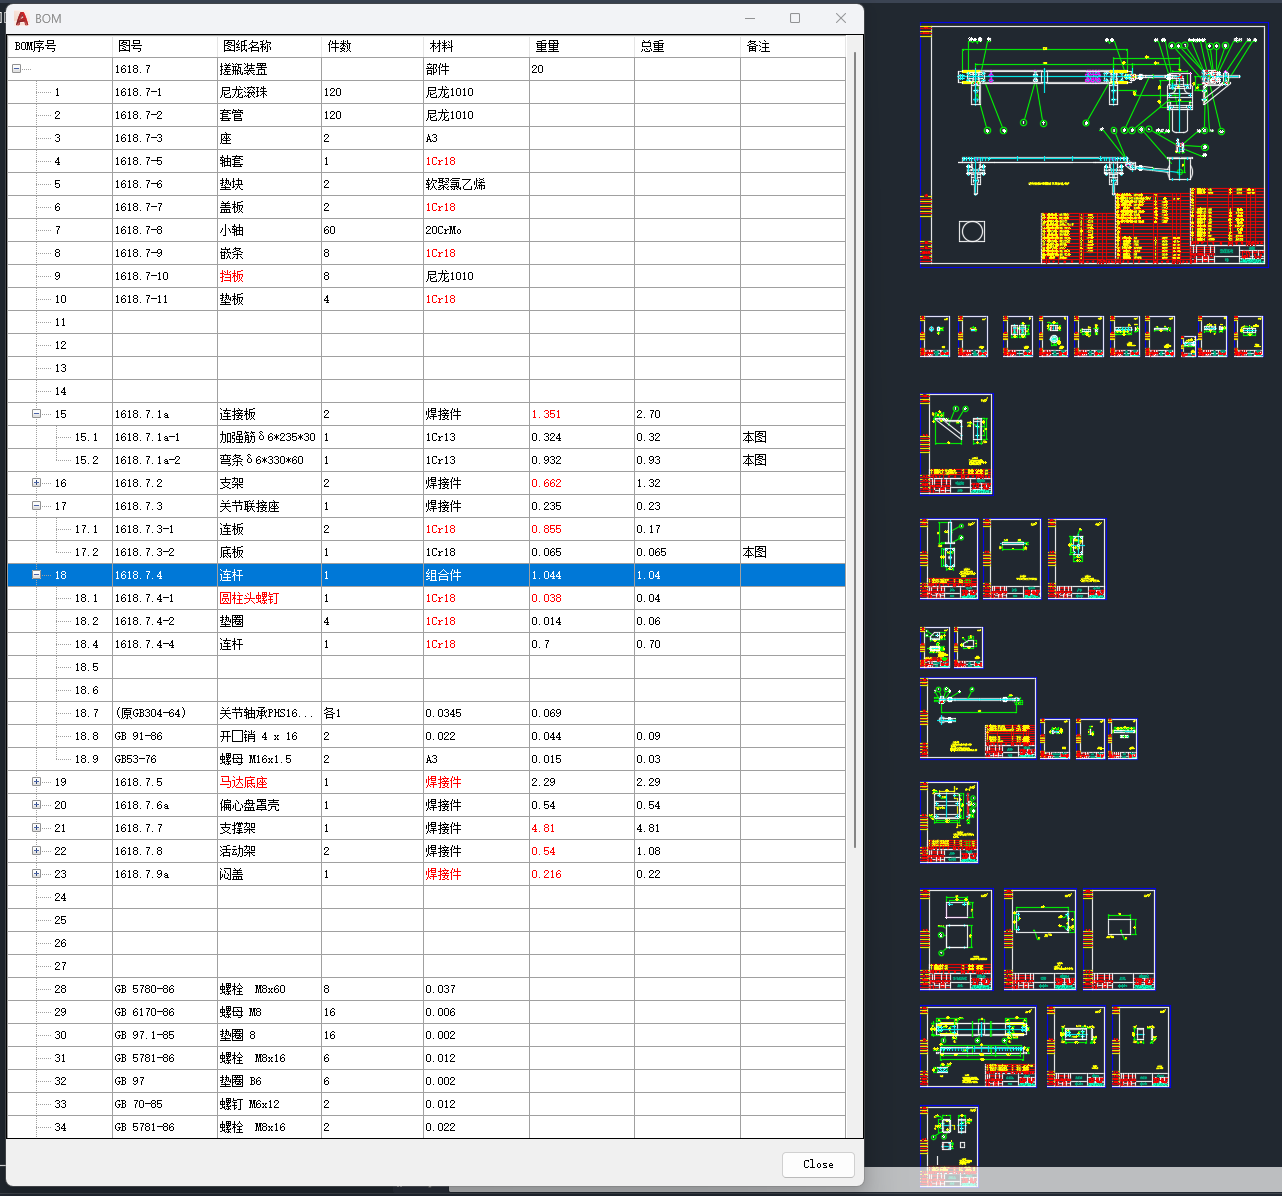
View BOM For manufacturing customers, if you define a title block template and a detail list template in batch printing, the program will automatically extract the BOM structure tree in the drawing and display it. This function supports generating a BOM structure tree when multiple drawing frames are included in one DWG file.
Any places where the title bar does not correspond to the previous level assembly file list are marked in red to facilitate user inspection and correction.
edit
Quickly check out and open for modificationCheck in Check in the selected files to the server. You can also check in files in a folder in batches. For checking in DWG files.
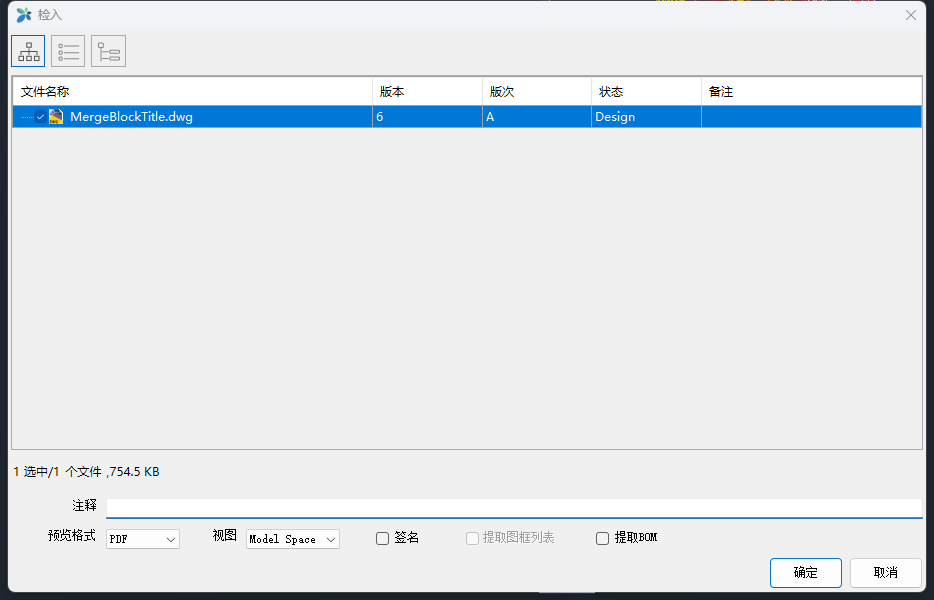
- Comments: Write down the changes made to the file or other comments. The comments can be viewed in the corresponding version on the server, and can record the historical information of the version for future modification and viewing.
- Preview format: Support PDF and SVG formats.
- PDF is to automatically convert all the drawing frames in the DWG file into PDF, one page is one drawing frame. What is generated is a PDF browsing file of the file, which is displayed in PDF format on the web page.
- SVG format is automatically converted to a similar format in the server background after uploading. When browsing on the web, it is similar to the original DWG format.
- View: Support Model Space and Paper Space
- Model Space, only convert the frame in the model space
- the frame in model space and paper space
- Signature: This option is available only when the preview format is PDF. Write signature watermark text on the converted PDF file according to predefined specifications.
- Extract drawing frame list: This option is valid only when a DWG file contains multiple drawing frames and the extraction information of the title block content is defined in the batch print.
- Extract BOM: You need to predefine the title bar and detail list templates. Extract the BOM information in the drawing and import it into HAPTYEAM's BOM database. This allows users to define design BOM, process BOM, order BOM and purchase BOM.
When you check in an Office file, it is automatically converted to PDF and uploaded to the server as a browse file for that version of the file.
Checkout
Checking out a file means obtaining the editing permission for the file and removing the read-only attribute from the local file.Undo Checkout
Undo the checkout of a file and return to the previous versionGet All
Get all files in this folder and its subdirectories from the server.Get
Get the latest version of this file from the server separatelyVersion Comparison Compare the differences between the two versions on the server. The comparison results are displayed as follows:
- All unmodified entities are changed to color 8
- New content is shown in green
- Deleted content is displayed in red
- Modified content is displayed in yellow
refresh Update the status of the file. The program will automatically compare the local and server files of the file, and then display the latest status with different status icons.
Material Code Get the enterprise's predefined coding standards from the server, automatically encode and assign the code to a certain attribute or a certain text, so that users can express the material code of parts in the drawing
Important note: Some functions of the right-click menu of HAPYTEAM Project Manager rely on the Hanna Batch Plot module. For the description of the relevant module functions, please refer to the Hanna Batch printing of user manuals.
Attachment:《Hanna Batch printing of user manuals》
# 7.Title bar template
The title bar template is divided into block title bars and non block title bars. If users want to use batch printing enterprise user commands, they must define the enterprise title bar template in advance. When users check relevant files into HAPYTEAM in CAD, some options also require pre-defined title bars in advance. After defining the title bar template, it can help us do the following:
- More accurate identification of image frames (can determine printing scale, calculate frame size, rename and extract attributes, etc.)
- Batch renaming when splitting or printing drawings
- Extract BOM, frame list and split into single page browsing when checking files into HAPYTEAM(Including model space and Drawing space )
The title bar template is divided into block title bars or non block title bars. Usually, defining a block class title bar is more convenient.
If the user's title bar cannot be guaranteed to be all blocks, title bars of the same class can be uniformly processed using non block title bars.

Steps for creating a block title bar:
Open a file containing a title block, click on the "Block Title Block" command, and then select the title block. A dialog box will appear as shown in the following figure, and you can design matching properties by comparing them with the corresponding properties.
Set Properties dialog box:
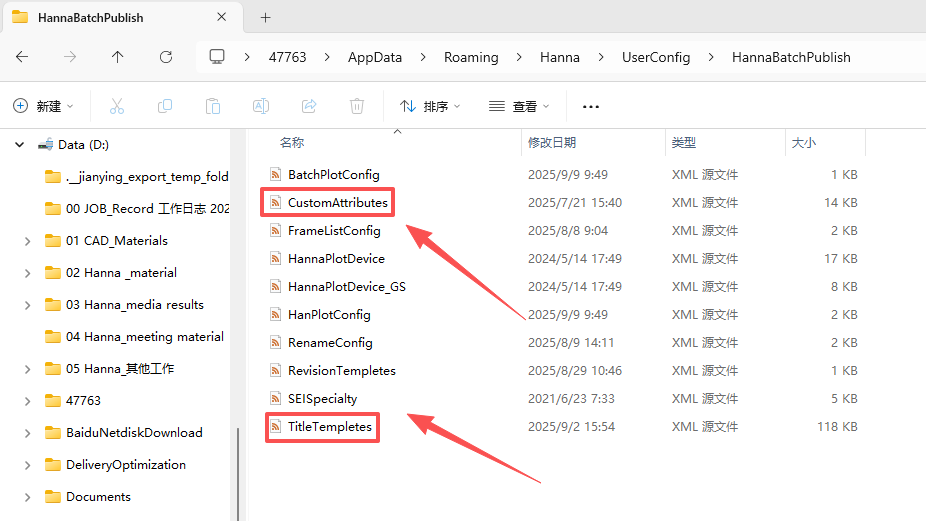
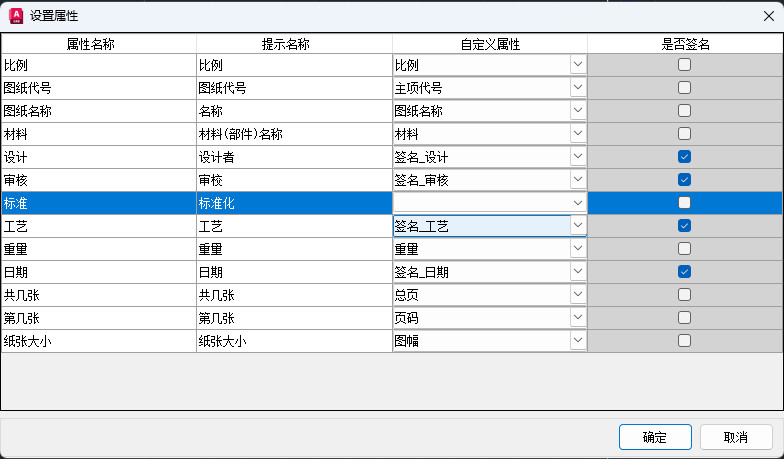 The generated title bar module definition is saved in the TitleTemplates. xml file in the following directory:%appdata%\Hanna\UserConfig\HannaBatchPublish\TitleTempletes.xml
The steps for creating a non block title bar are as follows:
Before creating a non block title block, it is necessary to ensure that there is a 1:1 drawing of the title block drawing content in the current image.
1.Execute non block title bar commands
2.Select the valid area related to the title bar, and the program will draw a large yellow box to surround the area
3.Select two enclosed areas containing fixed text, and the user only needs to click within the enclosed area. The program will automatically calculate the enclosed area and surround it with a yellow line
4.After selecting two fixed text areas, select other locations where signatures need to be extracted or reversed by clicking on them within the relevant enclosed area.
After selecting, press the enter key to pop up the following dialog box:
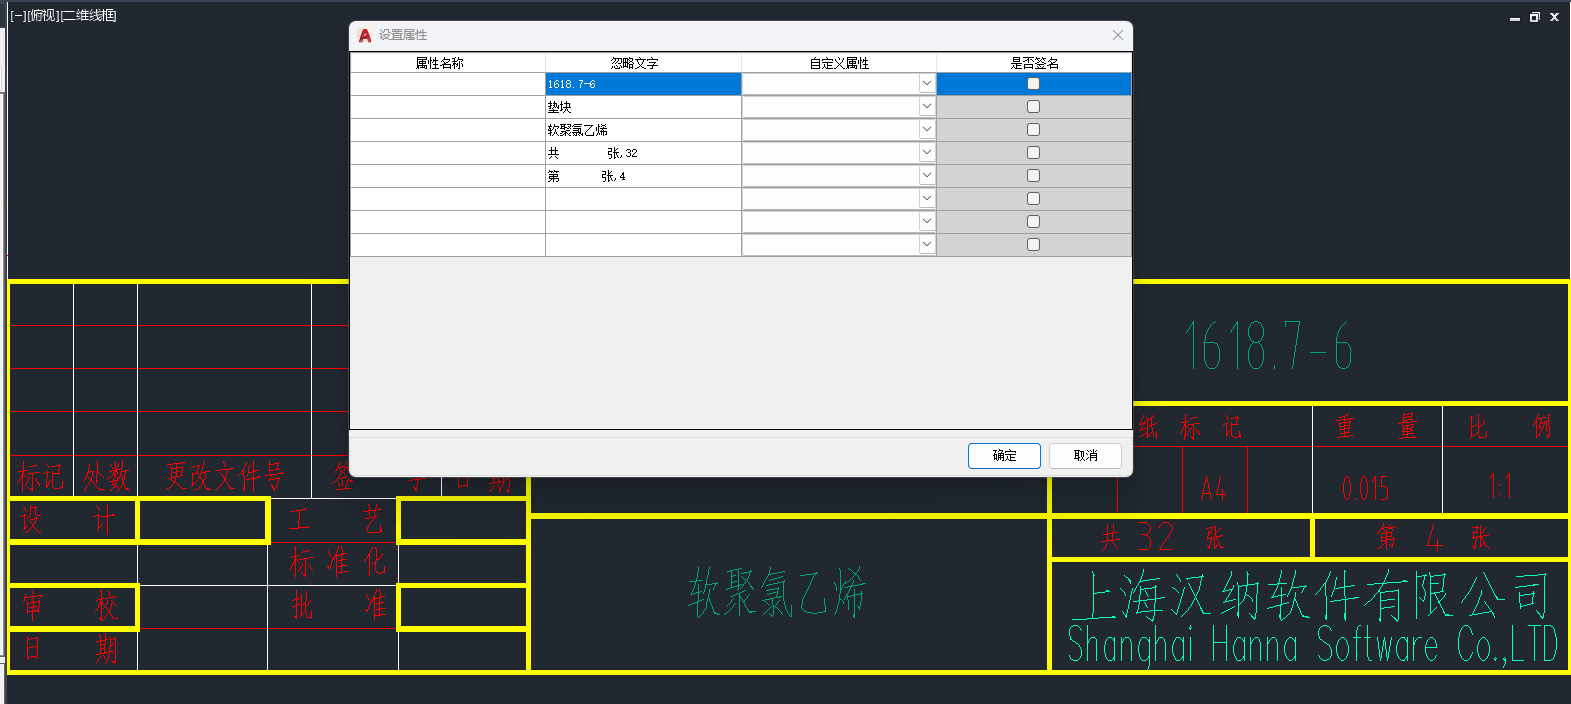 In the above figure, the yellow border represents the selected area. In the setting attribute permission box, complete the following:
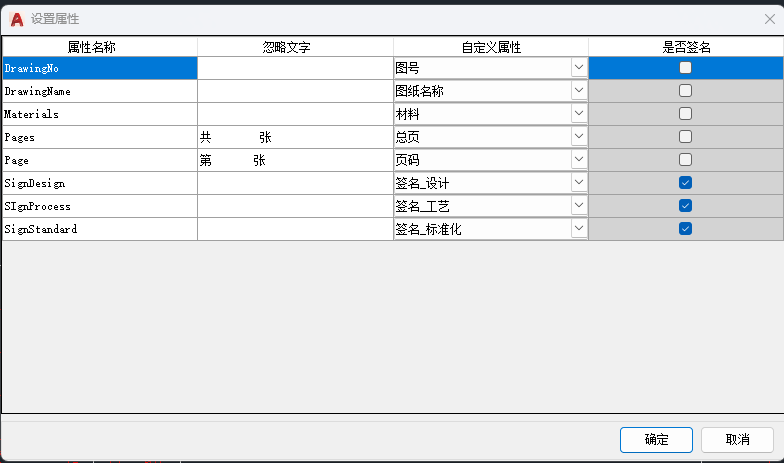
The content in the above figure is explained as follows:
Attribute Name: The display name of the attribute, which can be entered according to user specifications
Ignore Text: Indicates the information that needs to be ignored when extracting the content of the box. In the page number grid, in addition to the page numbers, There is also the text 'page number', but this file is not a page number, only an auxiliary explanatory document, so it needs to be filtered and ignored.
Custom attribute: This attribute is a dropdown list, defined in detail in the following directory's Customs Attributes. xml file %appdata%\Hanna\UserConfig\HannaBatchPublish\CustomAttributes.xml Already pre-defined.
Whether to sign: Whether to sign is also pre-defined in the Customs Attributes. xml file. If this item is selected, when converting PDF, if the "signature" on the interface is selected, the corresponding signature watermark text will be written in that area, making it easier for other signature systems to know which signature is signed and where.
# 8. Description of options when checking in DWG files
If DWG format files want to be checked into HAPYTEAM, users must check them in through plugins in various 2D CAD files. In the browser or HAPYTEAM client, only standard office format files such as Word/Excel/PDF/images and other undefined 3D CAD files can be checked in. The 3D CAD files supported by the system must also be checked in their respective 3D CAD plugins.
When checking in in the plugin of 2D CAD, the relevant check in options are described as follows:
When the options of extracting BOM, extracting frame list, and previewing a single frame are not selected
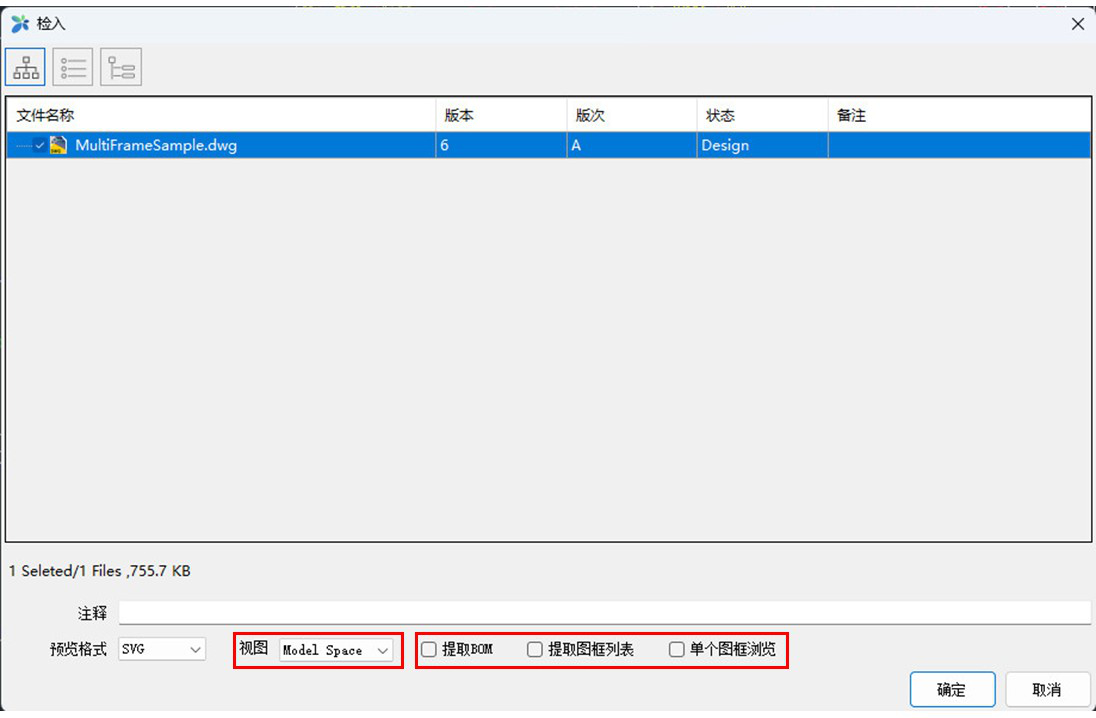
When selecting SVG as the preview format and Model Space as the view, only the model space drawings can be viewed online; Users can switch between model and paper space to browse drawings when selecting Paper Space view;
When previewing in PDF format, only views can be selected Model Space
Explanation of three options: extracting BOM, extracting frame list, and previewing individual frames These three options all require pre-defined templates for block or non block type enterprise title blocks.
Extract BOM: This option automatically extracts the BOM structure tree of the model space and writes it to the BOM tab of HAPYTEAM for browsing or viewing, or imports the BOM into the process BOM or order BOM. This option will be separately detailed in the BOM section later.
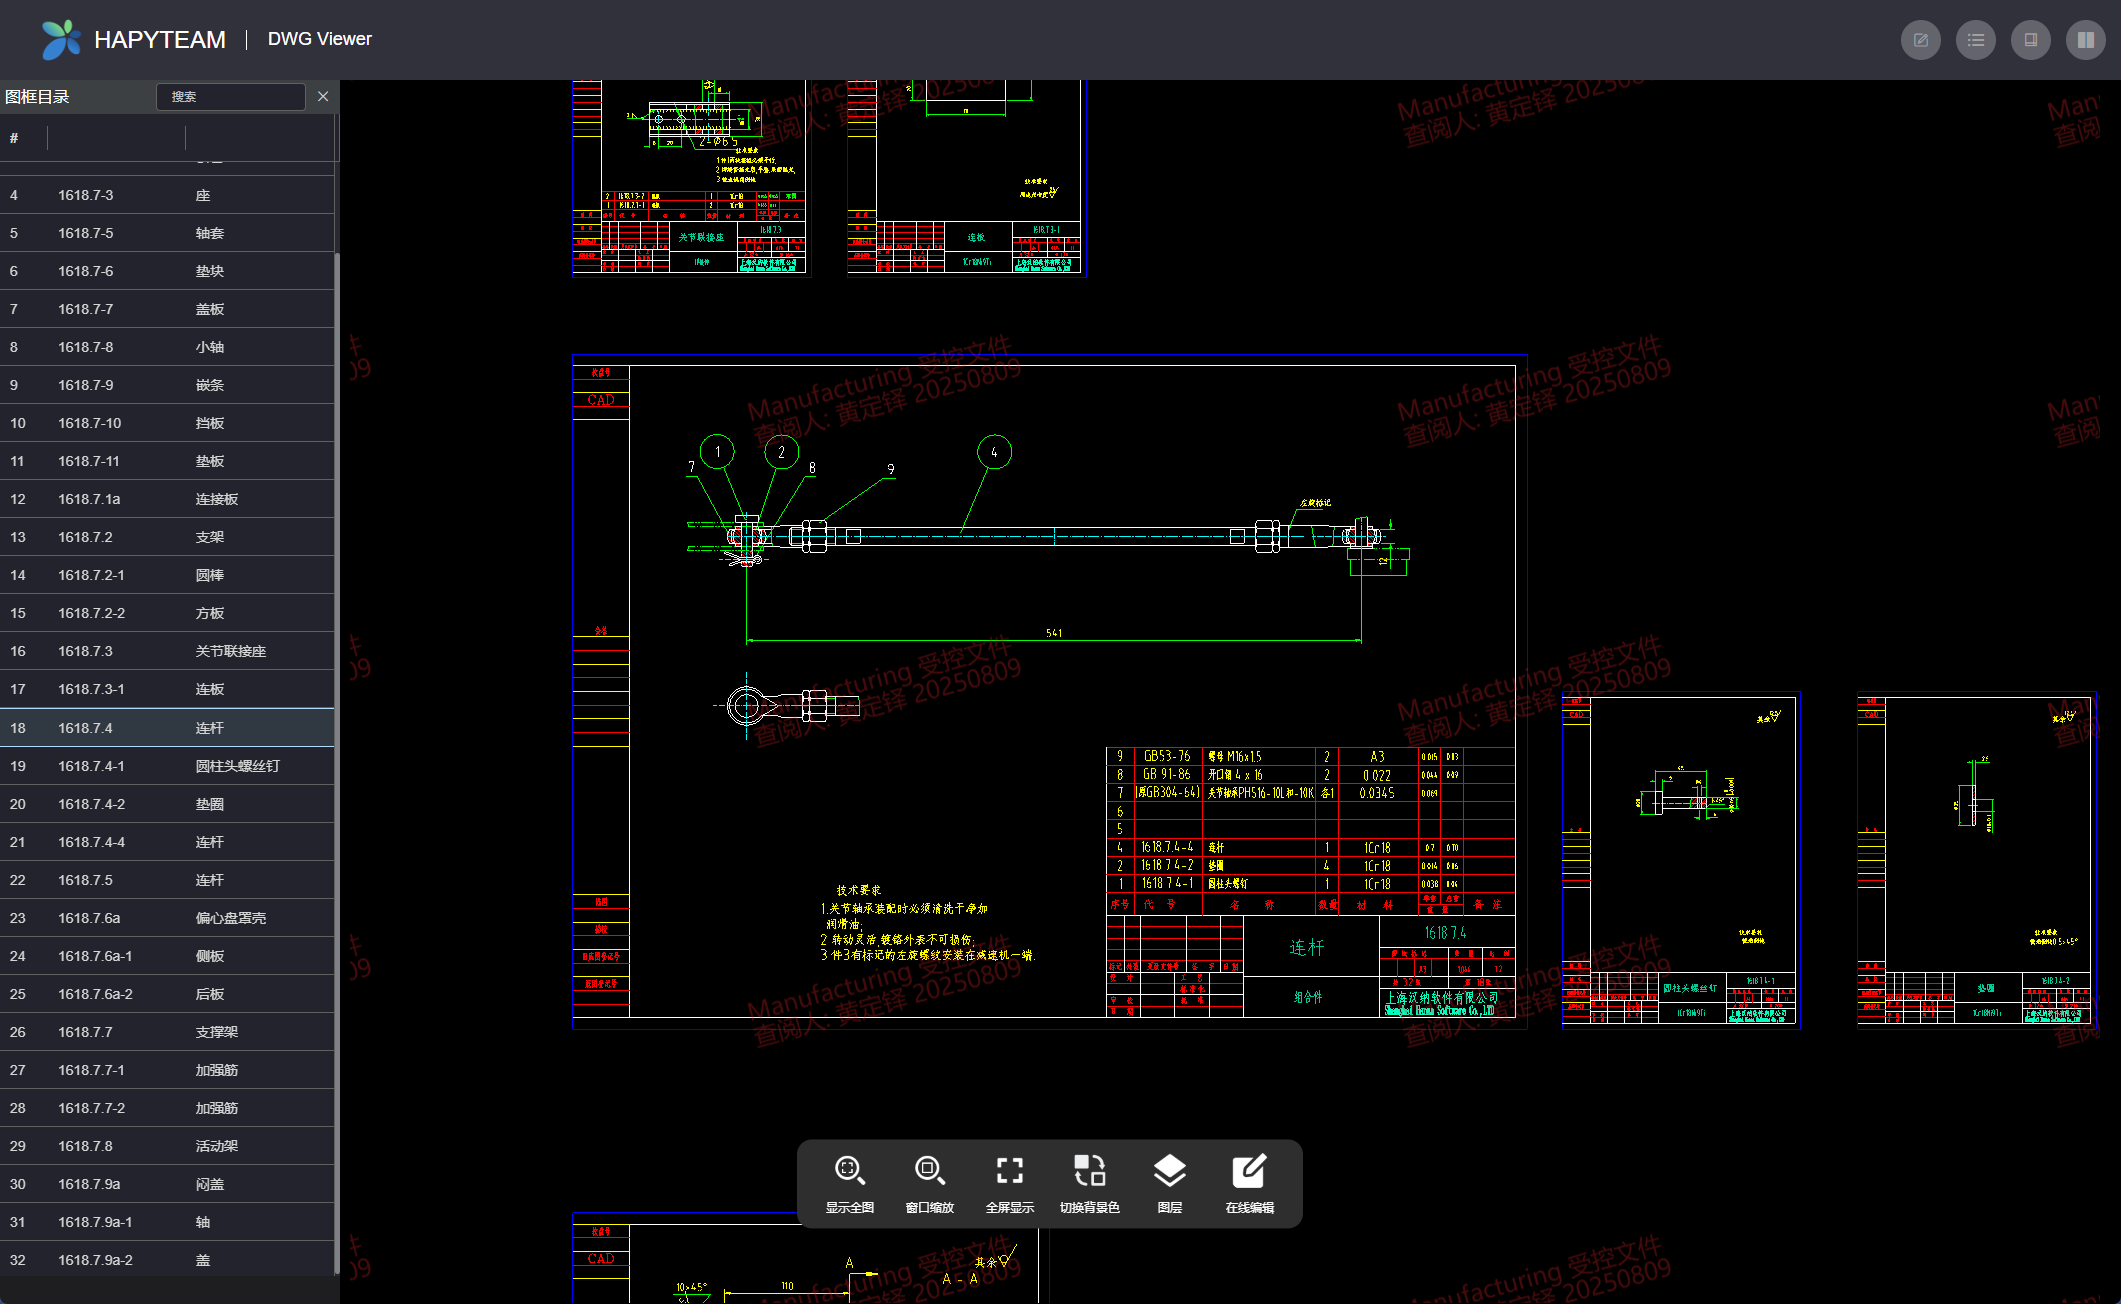
SVG+Model Space+Extract Frame List Options: When these three options are selected, the checked in file is browsed in full file format, but users can automatically jump to the frame area through the frame list in the browser. It is particularly emphasized here that if you need to extract a list of frames, you need to first configure the frame list in CAD, and after configuration, it will be displayed in CAD as follows:
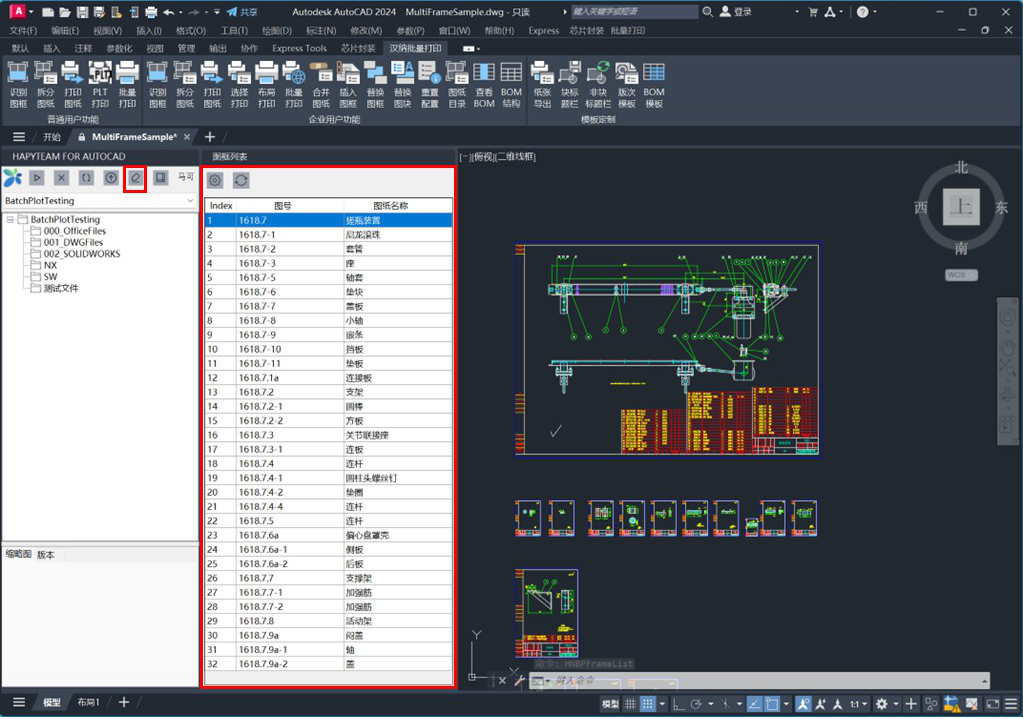 When checked into HAPYTEAM, the display is as follows:
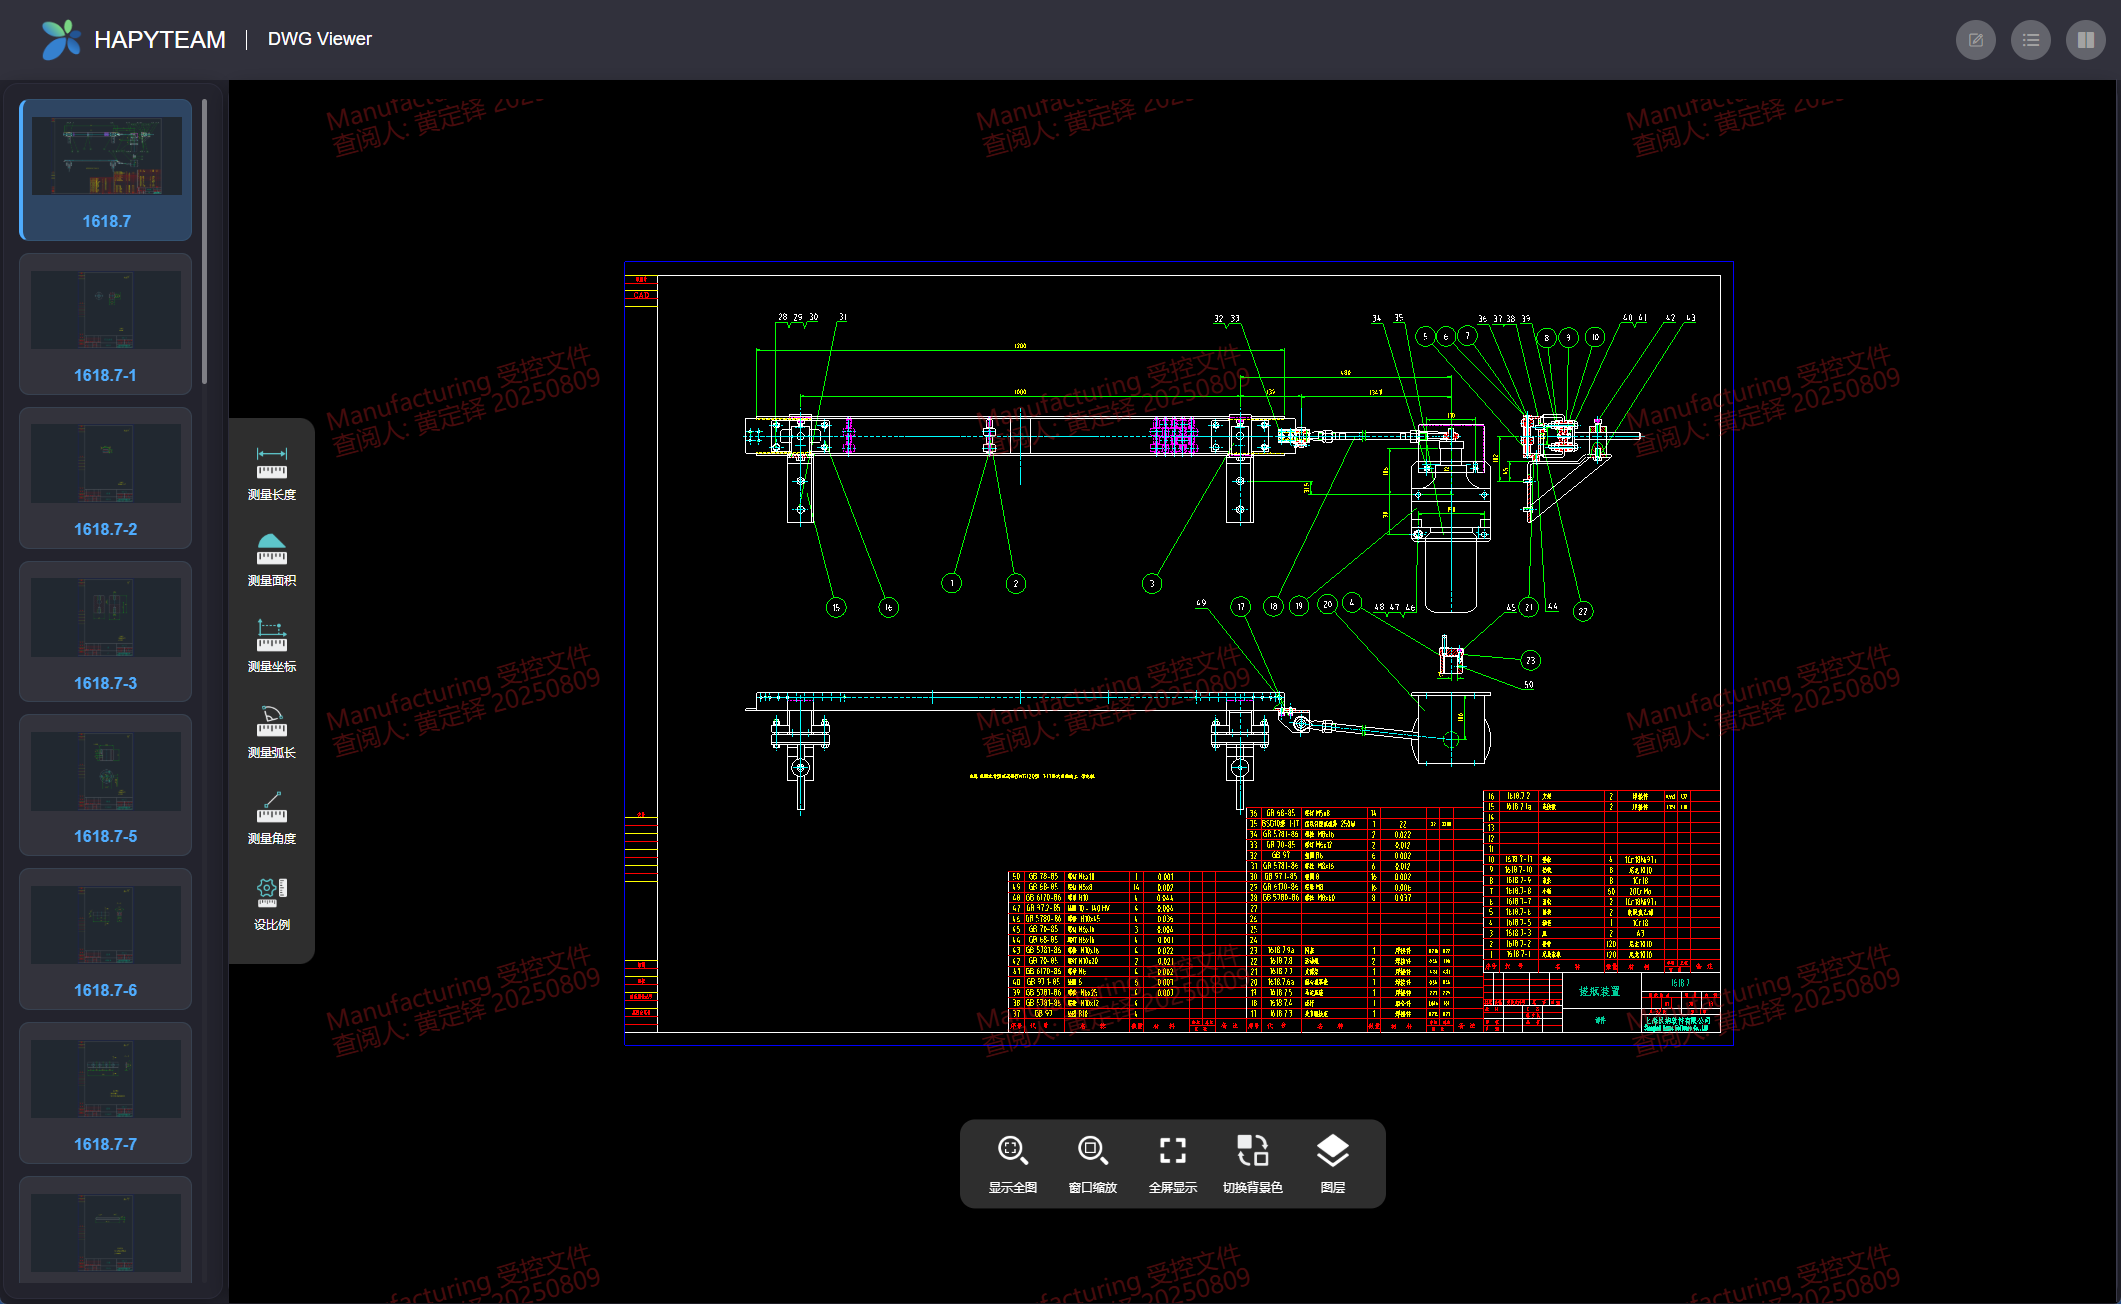
SVG+Model Space+Single Frame Preview Options: Select these three options, and the checked in drawings will be viewed in HAPYTEAM with a thumbnail on the left and a single enlarged view on the right. Please note that the naming format of the preview drawing is based on the current option in the batch printing or disassembly renaming options. For example, it can be named only by the drawing number or in the naming format of "Drawing Number - Drawing Name". The drawings checked in this mode are shown in the HAPYTEAM browsing mode as follows:
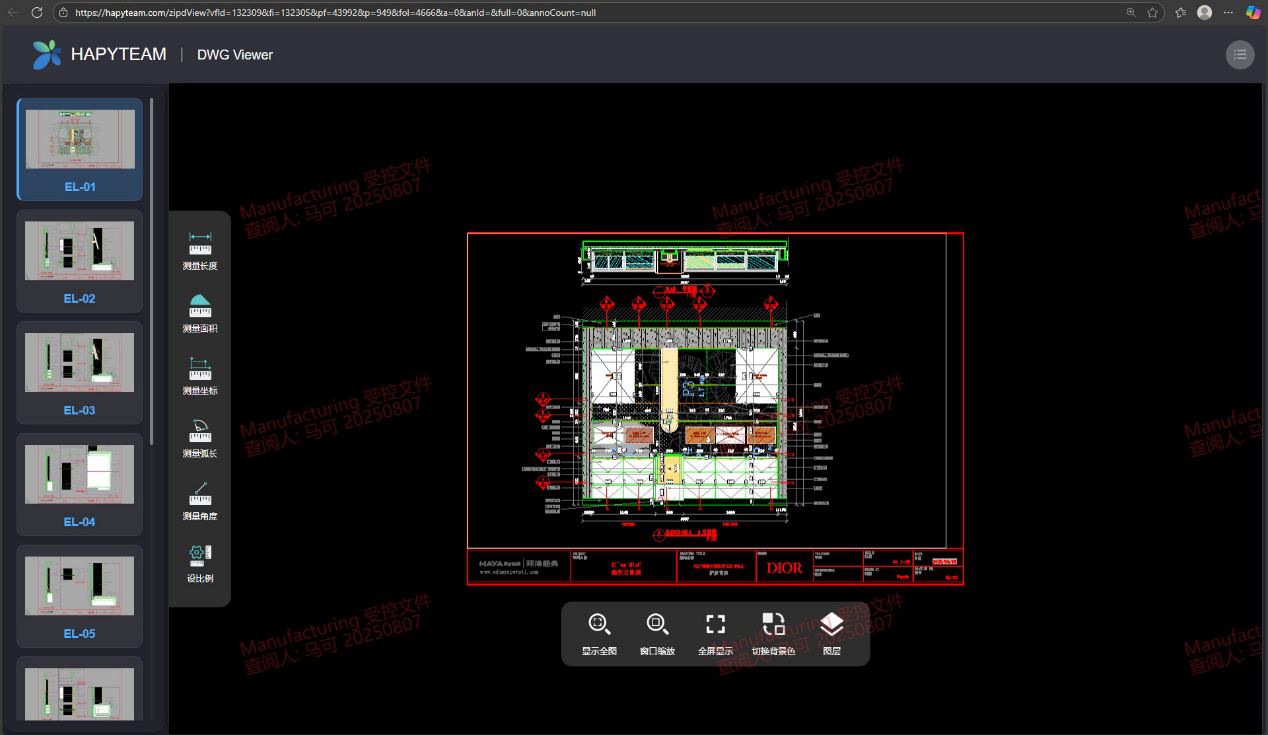
SVG+Paper Space+Single Frame Preview Options: Select these three options, and the checked in drawing will only display the frame removed from the paper space in HAPYTEAM
# 9.Definition of Signature Watermark Text File
When files checked in through the HAPYTEAM plugin require a built-in signature, both DWG and OFFICE files need to be preprocessed.
Pre-operation preparation
Software installation: Ensure that the HAPYTEAM plugin is correctly installed on the computer's AutoCAD, Zhongwang CAD, or G-StarCAD software, and that the plugin version supports DWG file conversion and related signature watermarking functions.
Signature file preparation:
- client:
- Check if the latest version of Custom Attributes and Title Templates XML files are configured in the local file path:% appdata% Hanna \ UserConfig \ HannaBatchPublish.
- Check the configuration of each personnel: whether there is a signature image under the user information signature information,
and ensure that the signature image is in a transparent background image format (such as PNG), and the signature is clear and complete.
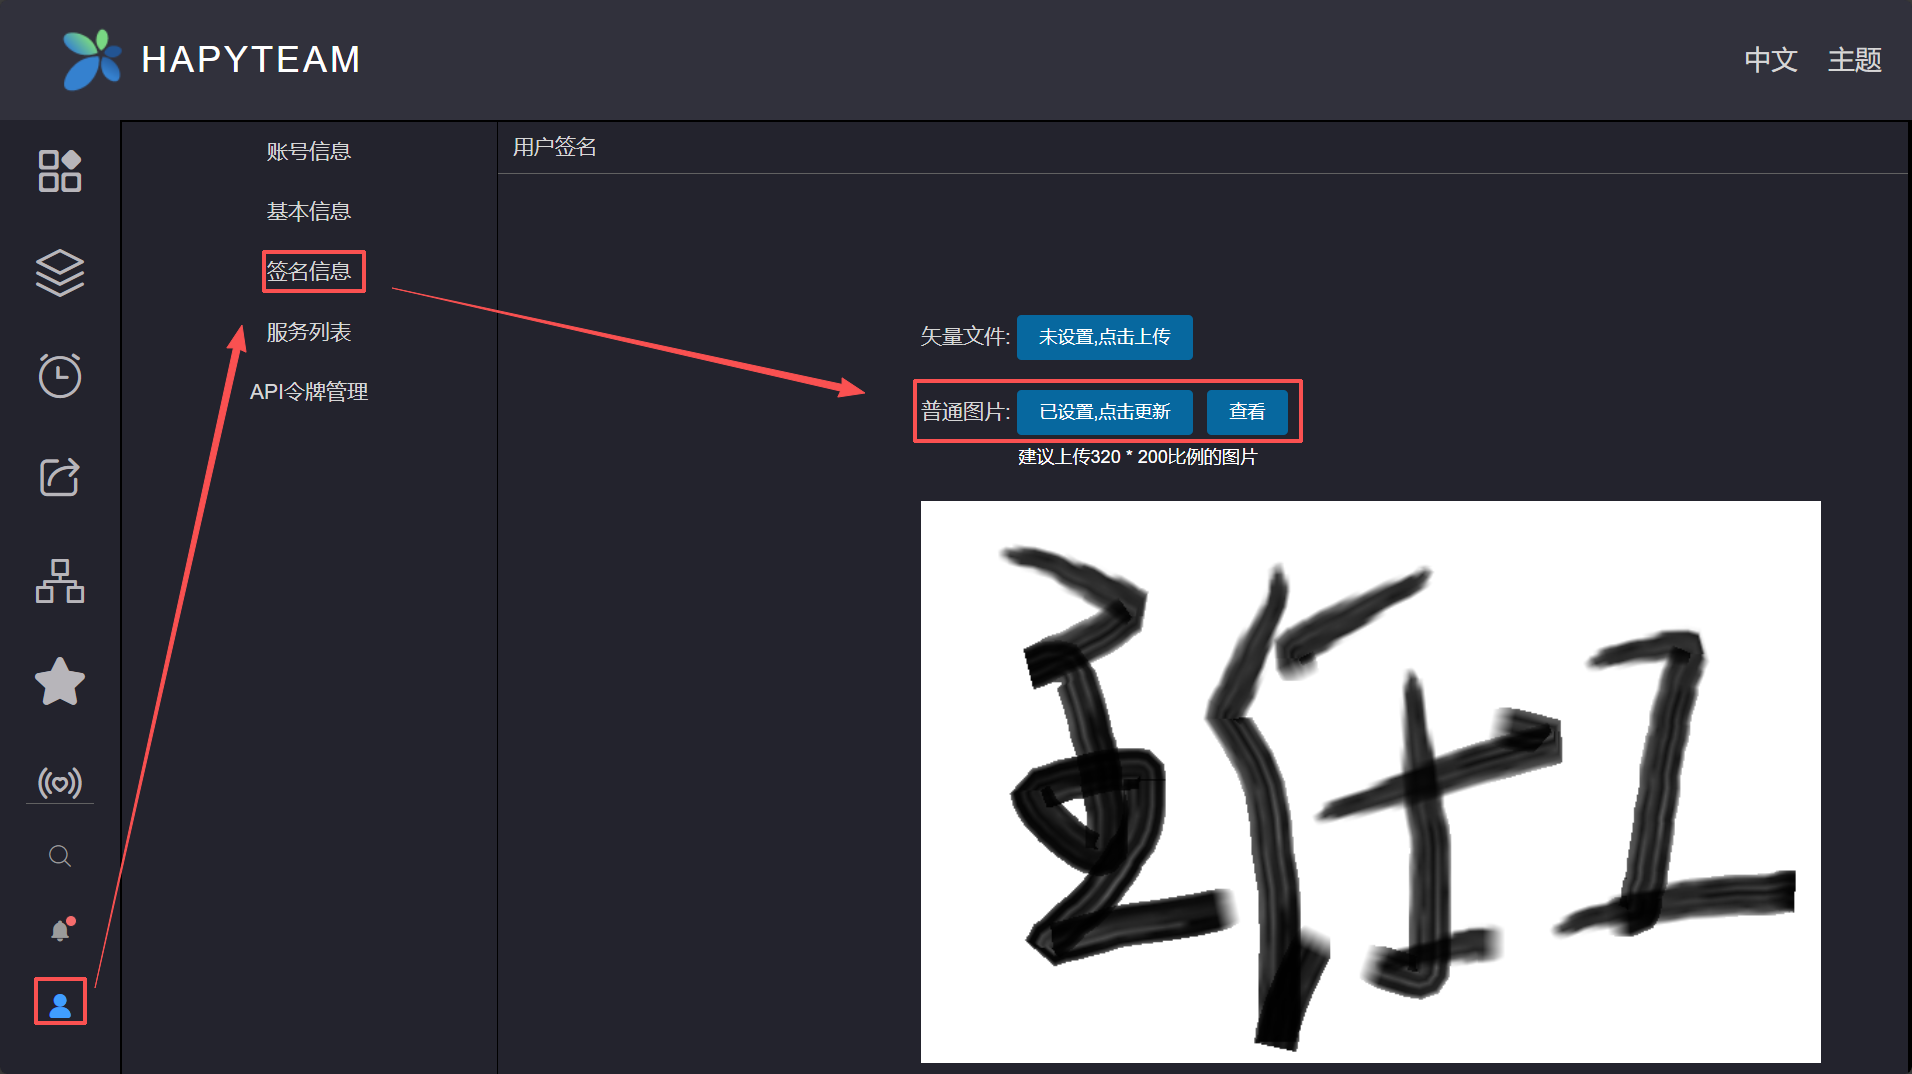
- Check if the latest version of Custom Attributes and Title Templates XML files are configured in the local file path:% appdata% Hanna \ UserConfig \ HannaBatchPublish.
- server:
- Check the configuration parameters of the enterprise administrator: whether there is a complete signature watermark template;
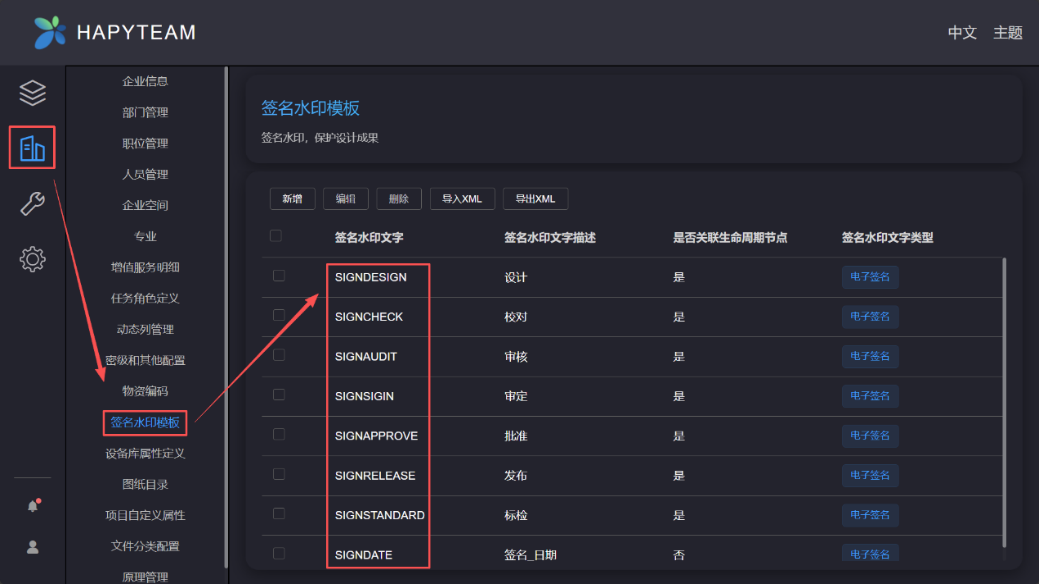
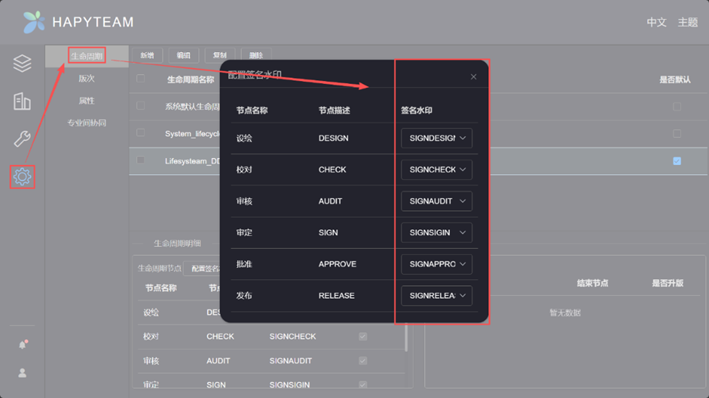
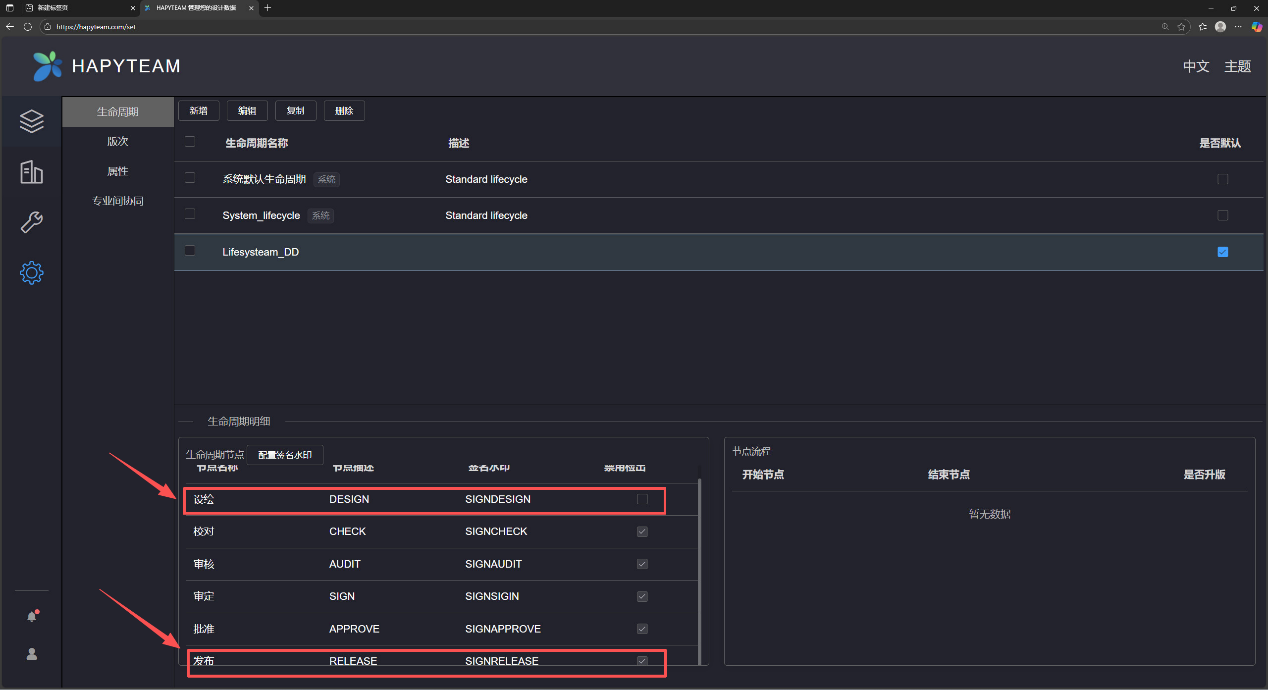
- Check lifecycle nodes: must include two nodes, "Initial Design State" (such as "Design working in progress") and "Release", and
the final release node does not support signing.
- Check the configuration parameters of the enterprise administrator: whether there is a complete signature watermark template;
- client:
If EXCEL and WORD files need to be signed, they must be preprocessed with signature watermark text before being checked into the HAPYTEAM webpage. The specific steps are as follows:
Write the English name (case sensitive) of the corresponding node in the signature watermark text (as shown in the figure above), and change the text color to white. After saving the file, upload the template file under the enterprise administrator account or perform check-in and other tasks through the HAPYTEAM plugin in AutoCAD. The signatures of EXCEL and WORD files are shown in the following figure:
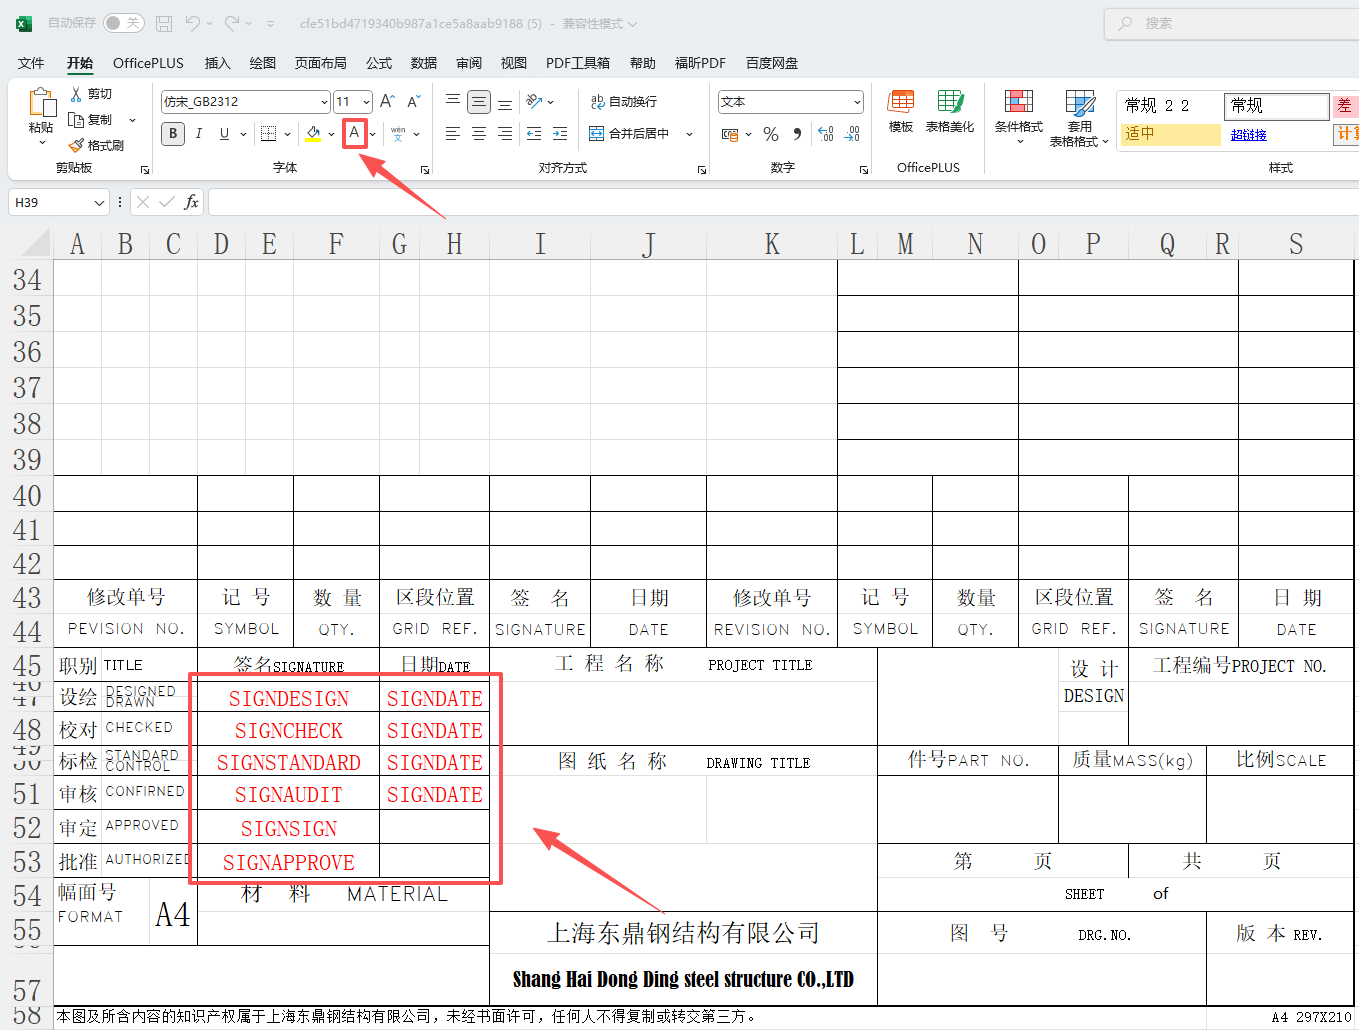
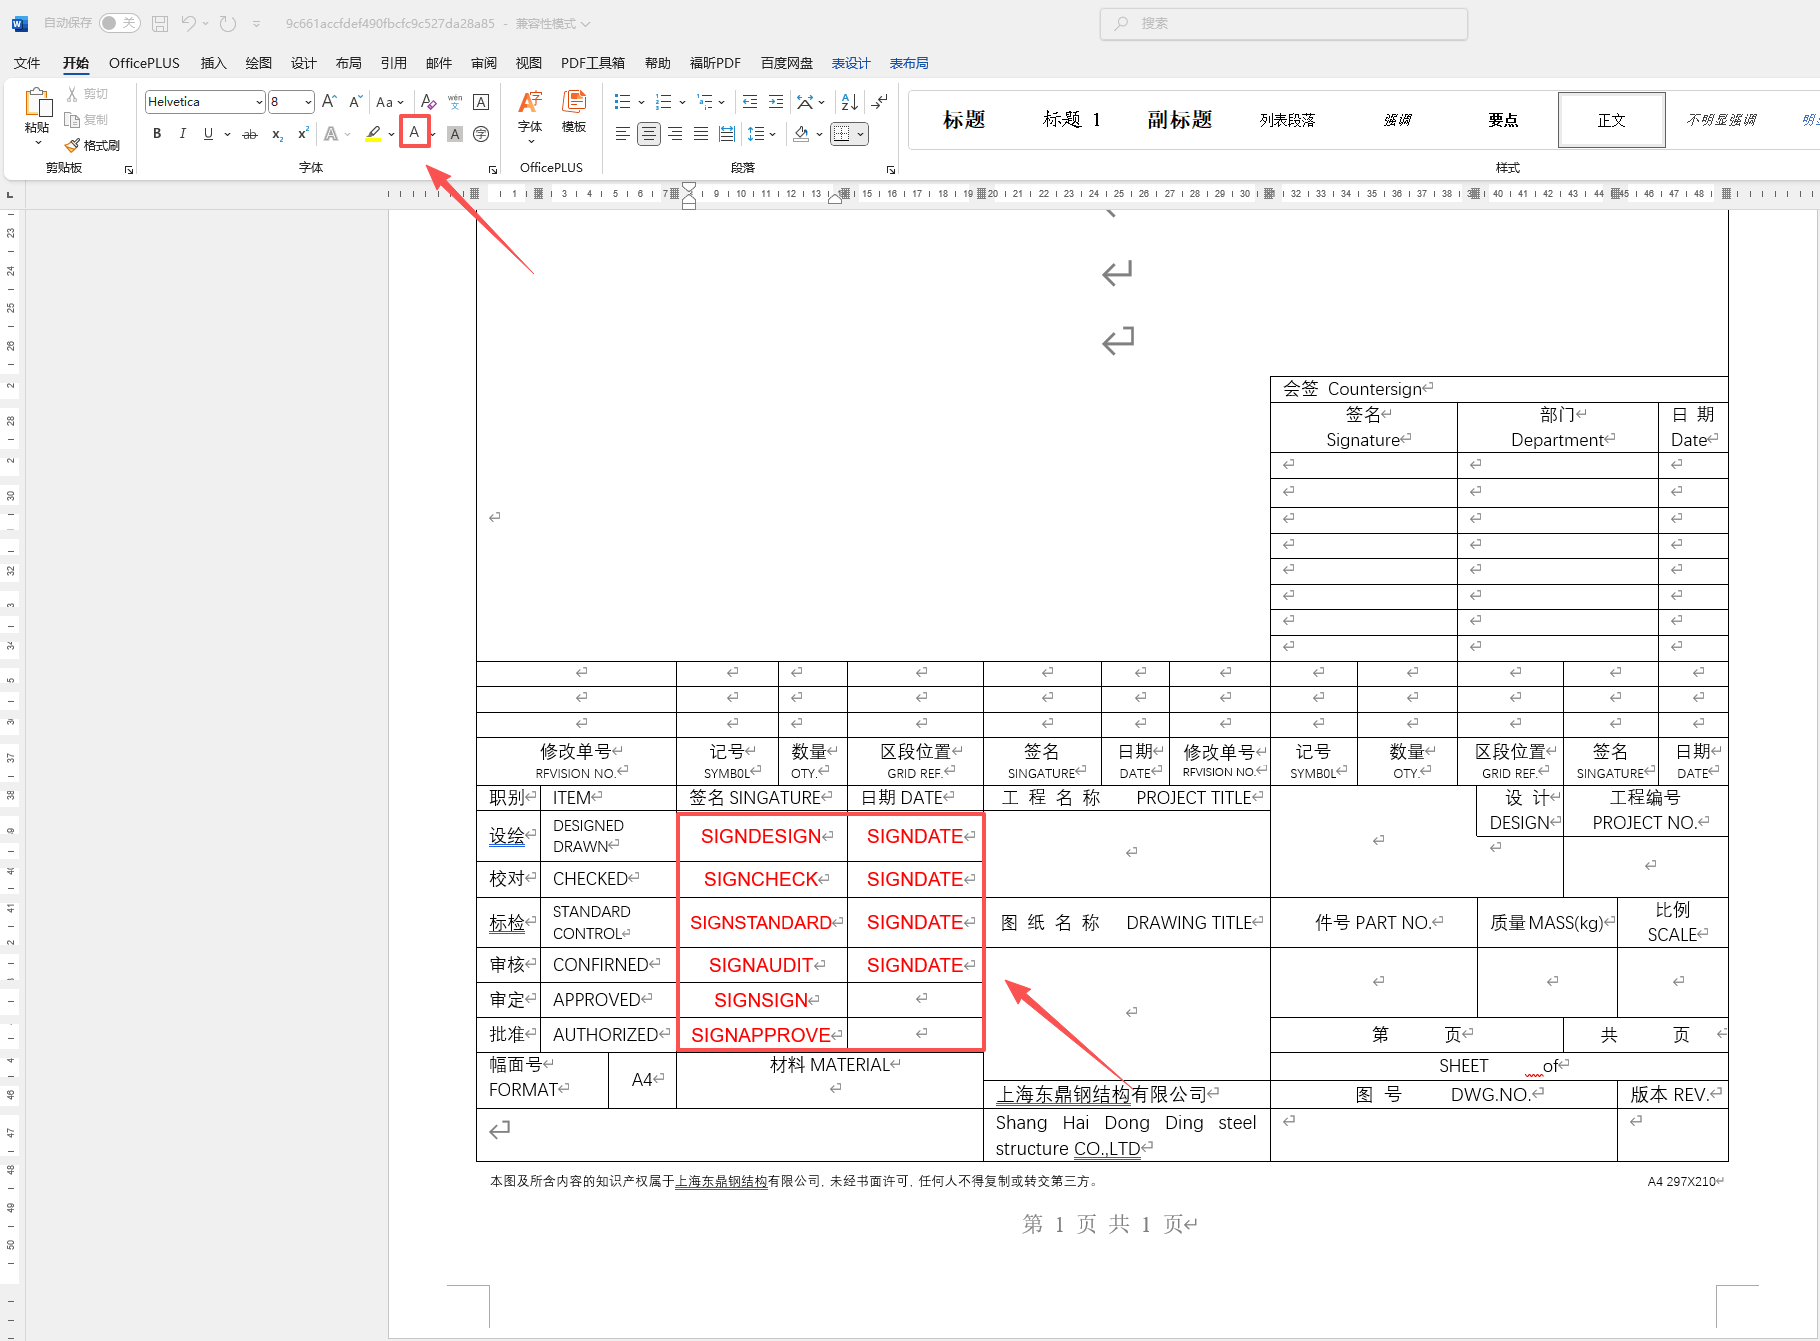
If DWG files require a built-in signature
- DWG file preparation:
Step 1: Can you identify the frame in the enterprise function? If you can identify the frame, proceed to Step 2; If not possible, skip back to the "Client Check Local File Path" section in "Signature File Preparation" or create block/non block title bars in AutoCAD. For specific methods, please refer to Section 7 of this document.
Step 2: Batch print the drawings
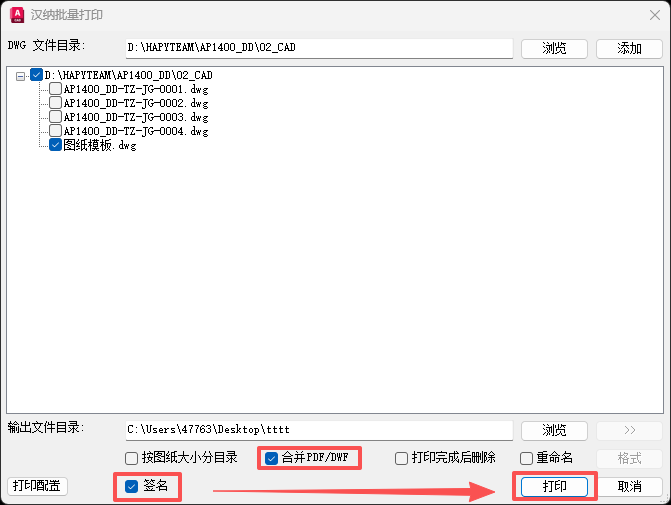
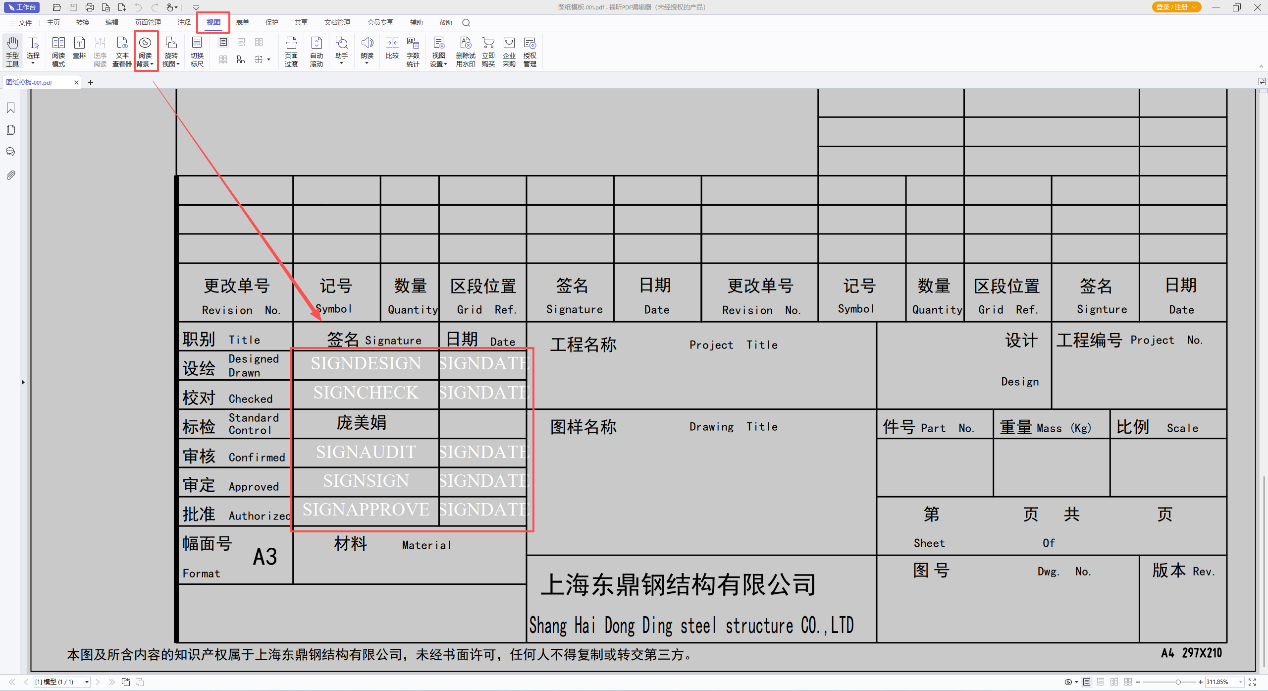
Step 3: Open the PDF file with Foxit Reader and select Night Mode. As shown in the figure below, there is white text, which is the template text with watermark.
- DWG file preparation:
Convert the file to PDF and automatically add a signature watermark Check in Files: Check in the selected files to the server, or batch check in files in the directory. Preview format: Select PDF.
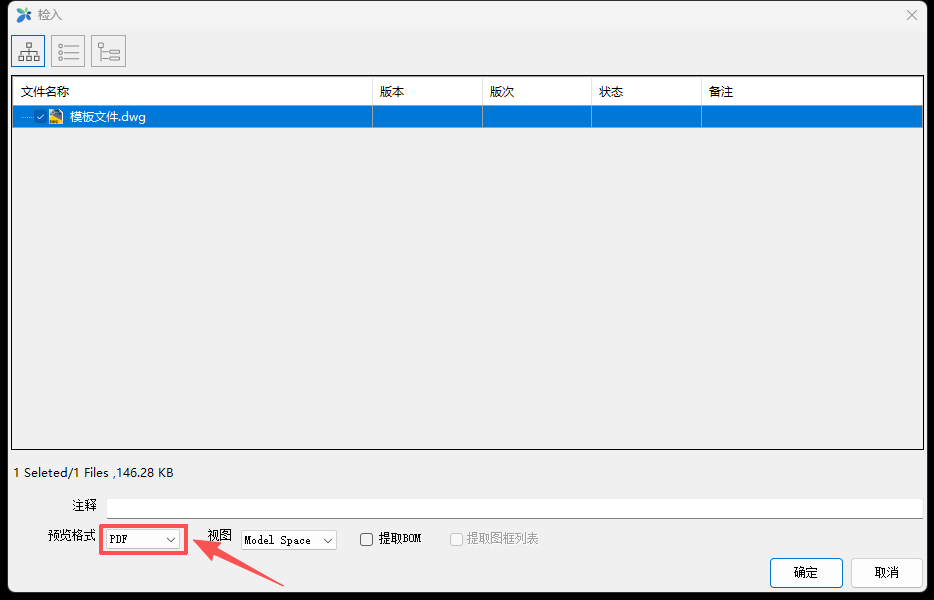
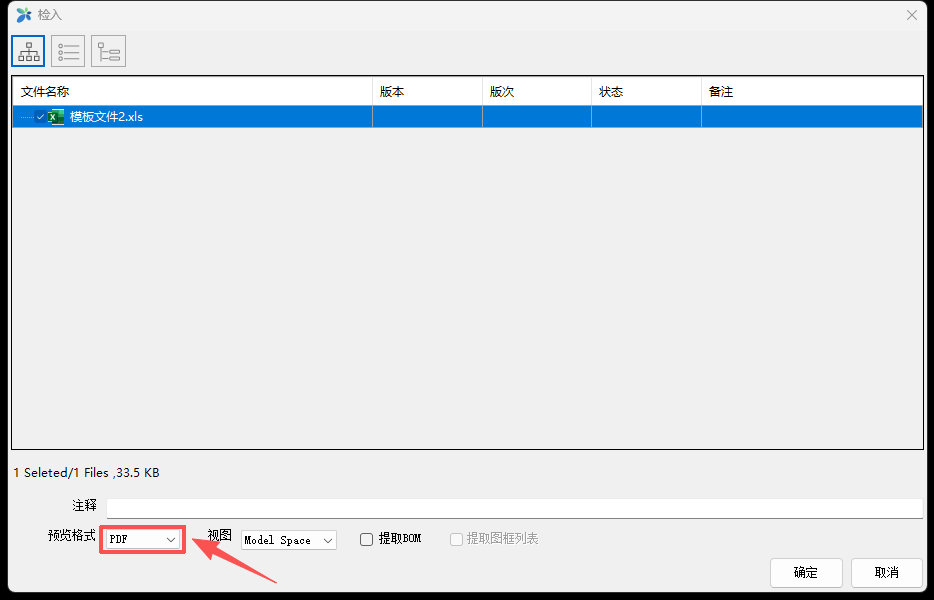
Automatic signature
- Initiate the review process: Right click on "Initiate Review Process" in the drawing directory or specific drawings, and complete the
process in sequence.
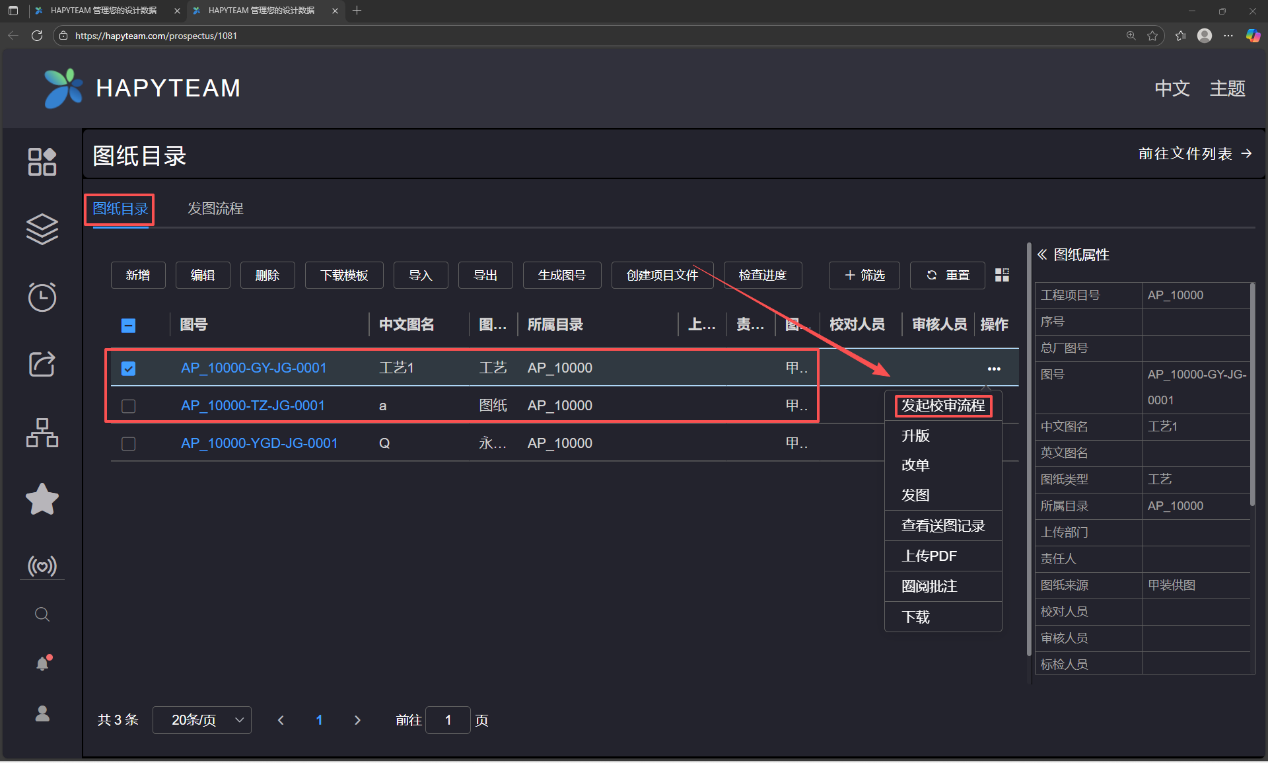
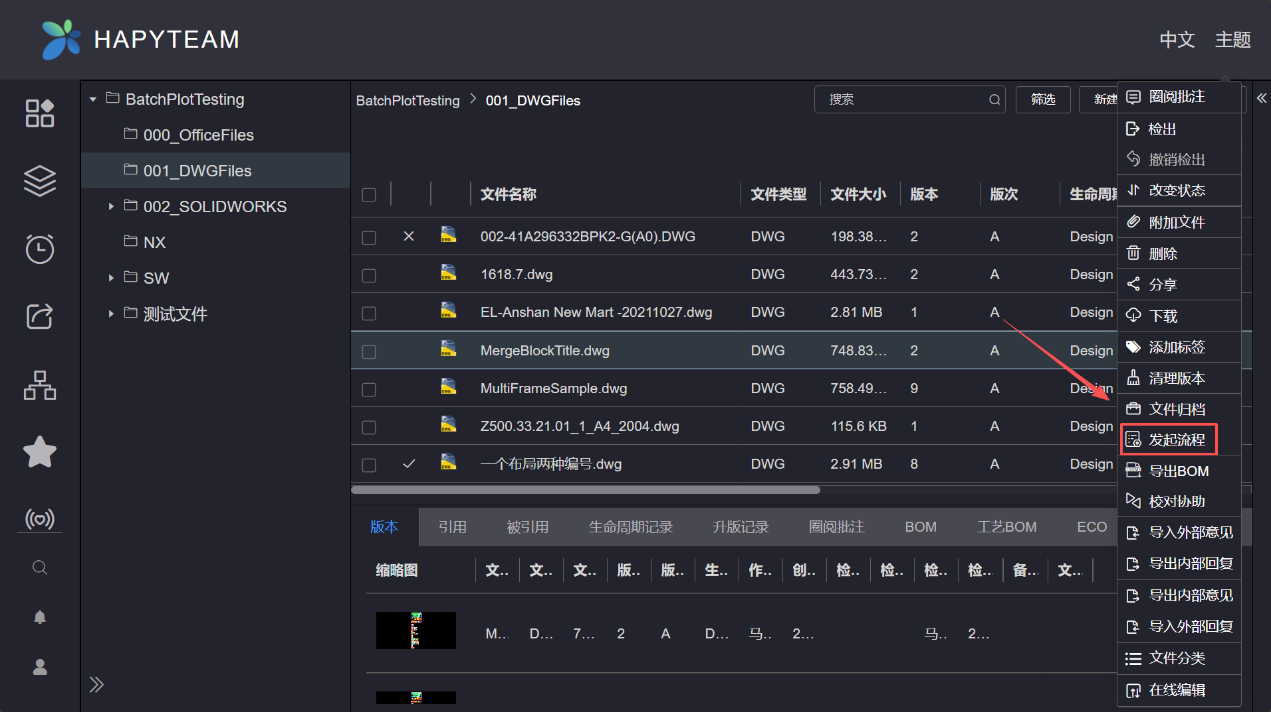
- Automatic signature: Once the process is completed, automatic signature can be obtained.
- Initiate the review process: Right click on "Initiate Review Process" in the drawing directory or specific drawings, and complete the
process in sequence.
# 10.Definition of file attributes
The DWG file checked in through the HAPYTEAM plugin software not only contains system attribute information, but also allows for the addition of drawing and signature information in the file properties.
- Pre-operation preparation
- Software installation: Ensure that the HAPYTEAM plugin is correctly installed on the computer's AutoCAD, Zhongwang CAD, or G-StarCAD software.
- Signature file preparation:
- client:
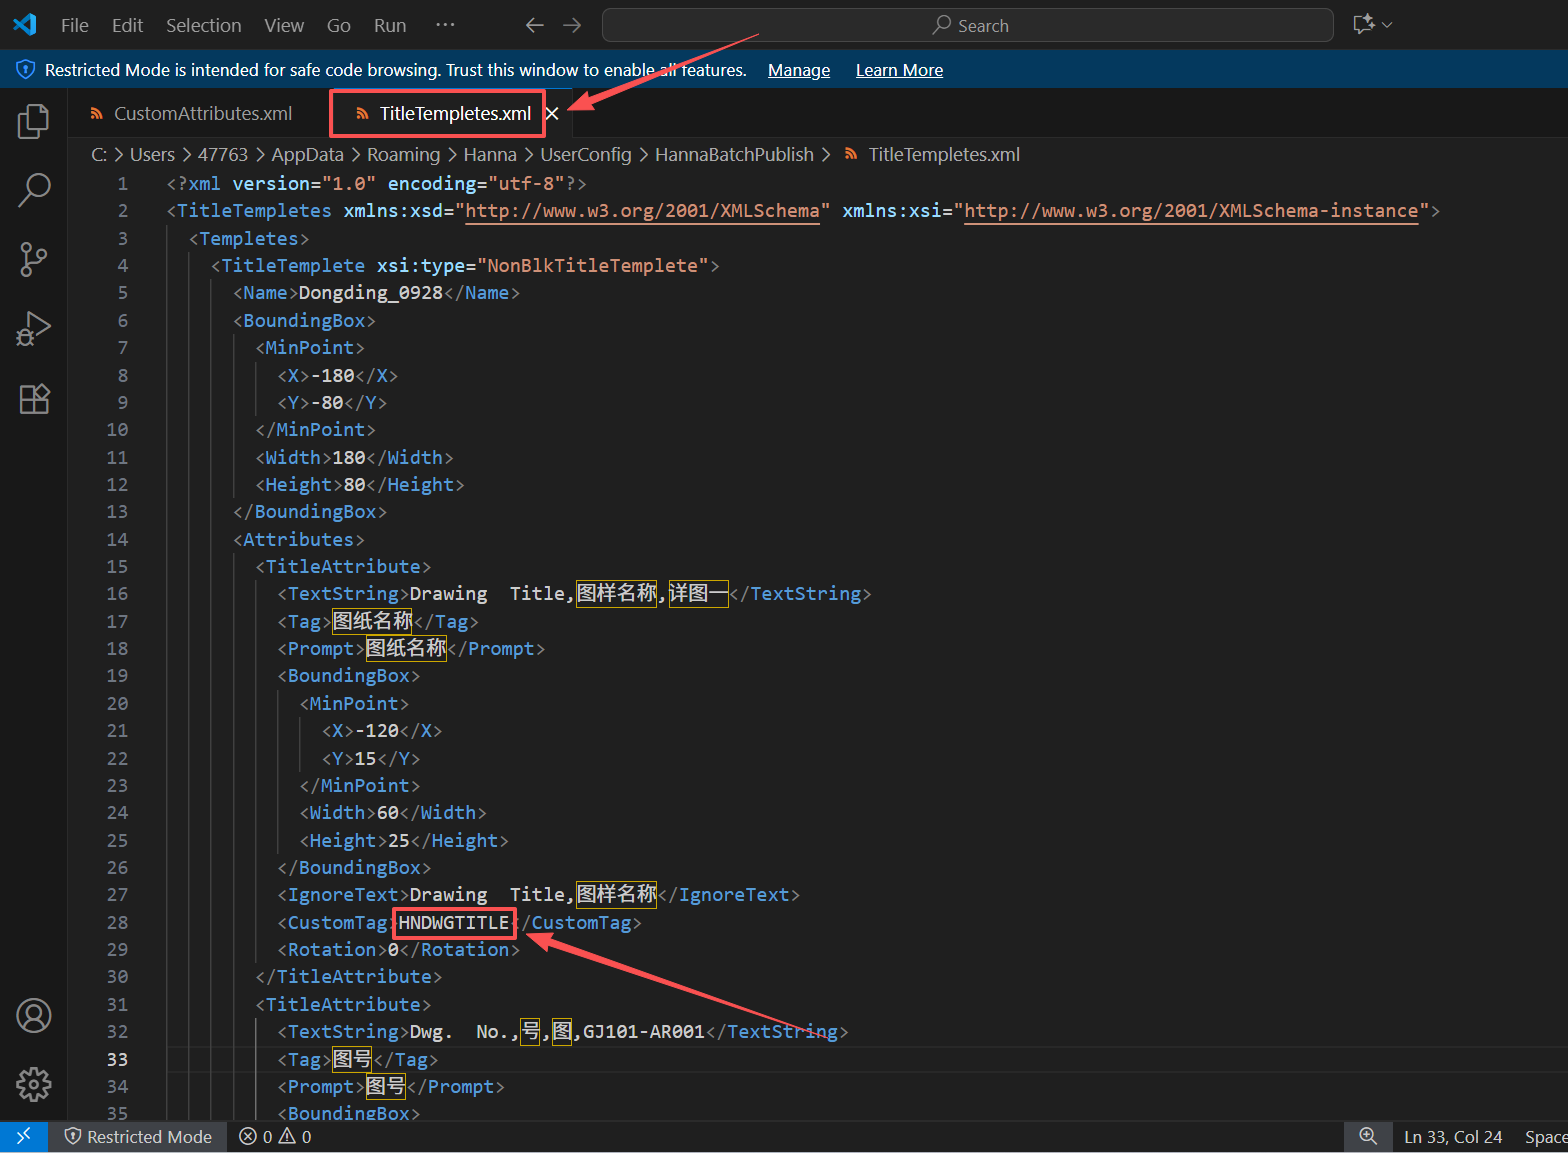
- Check if the latest version of Custom Attributes and Title Templates XML files are configured in the local file path:% appdata% Hanna \ UserConfig \ HannaBatchPublish.
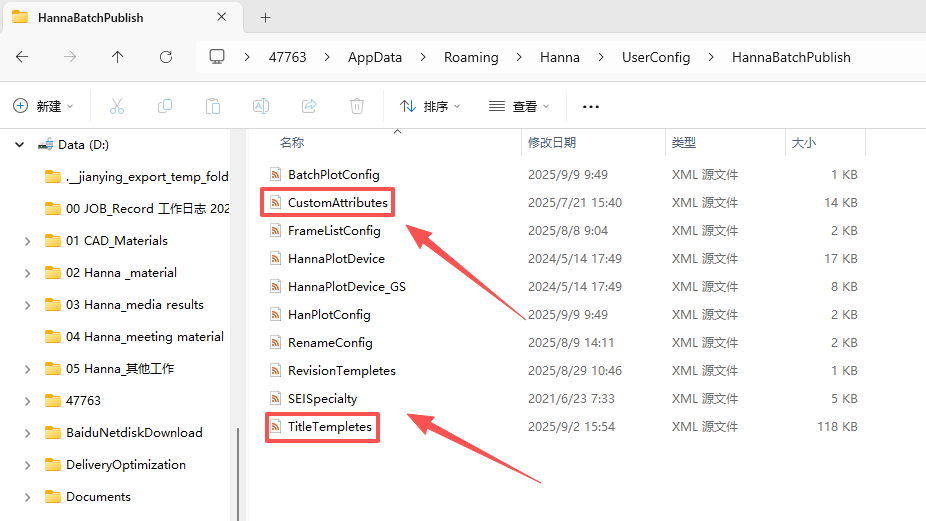
- Check if the latest version of Custom Attributes and Title Templates XML files are configured in the local file path:% appdata% Hanna \ UserConfig \ HannaBatchPublish.
- server:
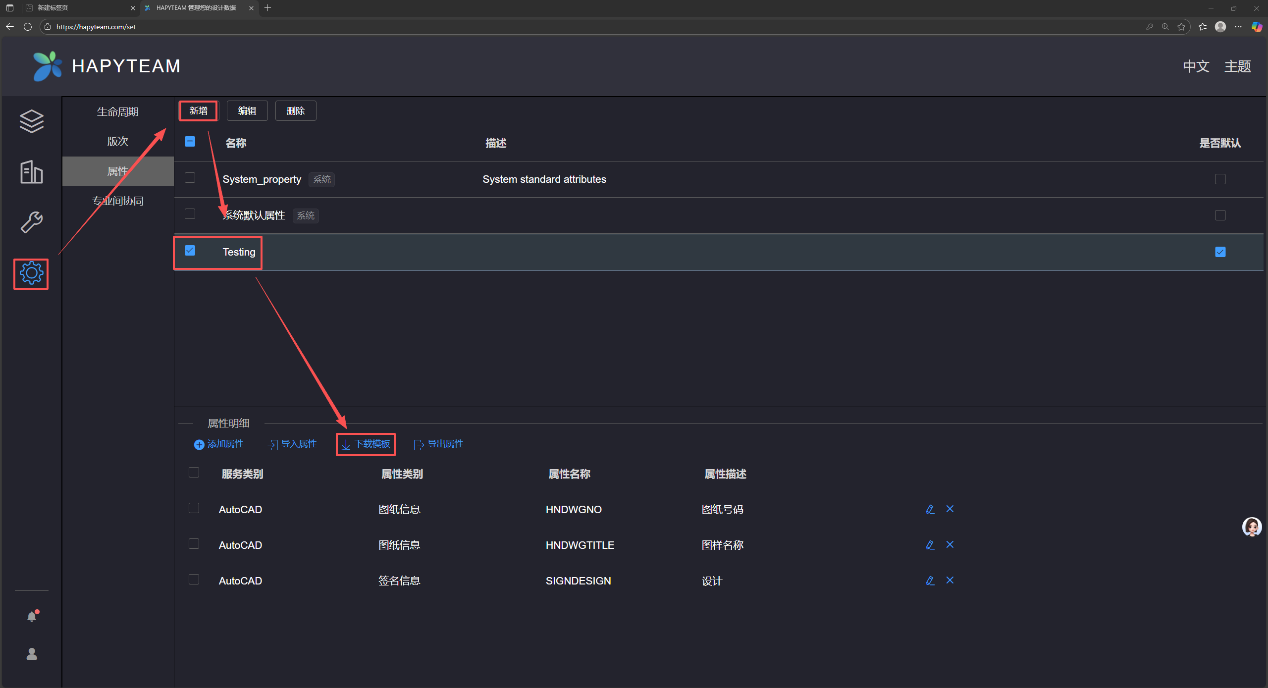
- Check the configuration parameters of the enterprise administrator: configure attribute templates in the settings;
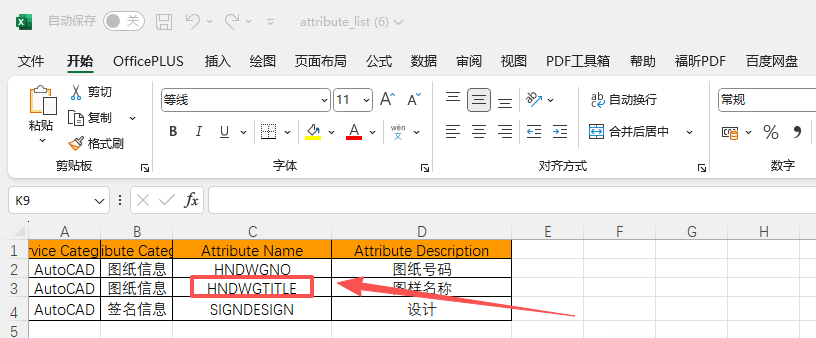
Fill in the relevant attributes that need to be displayed on the HAPYTEAM page by downloading attribute templates or directly adding
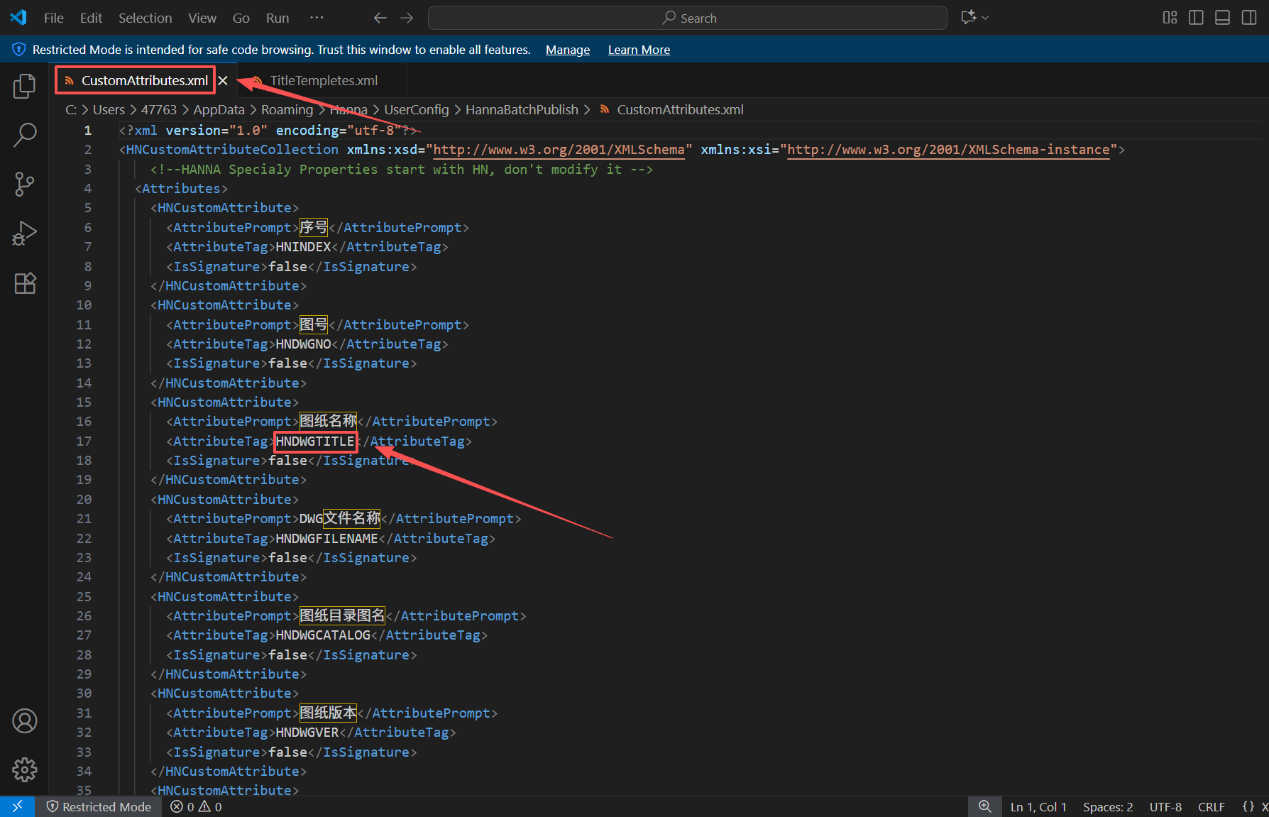
attributes. It should be noted that the attribute name needs to be consistent with The names in the XML files of Custom Attributes and
Title Templates correspond one-to-one, as shown in the following figure.
- client:
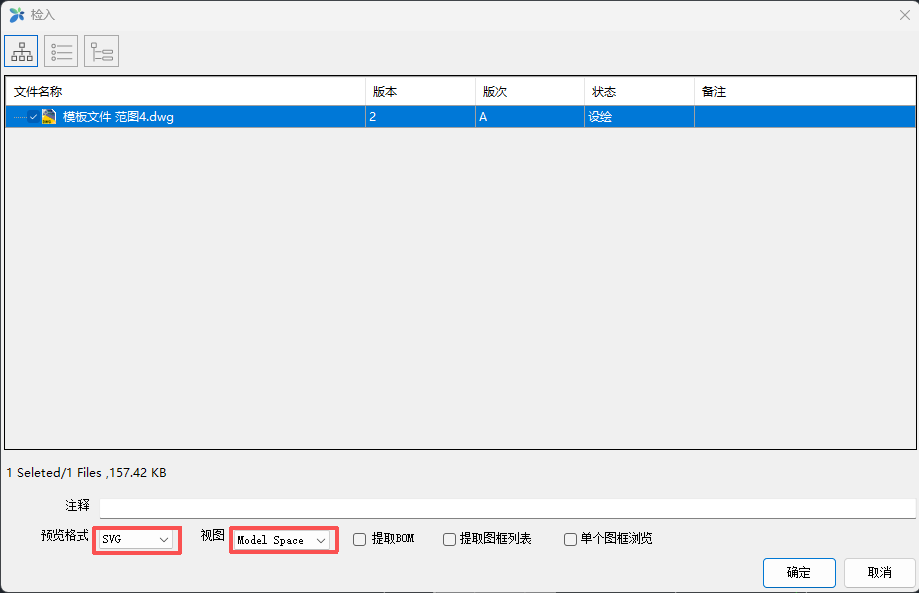
2)Check in file: Preview format is SVG, view is Model Space, and other options are selected according to Chapter 8 "Instructions for Checking in DWG Files".
3)The file properties on the HAPYTEAM web page: After checking in the file, the display effect of the file properties is as follows:
